You are using an out of date browser. It may not display this or other websites correctly.
You should upgrade or use an alternative browser.
You should upgrade or use an alternative browser.
To Infinity and Beyond - Becoming a Better DopeyBadger (Comments Welcome)
- Thread starter DopeyBadger
- Start date
DopeyBadger
Imagathoner
- Joined
- Oct 15, 2015
- Messages
- 10,376
You are going to turn heads at the Halloween party for sure!!
We're aiming for it.
DopeyBadger
Imagathoner
- Joined
- Oct 15, 2015
- Messages
- 10,376
Have you ever considered putting these costume builds on YouTube? It would be awesome to see how you are doing this!
I’ve considered it. However I don’t particularly like the sound of my voice, and I think it would be a lot of work in video editing and such. Much easier in print form where I can snap a few quick pics and then just type it out as I walk my memory through the process as I did it. Maybe if G took the lead on it. Is there something in particular that I’ve done that could use better explaining?
disneygpa
DIS Veteran
- Joined
- Aug 31, 2018
- Messages
- 797
Oh no. I think everything you have put on here is great! I just thought you could reach a wider audience on YouTube. I know my grandson would watch!I’ve considered it. However I don’t particularly like the sound of my voice, and I think it would be a lot of work in video editing and such. Much easier in print form where I can snap a few quick pics and then just type it out as I walk my memory through the process as I did it. Maybe if G took the lead on it. Is there something in particular that I’ve done that could use better explaining?

DopeyBadger
Imagathoner
- Joined
- Oct 15, 2015
- Messages
- 10,376
Oh no. I think everything you have put on here is great! I just thought you could reach a wider audience on YouTube. I know my grandson would watch!
That's fair. Something to chew on. I guess it would come down to its purpose and whether it's worth the time commitment.
DopeyBadger
Imagathoner
- Joined
- Oct 15, 2015
- Messages
- 10,376
Amphibia Costumes - Darcy Armor - Part 6
Alright, let's update where the Darcy armor is at these days. First up is the shoulders.
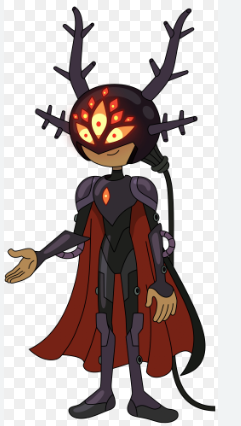
As you can see, her shoulder armor is two tone. This is where we're going to bring in the Candy Indigo ALC 711. You'll also notice that same color is used on the knees and the tubing on her arms. To accomplish the two tone, I'm using Green Frog Tape to section off the two sides. Easier said than done, and it took a few tries for the initial tape job. I essentially made a square out of the tape, and then using a paper cutout of an oval I traced that onto the square of tape. Then I cut away the traced sections to leave me with a oval inside a square.
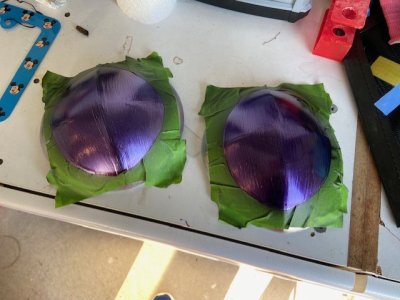
I gave this a few coats of ALC 417 Hot Metal Violet. Then I let it set overnight before I taped in the opposite direction.
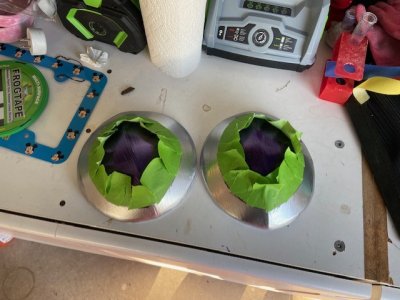
I then painted with two coats of ALC 711 Candy Indigo. This was the first time I've used Candy Indigo on any of the pieces outside of the test run. And it really drove home how much easier it is to work with than the Hot Metal Violet. Makes me seriously regret not testing Candy Violet even though the color was just slightly pinker and not what G wanted. I think it would have made the entire armor painting easier, and probably cheaper. So tuck that nugget away for the next time, and if by chance anyone's following along and plans on doing their own Darcy cosplay, I'd recommend testing out ALC 712 Candy Violet.
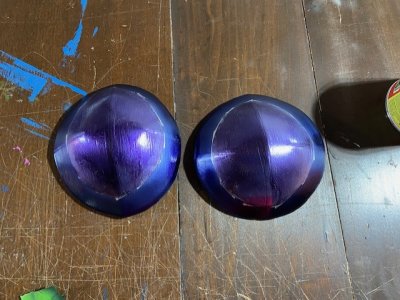
The frog tape worked well. Almost too well since I wasn't perfect on my oval lines. So this left me with a gap between the two colors. I used an acrylic black from my Liquitex collection (Mars Black to be specific), but I don't know if I like the lack of glossiness in the finish for the black compared to the other armor areas. So I've put a pin in whether I want to try and go back and fix this.
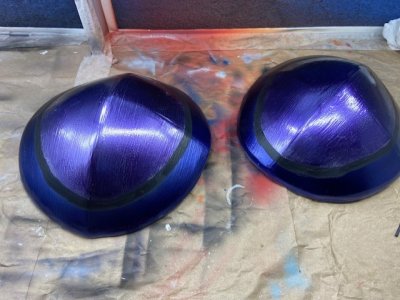
But if I don't, then the tops of the shoulder armor is essentially finished.
Next -Darcy Armor - Part 7
Alright, let's update where the Darcy armor is at these days. First up is the shoulders.

As you can see, her shoulder armor is two tone. This is where we're going to bring in the Candy Indigo ALC 711. You'll also notice that same color is used on the knees and the tubing on her arms. To accomplish the two tone, I'm using Green Frog Tape to section off the two sides. Easier said than done, and it took a few tries for the initial tape job. I essentially made a square out of the tape, and then using a paper cutout of an oval I traced that onto the square of tape. Then I cut away the traced sections to leave me with a oval inside a square.

I gave this a few coats of ALC 417 Hot Metal Violet. Then I let it set overnight before I taped in the opposite direction.

I then painted with two coats of ALC 711 Candy Indigo. This was the first time I've used Candy Indigo on any of the pieces outside of the test run. And it really drove home how much easier it is to work with than the Hot Metal Violet. Makes me seriously regret not testing Candy Violet even though the color was just slightly pinker and not what G wanted. I think it would have made the entire armor painting easier, and probably cheaper. So tuck that nugget away for the next time, and if by chance anyone's following along and plans on doing their own Darcy cosplay, I'd recommend testing out ALC 712 Candy Violet.

The frog tape worked well. Almost too well since I wasn't perfect on my oval lines. So this left me with a gap between the two colors. I used an acrylic black from my Liquitex collection (Mars Black to be specific), but I don't know if I like the lack of glossiness in the finish for the black compared to the other armor areas. So I've put a pin in whether I want to try and go back and fix this.

But if I don't, then the tops of the shoulder armor is essentially finished.
Next -Darcy Armor - Part 7
Last edited:
DopeyBadger
Imagathoner
- Joined
- Oct 15, 2015
- Messages
- 10,376
Amphibia Costumes - Darcy Armor - Part 7
Next up on the update list is the leg armor. From the previous update, you can see a small section of armor on the upper thigh of Darcy in a steel grey. At first I wasn't sure if I was going to do this part, or just keep the bare black leg, but after perusing other Darcy cosplays I saw it was common to include. So I knew I needed to make it as well. The trick was that Darcy's leg isn't very realistic. She lacks a hip and her legs are rail thin. So we decided to go a little off script and make something similar but not the same. G was really excited about this part, because it meant she got to wrap me in plastic wrap and masking tape.
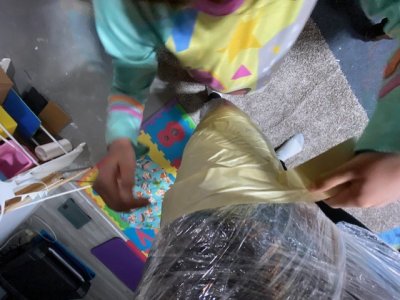
If anything she was too excited and went overboard with this. But we survived.
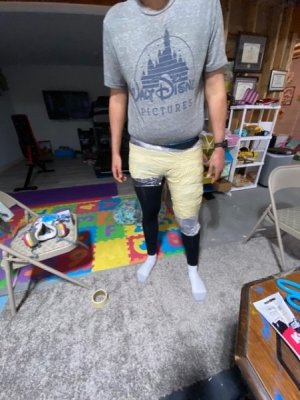
Then I gave her a pencil, then sharpie to draw what she thought would make a good leg armor piece inspired what Darcy has.
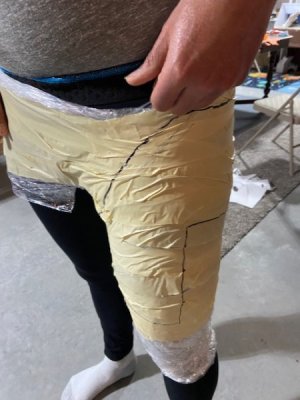
We then very carefully cut away that drawn out piece and checked out the look.

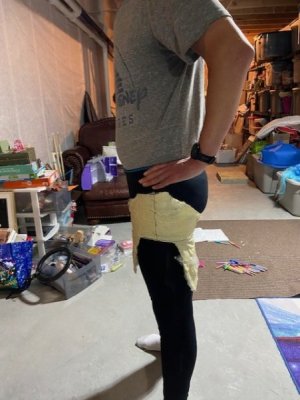
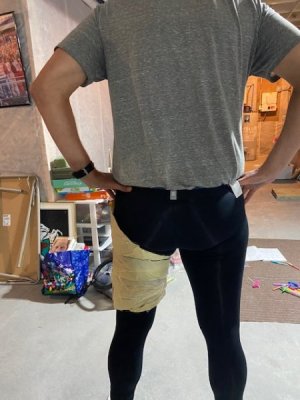
It got the thumbs up of approval from G, and so then I traced it out onto the 6mm EVA foam. I gave myself an extra 0.25 inches on the edges that would actually wrap on my leg (in the x-axis but not the y-axis).
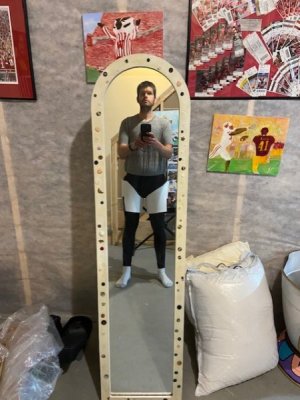
We monkeyed around with it a little more, and then shaved it down with the dremel to give it a realistic appearance. It went through the standard procedure of caulking, sanding, Flexbond, and then was airbrushed with ALC 305 Gloss Black as this one is headed towards the Chrome Black final finish.
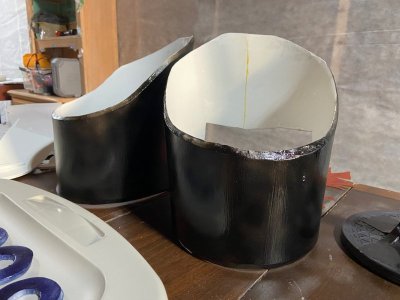
Two other sets of pieces went through the process as well. I'm using the Kamui Cosplay full foot armor (link), but it required quite a few edits to fit my shoe size. They've been caulked, sanded, flex bond, then painted with Candy Silver Base, and so far a single coat of Hot Metal Violet.
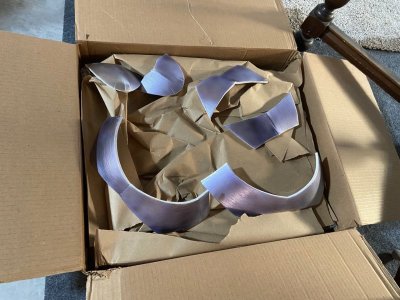
I'm also using knee piece #4 from the same set for the upper knee part of the Darcy armor, except I'm going to attach it upside down. Also, caulked, sanded, flex bond, silver candy, and then candy indigo. Only 2-3 coats gives quite the nice finish.
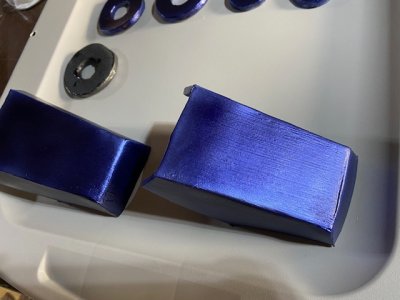
Again, it really drives home the difference between Candy Indigo and Hot Metal Violet in terms of ease of use. So much depth of color in the candy indigo as well. But maybe a little less reflective qualities.
Next -Darcy Armor - Part 8
Next up on the update list is the leg armor. From the previous update, you can see a small section of armor on the upper thigh of Darcy in a steel grey. At first I wasn't sure if I was going to do this part, or just keep the bare black leg, but after perusing other Darcy cosplays I saw it was common to include. So I knew I needed to make it as well. The trick was that Darcy's leg isn't very realistic. She lacks a hip and her legs are rail thin. So we decided to go a little off script and make something similar but not the same. G was really excited about this part, because it meant she got to wrap me in plastic wrap and masking tape.

If anything she was too excited and went overboard with this. But we survived.

Then I gave her a pencil, then sharpie to draw what she thought would make a good leg armor piece inspired what Darcy has.

We then very carefully cut away that drawn out piece and checked out the look.


It got the thumbs up of approval from G, and so then I traced it out onto the 6mm EVA foam. I gave myself an extra 0.25 inches on the edges that would actually wrap on my leg (in the x-axis but not the y-axis).

We monkeyed around with it a little more, and then shaved it down with the dremel to give it a realistic appearance. It went through the standard procedure of caulking, sanding, Flexbond, and then was airbrushed with ALC 305 Gloss Black as this one is headed towards the Chrome Black final finish.

Two other sets of pieces went through the process as well. I'm using the Kamui Cosplay full foot armor (link), but it required quite a few edits to fit my shoe size. They've been caulked, sanded, flex bond, then painted with Candy Silver Base, and so far a single coat of Hot Metal Violet.

I'm also using knee piece #4 from the same set for the upper knee part of the Darcy armor, except I'm going to attach it upside down. Also, caulked, sanded, flex bond, silver candy, and then candy indigo. Only 2-3 coats gives quite the nice finish.

Again, it really drives home the difference between Candy Indigo and Hot Metal Violet in terms of ease of use. So much depth of color in the candy indigo as well. But maybe a little less reflective qualities.
Next -Darcy Armor - Part 8
Last edited:
DopeyBadger
Imagathoner
- Joined
- Oct 15, 2015
- Messages
- 10,376
Amphibia Costumes - Darcy Armor - Part 8
Alright, let's talk chest now. The chest armor had already been painted with the Candy Silver base. So it was just a manner of painting with the ALC 417 Hot Metal Violet. For the most part, it went well.
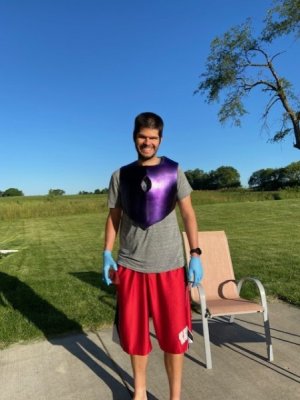
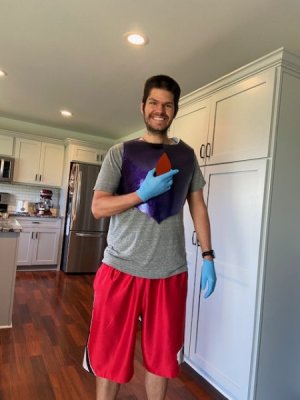
Except for one major flaw that I should have tried to fix earlier. In the first painting of Hot Metal Violet, the humidity must have been too high outside because the paint was extra wet and drippy. This caused a few buildups of paint (droplets or orange peels). In retrospect, I should have wiped them up as they occurred. But I didn't. Then in retrospect if they had dried I should have sanded them clean. But I didn't. Instead I continued to put more and more layers on it with the hope that it would not be as noticeable. It worked to an extent. Inside the errors weren't all that noticeable. But outside they were glaringly obvious to me. We went back and forth about how to fix it, and whether I should just start over again. My FIL the mechanic wasn't as worried as he's dealt with stuff like this with automotive painting.
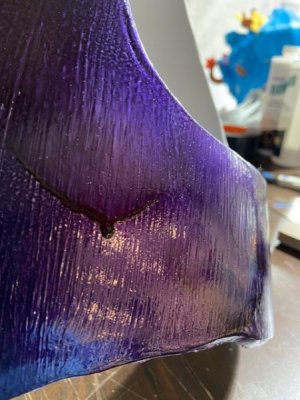
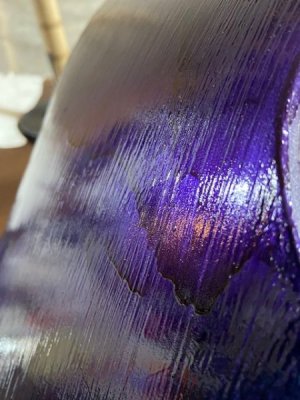
He suggested wet sanding it down until the drips were gone. Problem was that I wasn't sure whether the Flexbond layer would be affected by the water since it was multiple layers of paint down. But if it was, then the Flexbond is water soluble and could make bigger problems. So we decided on dry sanding. I started with 400 grit, but that didn't really do much. I tried 220 grit instead and made some headway. Initially I just took a little off, but didn't get down to the root of it since it was the first layer. But after discussing with FIL, we decided I had to go all the way with it, and go to the first layer when the problem occurred. So I did and it was removed. But now as we saw from before the Flexbond was scuffed up and lost its luster. So to try and fix this I put a very thin layer of Flexbond over the affected areas. Then I painted with two layers of silver candy base again to try and regain the luster. Then, so far a single layer of hot metal violet. I think we're on the right path, and hopefully the issue has been minimized.
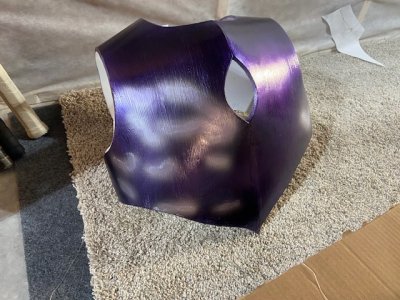
It'll definitely need additional layers to hopefully better blend in.
Next update -Darcy Helmet - Part 14
Next Darcy armor update -Darcy Armor - Part 9
Alright, let's talk chest now. The chest armor had already been painted with the Candy Silver base. So it was just a manner of painting with the ALC 417 Hot Metal Violet. For the most part, it went well.


Except for one major flaw that I should have tried to fix earlier. In the first painting of Hot Metal Violet, the humidity must have been too high outside because the paint was extra wet and drippy. This caused a few buildups of paint (droplets or orange peels). In retrospect, I should have wiped them up as they occurred. But I didn't. Then in retrospect if they had dried I should have sanded them clean. But I didn't. Instead I continued to put more and more layers on it with the hope that it would not be as noticeable. It worked to an extent. Inside the errors weren't all that noticeable. But outside they were glaringly obvious to me. We went back and forth about how to fix it, and whether I should just start over again. My FIL the mechanic wasn't as worried as he's dealt with stuff like this with automotive painting.


He suggested wet sanding it down until the drips were gone. Problem was that I wasn't sure whether the Flexbond layer would be affected by the water since it was multiple layers of paint down. But if it was, then the Flexbond is water soluble and could make bigger problems. So we decided on dry sanding. I started with 400 grit, but that didn't really do much. I tried 220 grit instead and made some headway. Initially I just took a little off, but didn't get down to the root of it since it was the first layer. But after discussing with FIL, we decided I had to go all the way with it, and go to the first layer when the problem occurred. So I did and it was removed. But now as we saw from before the Flexbond was scuffed up and lost its luster. So to try and fix this I put a very thin layer of Flexbond over the affected areas. Then I painted with two layers of silver candy base again to try and regain the luster. Then, so far a single layer of hot metal violet. I think we're on the right path, and hopefully the issue has been minimized.

It'll definitely need additional layers to hopefully better blend in.
Next update -Darcy Helmet - Part 14
Next Darcy armor update -Darcy Armor - Part 9
Last edited:
DopeyBadger
Imagathoner
- Joined
- Oct 15, 2015
- Messages
- 10,376
Amphibia Costumes - Darcy Helmet - Part 14
Next on the list was the helmet. The uncanny eyes were finished, but I still needed to figure out a method to attaching them to the helmet. The gold standard was finding a way to attach them that was non-permanent. Just on the off chance I'd need to edit the data, or possibly reuse these in a different costume. So I had considered gluing them down as a last resort. I tried using velcro in a test to see whether I could get that to work. It took a little work because the helmet is curved, and I wanted the eyes to sit flush. But eventually I did get it to work.
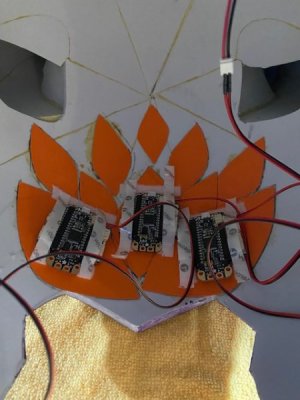
Tight fit, but everything fit as desired. Good thing I didn't try and make the eyeballs any closer together. Wouldn't have fit otherwise. I dealt with the batteries by attaching velcro on each, and then put the receiving end of the velcro where the back of my head is.
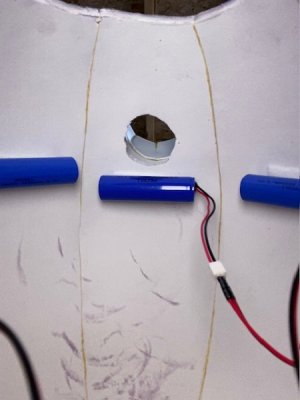
So then I could have all three eyes active without me having to hold them up.
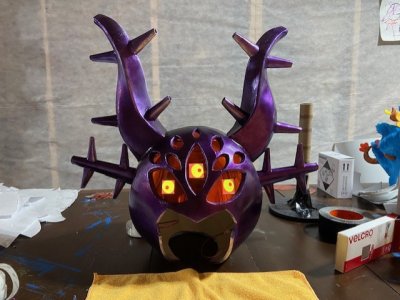
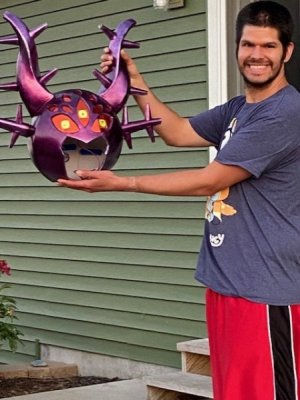
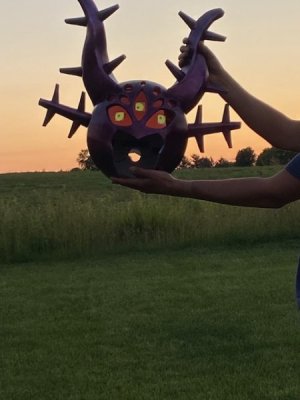
I also went through and added small pieces of the Kalevala flame orange visor to the gills.
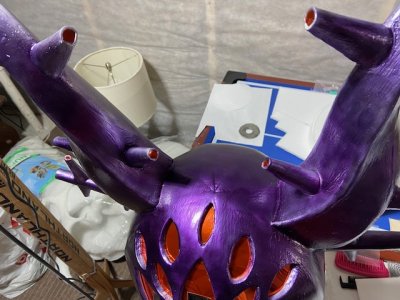
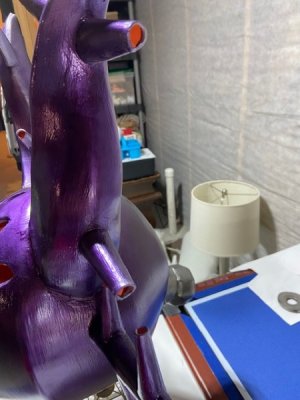
Just for that extra small detail.
Next -Darcy Helmet - Part 15
Next on the list was the helmet. The uncanny eyes were finished, but I still needed to figure out a method to attaching them to the helmet. The gold standard was finding a way to attach them that was non-permanent. Just on the off chance I'd need to edit the data, or possibly reuse these in a different costume. So I had considered gluing them down as a last resort. I tried using velcro in a test to see whether I could get that to work. It took a little work because the helmet is curved, and I wanted the eyes to sit flush. But eventually I did get it to work.

Tight fit, but everything fit as desired. Good thing I didn't try and make the eyeballs any closer together. Wouldn't have fit otherwise. I dealt with the batteries by attaching velcro on each, and then put the receiving end of the velcro where the back of my head is.

So then I could have all three eyes active without me having to hold them up.


I also went through and added small pieces of the Kalevala flame orange visor to the gills.


Just for that extra small detail.
Next -Darcy Helmet - Part 15
Last edited:
DopeyBadger
Imagathoner
- Joined
- Oct 15, 2015
- Messages
- 10,376
Amphibia Costumes - Darcy Helmet - Part 15
Nearing the end to the helmet! Hooray! One of the last pieces was the non-animated eyes in the other eye holes. We had went back and forth on yellow and orange LEDs, but orange LEDs ended up winning. I bought some cheap CR2032 battery holders with on/off switch from Amazon, but after working with them, I'll stick with Adafruit's for the slightly extra cost. The Amazon ones are REALLY hard to open. But they got the job done.
So I wired up 7 orange LEDs to the CR 2032 battery holders using soldering technique previously described.
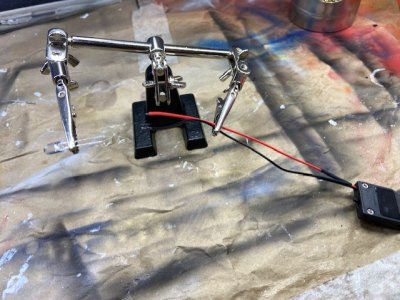
The question was then how to attach these. I wanted to try and get the LEDs to stay perpendicular to the eye piece so that it gave the appearance of glowing eyes. The LED wasn't going to want to stay like that on its own. So I came up with an idea where I would use a piece of masking tape, with a second masking tape in the opposite direction so only some of the tape was still sticky. Then I cut a small slit and forced the LED through it.

Then I tented the LED on the outer edges of the eye piece on the inside of the helmet. Since only part of the tape was still sticky, it maintained it's tent shape without collapsing.
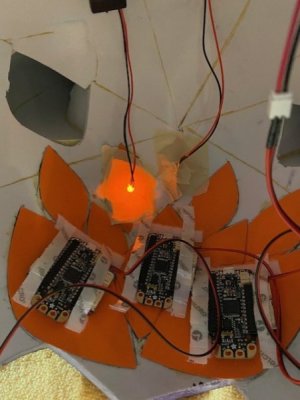
Then to maintain the perpendicular verticality, I wrapped a second piece of masking tape around the LED to hold it into place. For the most part this worked.
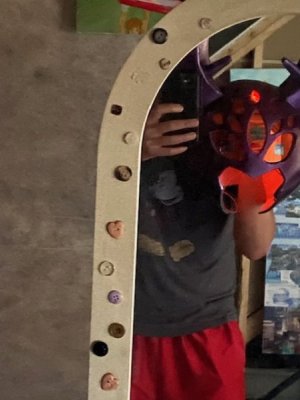
After one was successful, I put the rest in.
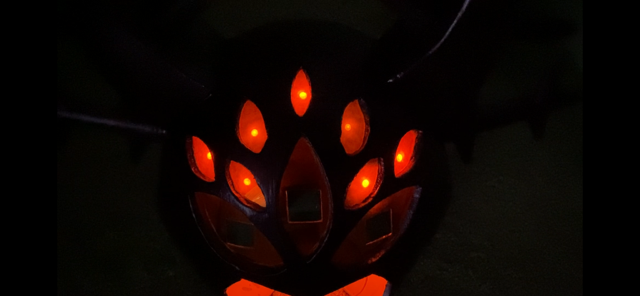
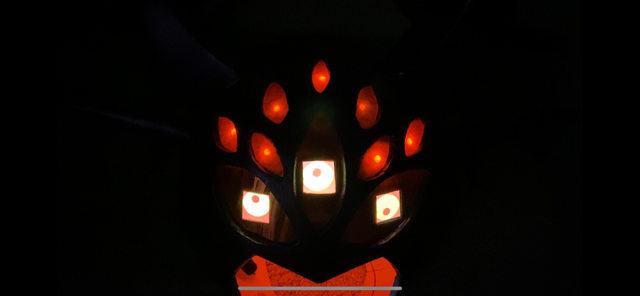
It definitely was giving off the right vibes.
One of the last tasks was figuring out how to attach the helmet to my head. I had originally planned on using a formed skull cap with like we did for Anne's hair previously described. Except we would use magnets for the Darcy helmet because I needed to still have access to the inside batteries unlike the Anne hair piece. But after holding the Darcy helmet, I'm not sure the magnets would be strong enough, nor was there a ton of room left in the front of the helmet right above my hair line. So instead I opted for trying the Monster's Inc Mike W. helmet technique. I cut out a piece of tri-board that is relatively stiff in a 11 inch circle (roughly the size of the inside of the helmet). Then I traced the size of my head around where my hair line is so the helmet would sit in the right place. The problem was that an 11 inch circle isn't going to fit inside a sphere when the bottom of the sphere is much smaller than 11 inch. So I folded the tri-board in half, and then angled the piece on the inside. Then I let the piece expand back into full shape and wedged it in there. And wa-laa, the piece held. And I was able to place the helmet on my head and it stayed in place.
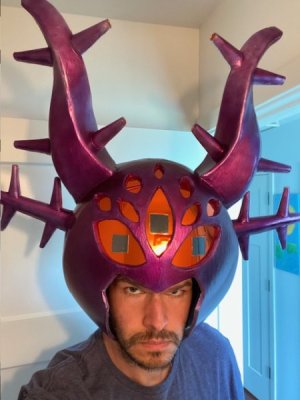
Turns out, me and the helmet are quite tall in combination. Like too tall for a standard doorway (6'8"). So another thing I'll have to keep in mind as I move around.

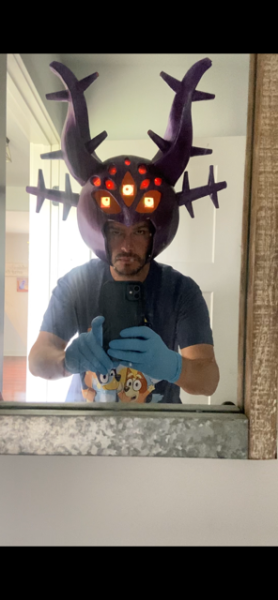
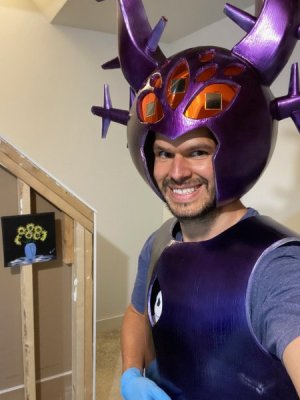
It's a bit tiring to have it on my head, but it's not that bad. All in all, I think it's turned out quite good. Only a few small ends to wrap up but then the helmet should be done!
Next -Darcy Armor - Part 9
Nearing the end to the helmet! Hooray! One of the last pieces was the non-animated eyes in the other eye holes. We had went back and forth on yellow and orange LEDs, but orange LEDs ended up winning. I bought some cheap CR2032 battery holders with on/off switch from Amazon, but after working with them, I'll stick with Adafruit's for the slightly extra cost. The Amazon ones are REALLY hard to open. But they got the job done.
So I wired up 7 orange LEDs to the CR 2032 battery holders using soldering technique previously described.

The question was then how to attach these. I wanted to try and get the LEDs to stay perpendicular to the eye piece so that it gave the appearance of glowing eyes. The LED wasn't going to want to stay like that on its own. So I came up with an idea where I would use a piece of masking tape, with a second masking tape in the opposite direction so only some of the tape was still sticky. Then I cut a small slit and forced the LED through it.

Then I tented the LED on the outer edges of the eye piece on the inside of the helmet. Since only part of the tape was still sticky, it maintained it's tent shape without collapsing.

Then to maintain the perpendicular verticality, I wrapped a second piece of masking tape around the LED to hold it into place. For the most part this worked.

After one was successful, I put the rest in.


It definitely was giving off the right vibes.
One of the last tasks was figuring out how to attach the helmet to my head. I had originally planned on using a formed skull cap with like we did for Anne's hair previously described. Except we would use magnets for the Darcy helmet because I needed to still have access to the inside batteries unlike the Anne hair piece. But after holding the Darcy helmet, I'm not sure the magnets would be strong enough, nor was there a ton of room left in the front of the helmet right above my hair line. So instead I opted for trying the Monster's Inc Mike W. helmet technique. I cut out a piece of tri-board that is relatively stiff in a 11 inch circle (roughly the size of the inside of the helmet). Then I traced the size of my head around where my hair line is so the helmet would sit in the right place. The problem was that an 11 inch circle isn't going to fit inside a sphere when the bottom of the sphere is much smaller than 11 inch. So I folded the tri-board in half, and then angled the piece on the inside. Then I let the piece expand back into full shape and wedged it in there. And wa-laa, the piece held. And I was able to place the helmet on my head and it stayed in place.

Turns out, me and the helmet are quite tall in combination. Like too tall for a standard doorway (6'8"). So another thing I'll have to keep in mind as I move around.


It's a bit tiring to have it on my head, but it's not that bad. All in all, I think it's turned out quite good. Only a few small ends to wrap up but then the helmet should be done!
Next -Darcy Armor - Part 9
Last edited:
Blue Caterpillar
DIS Veteran
- Joined
- Nov 1, 2015
- Messages
- 698
Those are amazing! I wish I could see them in person. Looking forward to seeing them finished.
DopeyBadger
Imagathoner
- Joined
- Oct 15, 2015
- Messages
- 10,376
Just....wow! So impressed with your work.
Thanks! I appreciate it. I can be my own worst critic at times.
Those are amazing! I wish I could see them in person. Looking forward to seeing them finished.
Thanks! Well you could always come to the Halloween party. Steph wants to take them to D23 someday as well.
That helmet has turned out so cool!!
At least being that tall, you won’t have to worry about poking many people’s eyes out. If my 5’3” self wore a helmet with big horns, I’d be constantly hitting people in the face with it
Thanks! It’s nice to see it coming into a final form.
Yea I think you’d have issues. The helmet is 22 inches tall. So it probably adds about 14-17 inches onto my height of 6 feet. So I’m getting up there in terms of how tall it makes me appear. It would definitely put your horns in the average height range. I guess good thing they’re made of soft foam.
DopeyBadger
Imagathoner
- Joined
- Oct 15, 2015
- Messages
- 10,376
Amphibia Costumes - Darcy Armor - Part 9
Homestretch at this point. Almost all of the armor had been painted at this point. Just a little touchups here and there. I also painted the inside of the knee covers because they were semi visible when on the leg armor.
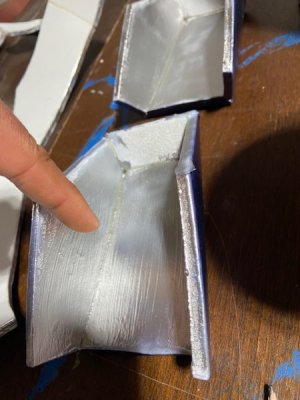
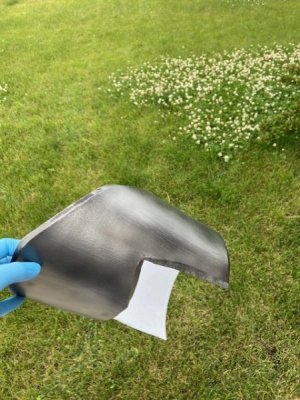
The thigh armor was painted with the Alclad Black Chrome. Only one coat and decent coverage.
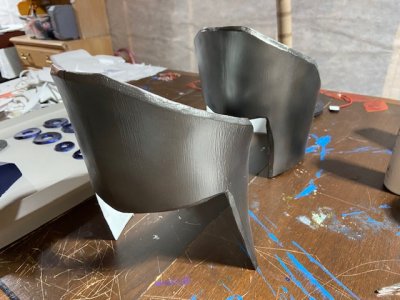
Once everything had been painted with their final coats of color, then it was time for the Alclad II Aqua Gloss ALC 600. This would provide a clear glossy finish coat that would help protect the final color.
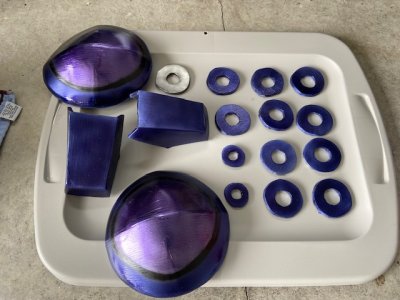
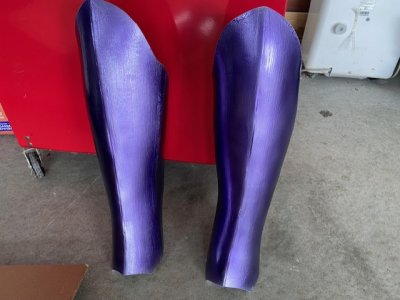
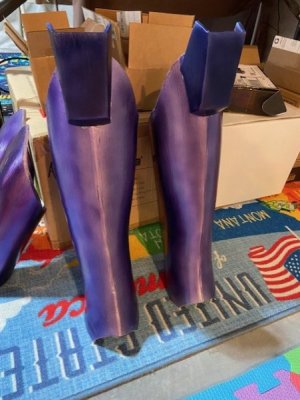
For the leg armor, in order to attach the knee pieces I had to use hot glue. Because of the aqua gloss clear coat, the Barge All-purpose cement doesn't stick. It just tries to take off a layer or smudge the paint. Hot glue worked, but it was a little less clean of a look than I wanted. Although you can't really notice unless you get up close to it.
The thigh armor didn't really change all that much after the clear coat.
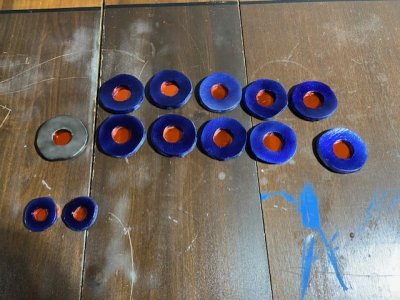
Lastly, I had to assemble all of the ports found on Darcy's body. I used more of the flame orange Kalevala visor I had left. I all purpose cemented orange cardstock to the back of the visor to reduce transparency, then used the all-purpose cement to glue the port to the visor piece.
Next -Darcy Armor - Part 10
Homestretch at this point. Almost all of the armor had been painted at this point. Just a little touchups here and there. I also painted the inside of the knee covers because they were semi visible when on the leg armor.

The thigh armor was painted with the Alclad Black Chrome. Only one coat and decent coverage.

Once everything had been painted with their final coats of color, then it was time for the Alclad II Aqua Gloss ALC 600. This would provide a clear glossy finish coat that would help protect the final color.


For the leg armor, in order to attach the knee pieces I had to use hot glue. Because of the aqua gloss clear coat, the Barge All-purpose cement doesn't stick. It just tries to take off a layer or smudge the paint. Hot glue worked, but it was a little less clean of a look than I wanted. Although you can't really notice unless you get up close to it.

The thigh armor didn't really change all that much after the clear coat.

Lastly, I had to assemble all of the ports found on Darcy's body. I used more of the flame orange Kalevala visor I had left. I all purpose cemented orange cardstock to the back of the visor to reduce transparency, then used the all-purpose cement to glue the port to the visor piece.

Next -Darcy Armor - Part 10
Last edited:
DopeyBadger
Imagathoner
- Joined
- Oct 15, 2015
- Messages
- 10,376
Amphibia Costumes - Darcy Armor - Part 10
Next up was finishing the shoe armor. All of the armor pieces previously detailed went through several coats of Alclad 417 Hot Metal Violet, and then ALC 600 aqua gloss clear coat.
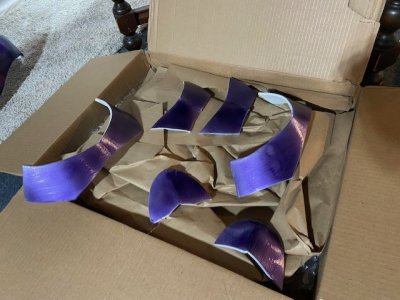
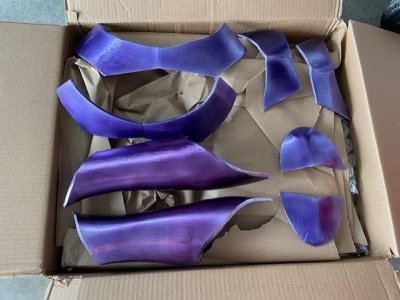
I had to do the shoes as well. I found an old pair of Saucony running shoes that were retired. I put FlexBond along the bottom edge, then painted it with Alclad Silver Candy Base.
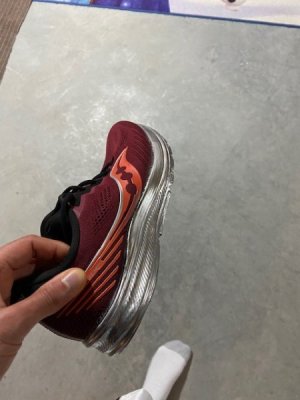
Then I painted it with Alclad Candy Indigo, since it's suppose to be the complimentary color on the bottom trim of the shoe.
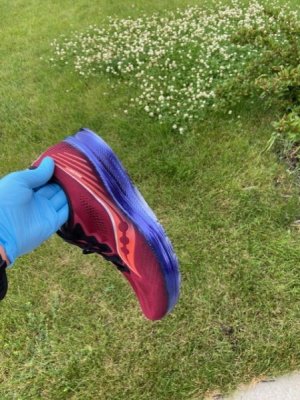
Showed it to G, and now she wants me to do this to all of her normal shoes for daily wear. LOL!
I put several strips of velcro along the shoes, and then on the inside of the armor pieces as well. I tried to put a ton of velcro on the shoe, so that when I attached it, it didn't have to be exact.
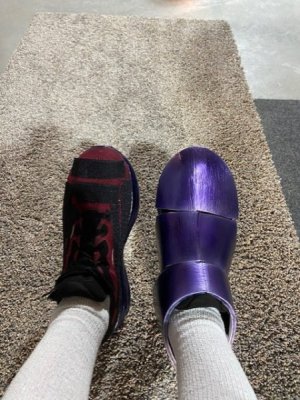
I repeated the process on the other shoe, and then got a final look of this.
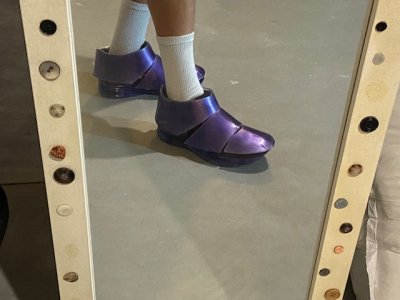
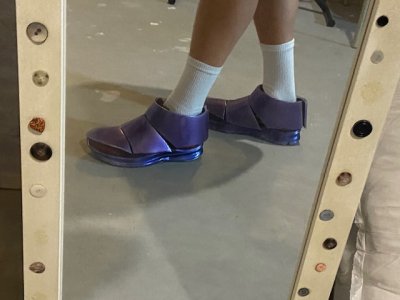
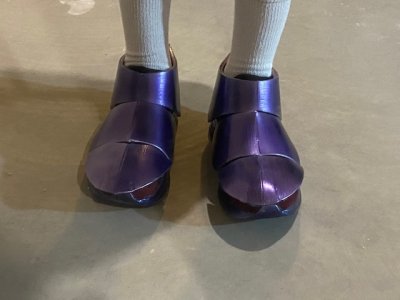
The grooves make it such that it can move naturally and there's no real issue there. So it works quite well for a segmented armor shoe look. Happy with how they turned out in the end.
Next -Darcy Armor - Part 11
Next up was finishing the shoe armor. All of the armor pieces previously detailed went through several coats of Alclad 417 Hot Metal Violet, and then ALC 600 aqua gloss clear coat.


I had to do the shoes as well. I found an old pair of Saucony running shoes that were retired. I put FlexBond along the bottom edge, then painted it with Alclad Silver Candy Base.

Then I painted it with Alclad Candy Indigo, since it's suppose to be the complimentary color on the bottom trim of the shoe.

Showed it to G, and now she wants me to do this to all of her normal shoes for daily wear. LOL!
I put several strips of velcro along the shoes, and then on the inside of the armor pieces as well. I tried to put a ton of velcro on the shoe, so that when I attached it, it didn't have to be exact.

I repeated the process on the other shoe, and then got a final look of this.


The grooves make it such that it can move naturally and there's no real issue there. So it works quite well for a segmented armor shoe look. Happy with how they turned out in the end.
Next -Darcy Armor - Part 11
Last edited:
DopeyBadger
Imagathoner
- Joined
- Oct 15, 2015
- Messages
- 10,376
Amphibia Costumes - Darcy Armor - Part 11
If I've got two regrets with the Amphibia costumes to date, the first would be the use of the Alclad Hot Metal Violet paint. It took way more coats then anticipated and made the project more expensive than desired. Especially since a Candy Violet existed as an alternative and the Candy Indigo covered really easily. The caveat is that I never tried Candy Violet, so it's hard to say whether it would have the same metallic appearance as Hot Metal Violet.
The second regret would be also associated with Hot Metal Violet. Because of its watery quality, it was prone to accumulating and causing drips or runs. I just wasn't patient enough on that first few coats on the chest armor. And because of that, I had a few runs/drips here and there. I ultimately made the choice to try and fix them by sanding those areas down, re-applying Flexbond, re-applying the Silver Candy Base, and then putting the Hot Metal Violet layers on to blend it back in. Problem is no matter how many layers I applied, it just doesn't blend back in. So I'm left with some clear errors of trying to fix an issue that was small and for most would have gone unnoticed and instead created something that is more obvious. Now we'll try and spin it and say it's battle damage, but that doesn't take away the regrets of how I handled that process. It would be too expensive to try and go back and redo the chest piece at this point. So it is what it is. Steph's convinced no one will notice once the entire costumes are put together, and neither is anyone so well versed in the little details of these character costumes that they wouldn't know it's not suppose to be there.
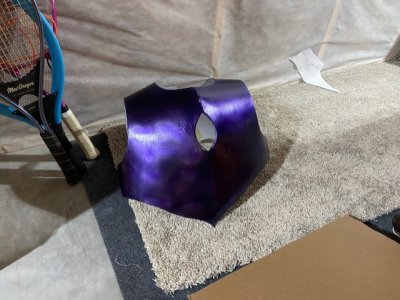
I put the clear coats on like the other armor pieces.
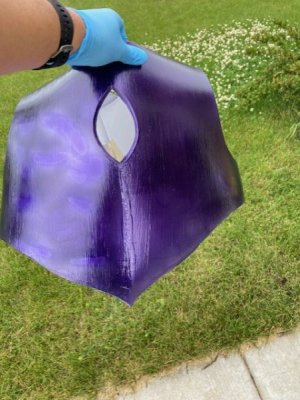
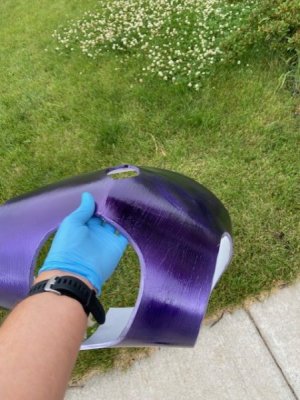
Then I cut a piece of the flame orange Kalevala visor, and followed the same procedure as previously described to attach it to the center hole.
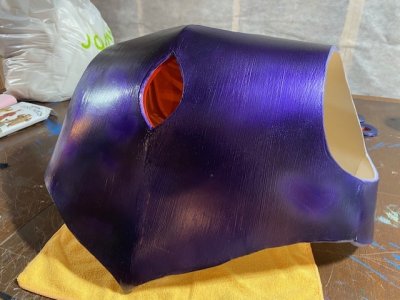
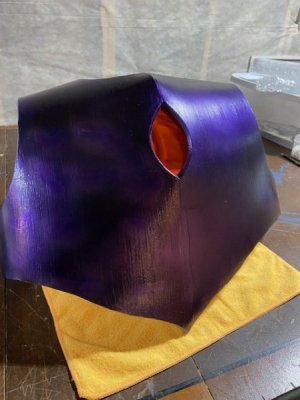

One of the last pieces of the costume was Darcy's cape. So we trekked over to Jo-Anns to get some fabric. Let me tell you, that was an adventure. We're working on a lot of things in the Blaser household right now, and so it was a bit of a mind melter. Project wise we had Darcy's cape, Anne's cape, Anne's skirt, Pua from Moana, water fans for Moana, and villager skirts for Moana. After about 15 min of everyone finding fabric for each different project, I finally told everyone to stop and we should just gather items for one project at a time. Because it was becoming too overwhelming with everything going on. But we eventually got everything we were looking for. G was really into it though and truly in her element. I'll detail the other costume pieces as they come up at a later time.
But for Darcy's cape, we needed something that was black on one side and maroon/red on the other. I went looking originally for satin as it's light and has a lot of movement, plus some nice shine to it. But then I found a velvet black and velvet red that looked really good. Problem was everyone else didn't like how bold the red velvet was and were worried it might take away too much from the rest of the costume. Then we ventured into the crushed velvet area and everyone thought that a crushed velvet black outer cape when look pretty sharp from the back since there's not a lot going on back there. When we pulled the crushed velvet black off the reel it revealed that the inner layer was a maroon red. That was a sale for all of us at that point. Because then I didn't have to do any extra stitching.
We played around with the length and width a little. Steph though instead of making it triangle shape, I should instead sew a pocket and put a string through it to bunch it up. This way it would flow better from my shoulders and have more interesting shape to it. I tried to keep it just below my waist height, but not longer than the knee. So a tad longer than the costume guidelines, but I can always pin it if they have an issue with it.
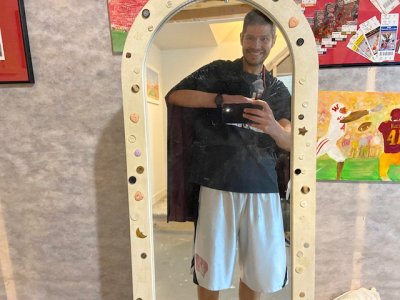
It was a little difficult to sew because the velvet kept catching on the moving pieces of the sewing machine meant to keep the fabric moving. But I found that if I kept it stretched in my fingers then I could keep everything moving along.
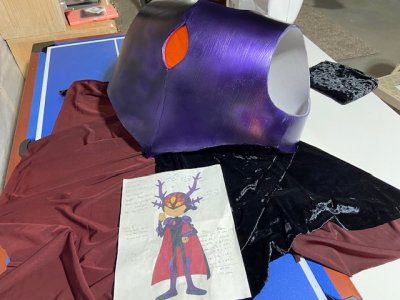
I'd say the combination of the three colors bares a strong resemblance to the goal image. So we're definitely heading in the right direction. There's only a few odds and ends to finish up the costume, but then it'll be time to move onto the Moana Pua costume for G's theater stage play.
Next -Darcy Armor - Part 12
If I've got two regrets with the Amphibia costumes to date, the first would be the use of the Alclad Hot Metal Violet paint. It took way more coats then anticipated and made the project more expensive than desired. Especially since a Candy Violet existed as an alternative and the Candy Indigo covered really easily. The caveat is that I never tried Candy Violet, so it's hard to say whether it would have the same metallic appearance as Hot Metal Violet.
The second regret would be also associated with Hot Metal Violet. Because of its watery quality, it was prone to accumulating and causing drips or runs. I just wasn't patient enough on that first few coats on the chest armor. And because of that, I had a few runs/drips here and there. I ultimately made the choice to try and fix them by sanding those areas down, re-applying Flexbond, re-applying the Silver Candy Base, and then putting the Hot Metal Violet layers on to blend it back in. Problem is no matter how many layers I applied, it just doesn't blend back in. So I'm left with some clear errors of trying to fix an issue that was small and for most would have gone unnoticed and instead created something that is more obvious. Now we'll try and spin it and say it's battle damage, but that doesn't take away the regrets of how I handled that process. It would be too expensive to try and go back and redo the chest piece at this point. So it is what it is. Steph's convinced no one will notice once the entire costumes are put together, and neither is anyone so well versed in the little details of these character costumes that they wouldn't know it's not suppose to be there.

I put the clear coats on like the other armor pieces.


Then I cut a piece of the flame orange Kalevala visor, and followed the same procedure as previously described to attach it to the center hole.


One of the last pieces of the costume was Darcy's cape. So we trekked over to Jo-Anns to get some fabric. Let me tell you, that was an adventure. We're working on a lot of things in the Blaser household right now, and so it was a bit of a mind melter. Project wise we had Darcy's cape, Anne's cape, Anne's skirt, Pua from Moana, water fans for Moana, and villager skirts for Moana. After about 15 min of everyone finding fabric for each different project, I finally told everyone to stop and we should just gather items for one project at a time. Because it was becoming too overwhelming with everything going on. But we eventually got everything we were looking for. G was really into it though and truly in her element. I'll detail the other costume pieces as they come up at a later time.
But for Darcy's cape, we needed something that was black on one side and maroon/red on the other. I went looking originally for satin as it's light and has a lot of movement, plus some nice shine to it. But then I found a velvet black and velvet red that looked really good. Problem was everyone else didn't like how bold the red velvet was and were worried it might take away too much from the rest of the costume. Then we ventured into the crushed velvet area and everyone thought that a crushed velvet black outer cape when look pretty sharp from the back since there's not a lot going on back there. When we pulled the crushed velvet black off the reel it revealed that the inner layer was a maroon red. That was a sale for all of us at that point. Because then I didn't have to do any extra stitching.
We played around with the length and width a little. Steph though instead of making it triangle shape, I should instead sew a pocket and put a string through it to bunch it up. This way it would flow better from my shoulders and have more interesting shape to it. I tried to keep it just below my waist height, but not longer than the knee. So a tad longer than the costume guidelines, but I can always pin it if they have an issue with it.

It was a little difficult to sew because the velvet kept catching on the moving pieces of the sewing machine meant to keep the fabric moving. But I found that if I kept it stretched in my fingers then I could keep everything moving along.

I'd say the combination of the three colors bares a strong resemblance to the goal image. So we're definitely heading in the right direction. There's only a few odds and ends to finish up the costume, but then it'll be time to move onto the Moana Pua costume for G's theater stage play.
Next -Darcy Armor - Part 12
Last edited:
DopeyBadger
Imagathoner
- Joined
- Oct 15, 2015
- Messages
- 10,376
Amphibia Costumes - Darcy Armor - Part 12
Now that most of the armor is complete, it was time to determine how to attach everything to my body. So I did a quick test run of most of the pieces.
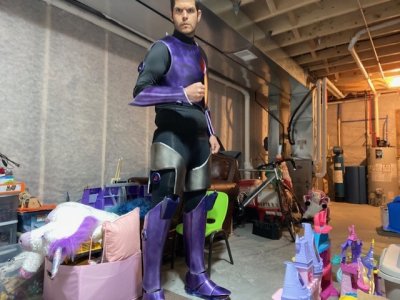
The shoes were as previously described and affixed with velcro. However, the velcro does not want to stay on the shoes, so I'm probably going to have to hand sew that on.
I had thought that the shin armor might need to be affixed with velcro as well, but after putting the shoes on, the shins aren't going anywhere. There's no additional space remaining.
The upper thigh armor and ports were affixed with velcro. But the velcro refuses to stick to Steph's columbia tights. So that'll need to be sewn in as well.
The forearms velcro onto itself around my arm, and the end of it is too small to get past my hand or bicep, so it isn't going anywhere.
The port on the bicep is affixed with velcro and that does stick to the shirt quite well, so that probably won't be sewn on.
Lastly, the chest armor isn't going anywhere once it is Velcro'ed to itself along the back.
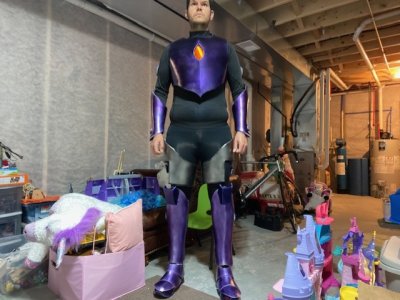
But the Steph's columbia tights just don't hit me right and definitely force me to have a muffin top. It's not the end of the world, but it's like the one part of my body that's not covered by armor and it really gets highlighted because of that. So I tried on some of Steph's other tights to find a better slimming pair. Steph said I needed something with a higher waistline that didn't pinch me in the wrong place.
She had me try on her Old Navy brand pants.
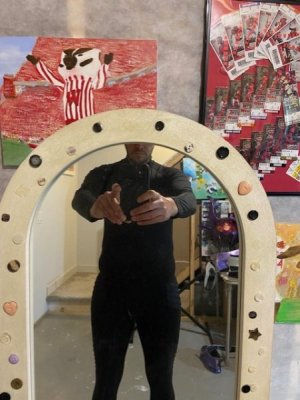
And her Fabletics pants (which were navy blue).
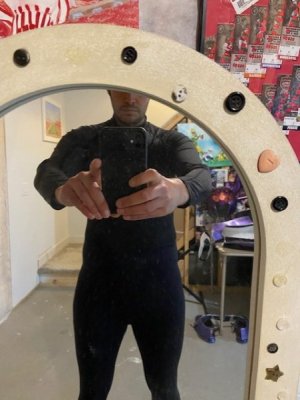
The Fabletics pants were definitely better, but since they were navy blue we'd have to buy a new pair just for this purpose. The Old Navy ones had some interesting vent patterns which aligned well with the armor and they were like a good middle ground. Better than columbia, but free compared to Fabletics. So we decided to go with the Old Navy ones.

Like the Columbia tights, the velcro didn't stick to the material, so I had to sew these on.
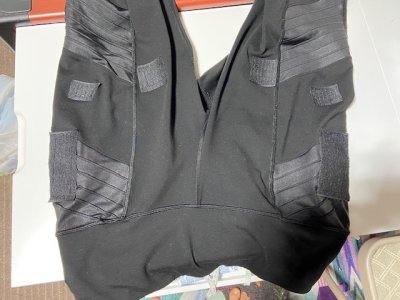
It was difficult because the velcro has a glue backing, so the sewing machine was getting fussy, and it was a challenge to work with. But eventually everything worked out.
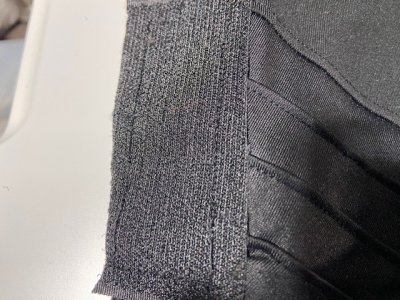
Next -Darcy Armor - Part 13
Now that most of the armor is complete, it was time to determine how to attach everything to my body. So I did a quick test run of most of the pieces.

The shoes were as previously described and affixed with velcro. However, the velcro does not want to stay on the shoes, so I'm probably going to have to hand sew that on.
I had thought that the shin armor might need to be affixed with velcro as well, but after putting the shoes on, the shins aren't going anywhere. There's no additional space remaining.
The upper thigh armor and ports were affixed with velcro. But the velcro refuses to stick to Steph's columbia tights. So that'll need to be sewn in as well.
The forearms velcro onto itself around my arm, and the end of it is too small to get past my hand or bicep, so it isn't going anywhere.
The port on the bicep is affixed with velcro and that does stick to the shirt quite well, so that probably won't be sewn on.
Lastly, the chest armor isn't going anywhere once it is Velcro'ed to itself along the back.

But the Steph's columbia tights just don't hit me right and definitely force me to have a muffin top. It's not the end of the world, but it's like the one part of my body that's not covered by armor and it really gets highlighted because of that. So I tried on some of Steph's other tights to find a better slimming pair. Steph said I needed something with a higher waistline that didn't pinch me in the wrong place.
She had me try on her Old Navy brand pants.

And her Fabletics pants (which were navy blue).

The Fabletics pants were definitely better, but since they were navy blue we'd have to buy a new pair just for this purpose. The Old Navy ones had some interesting vent patterns which aligned well with the armor and they were like a good middle ground. Better than columbia, but free compared to Fabletics. So we decided to go with the Old Navy ones.

Like the Columbia tights, the velcro didn't stick to the material, so I had to sew these on.

It was difficult because the velcro has a glue backing, so the sewing machine was getting fussy, and it was a challenge to work with. But eventually everything worked out.

Next -Darcy Armor - Part 13
Last edited:
DopeyBadger
Imagathoner
- Joined
- Oct 15, 2015
- Messages
- 10,376
Amphibia Costumes - Darcy Armor - Part 13
Next up was figuring out how to attach the shoulder pieces to the chest armor. My hope was to devise a method that allowed the shoulder pads to have some movement. Otherwise it was going to be a really stiff 8 hrs if I couldn't raise my arms past a certain height. Steph had suggested using some type of elastic, but I was worried it might leave too much flexibility. I came up with the idea of attaching a small pillow inside the shoulder pad that could move and compress when needed.
I had some scrap black felt from a previous project and some medium weight backing from the Mike Wazowski Monsters Inc costume.
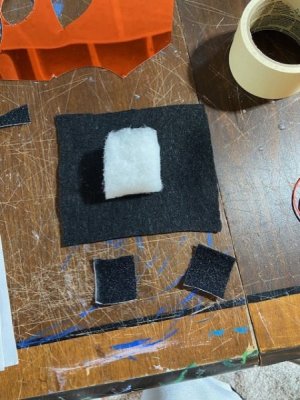
It cut the felt into a square, and then wrapped the backing like a christmas present. In the middle of the felt and on the opposite side from the backing (so the outside of the present), I sewed on some velcro.
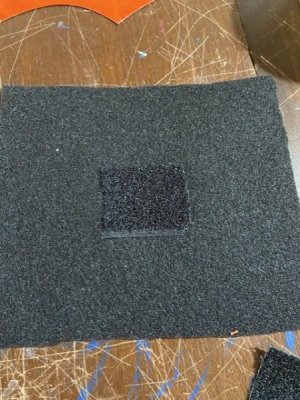
Then I cut a piece of velcro into a smaller strip and attached it to the outside edges.
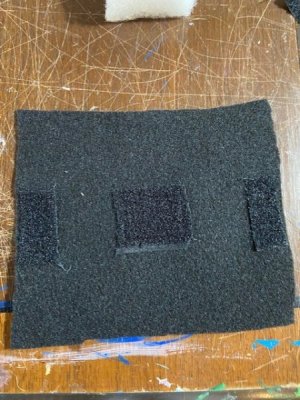
I flipped it over and placed the backing in the middle, and then closed the velcro. I sewed the two half pieces of velcro together to make it a full square.
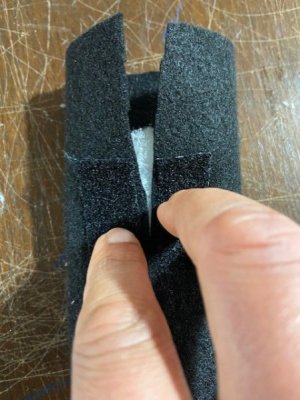
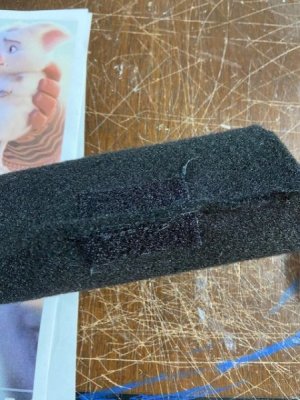
Then I sewed the two other edges, and cut off the excess.
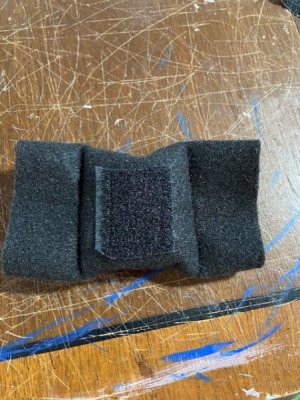
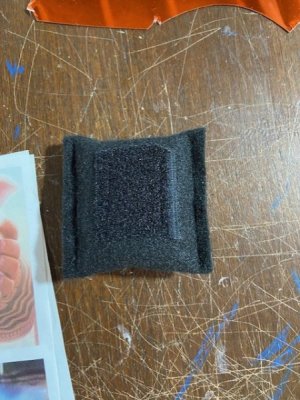
So this left me with a little pillow square of backing that had velcro on both sides (top and bottom). So that I could attach one side to the shoulder piece, and the other side to the top of my chest armor.
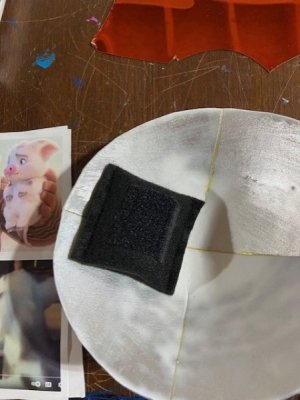
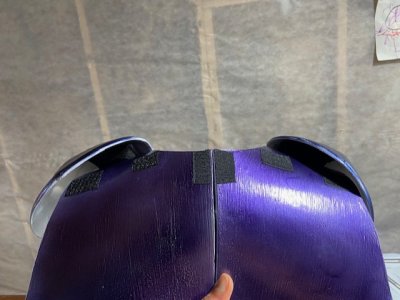
You can sort of see them in there, but once the cape is in place, it'll be harder to see. The overall design worked. The shoulder pieces were secure, but mobile and allowed me the freedom to move my arms higher than if they were held on in static.
Next -Darcy Armor - Part 14
Next up was figuring out how to attach the shoulder pieces to the chest armor. My hope was to devise a method that allowed the shoulder pads to have some movement. Otherwise it was going to be a really stiff 8 hrs if I couldn't raise my arms past a certain height. Steph had suggested using some type of elastic, but I was worried it might leave too much flexibility. I came up with the idea of attaching a small pillow inside the shoulder pad that could move and compress when needed.
I had some scrap black felt from a previous project and some medium weight backing from the Mike Wazowski Monsters Inc costume.

It cut the felt into a square, and then wrapped the backing like a christmas present. In the middle of the felt and on the opposite side from the backing (so the outside of the present), I sewed on some velcro.

Then I cut a piece of velcro into a smaller strip and attached it to the outside edges.

I flipped it over and placed the backing in the middle, and then closed the velcro. I sewed the two half pieces of velcro together to make it a full square.


Then I sewed the two other edges, and cut off the excess.


So this left me with a little pillow square of backing that had velcro on both sides (top and bottom). So that I could attach one side to the shoulder piece, and the other side to the top of my chest armor.


You can sort of see them in there, but once the cape is in place, it'll be harder to see. The overall design worked. The shoulder pieces were secure, but mobile and allowed me the freedom to move my arms higher than if they were held on in static.
Next -Darcy Armor - Part 14
Last edited:
-
What Happens to All This Disney Stuff When You Get Home?
-
New Disney Merch: Dooney and Bourke, RSVLTS & Her Universe
-
DIS Unlimited: Weekly Disney News & Discussion Podcast
-
Luke Combs' Category 10 Coming to Universal CityWalk in 2027
-
Star Wars Drops First Trailer for 'The Mandalorian and Grogu'
-
New Collectible Trend Coming for Disneyland Fans!
-
"Marriage Made in Hell": Michael Eisner on Disney Leadership and Rising Park Prices
New Threads
- Replies
- 2
- Views
- 263
- Replies
- 1
- Views
- 235
New Posts
-
-
-
Resort Thread Walt Disney World SWAN, DOLPHIN & SWAN RESERVE Resorts
- Latest: gottalovepluto
-
Disney Vacation Planning. Free. Done for You.

Our Authorized Disney Vacation Planners are here to provide personalized, expert advice, answer every question, and uncover the best discounts.
Let Dreams Unlimited Travel take care of all the details, so you can sit back, relax, and enjoy a stress-free vacation.
Start Your Disney Vacation

New Posts
- Replies
- 15K
- Views
- 403K
- Replies
- 15K
- Views
- 379K
Resort Thread
Walt Disney World SWAN, DOLPHIN & SWAN RESERVE Resorts
- Replies
- 24K
- Views
- 3M
- Replies
- 72
- Views
- 10K
- Sticky
- Replies
- 57
- Views
- 5K
- Replies
- 13
- Views
- 1K