DopeyBadger
Imagathoner
- Joined
- Oct 15, 2015
- Messages
- 10,376
Shang-Chi Costume
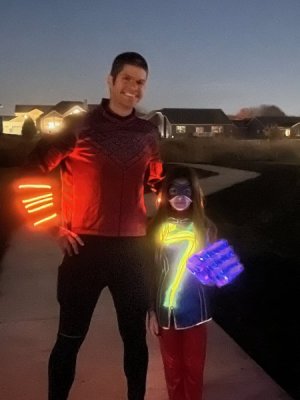
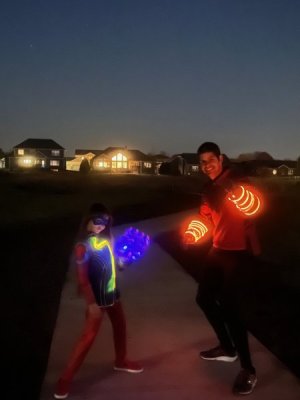
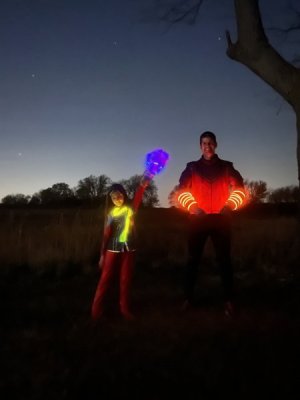
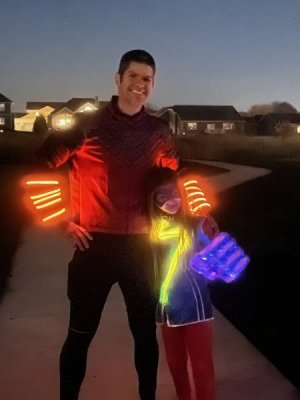
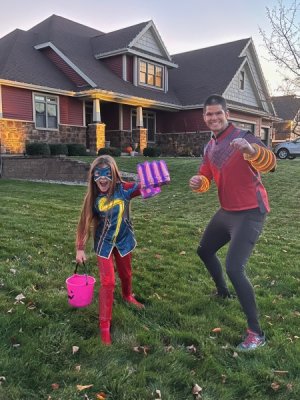
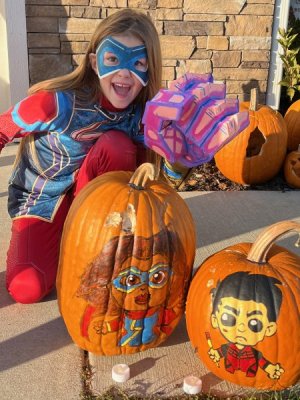
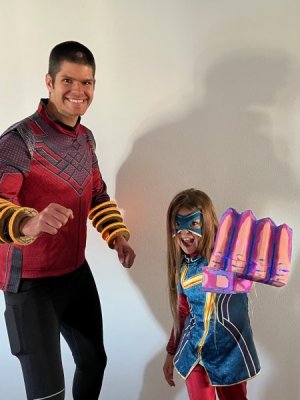
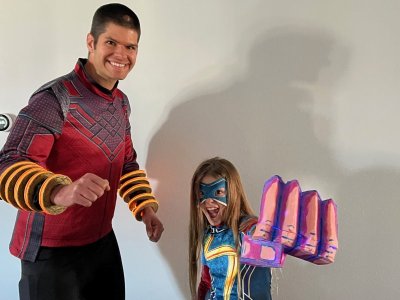
See the final product -Finished!
This costume ended up being much simpler than G's Ms. Marvel costume. Which is a good thing since Ms. Marvel took me months, and I only had a few weeks before Halloween for Shang-Chi. So I should be able to cover most of the steps in a single post. The experience gained from Ms. Marvel made this one easier. Plus, since the Shang-Chi costume mainly consists of the ten rings (which is a repetitive exercise in making each one) it was fairly straight forward. The goal was to make the ten rings look similar to this:

As you can see from the image of Xu Wenwu, the rings are not all the same size and are form fitted to his arm. So that meant it was going to take some math to replicate these on my arm.
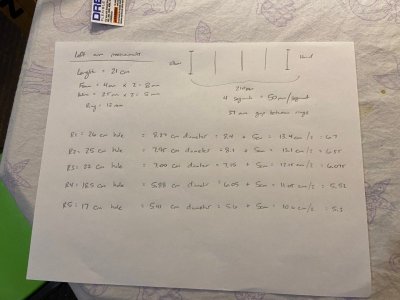
I started by measuring my arm from the elbow to the wrist to determine how much space the five rings could each take up. I also wanted to make sure that each ring had space between them too. The Plastazote LD45 foam (link) comes in three widths (4mm, 6mm, and 8mm). The rings will have two sides and a core. So they could be as thick as 24mm (3x8mm) or as thin as 12mm (3x4mm). With the distance of my elbow to wrist at 210mm, I had about 50mm for each ring space. Given this, and how things played out once I started, I ended up going with 4mm foam for the outside pieces of the ring, and 8mm for the core of the ring. I chose 8mm for the core because the width of the EL wire (link) is roughly 2.5mm. So if I wrapped twice on any ring, then it would be about 5mm across.
Once I knew how thick each ring was going to be, I tried to measure the circumference of my arm in five places where the five rings would sit. I wanted the inside of the ring to be reasonably snug against my arm so that there would be little incentive for it to move around much. Once I had the circumference, I could calculate the diameter of the inner circle of the ring. I settled on making the ring 2.5 cm in thickness when viewing in the lateral plane. So I added 5cm to the calculated diameter of each ring, which would give me the total diameter of the outer circle. I then halved that value, and it gave me the radius (or the ability to determine the center of the outer/inner ring. I could then use a compass set to those distances to trace both the inner and outer circles on the plastazote foam. It ended up being a lot of math, but once I figured out the pattern it wasn't terribly difficult to replicate it.
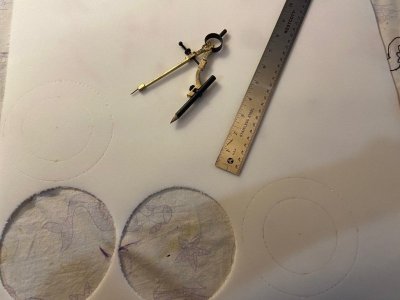
So for each of the ten rings, I would need two 4mm rings (to serve as the outers), and one 8mm ring (to serve as the inner core). The 8mm core ring was the same as the 4mm ring, except I reduced the size of the outer portion of the ring by 5mm (2.5 mm from each side of the radius). This would leave a gap around the ring for the EL wire to sit in.
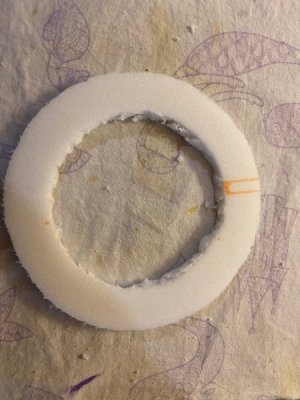
The above is representative of an inner 8mm core ring. Then it came time to determine how to intermix the EL wire with the ten rings themselves. When I had originally come up with this concept, I thought the EL wire would be stiff like chicken wire. So I would put it into shape, it would hold that shape, and then I would clasp the foam rings around the rigid EL wire. But the EL wire is not rigid. It's more like weed wacker wire. It is flexible enough to go into shapes, but it won't hold that shape on its own. So I pivoted to the idea of weaving the EL wire through the rings instead. So what I ended up doing was cutting a small gap in the inner core ring of about 5mm. This would allow me to weave the EL wire into the inside of the core ring, come out on the outer edge of the core ring, follow along the circumference of the core ring, and then go back into the same hole to pass through to the next ring in succession. I could pull the wire taunt and it would hold its shape around the inner core foam ring.
So ultimately, this was what each of the ten rings consisted of:
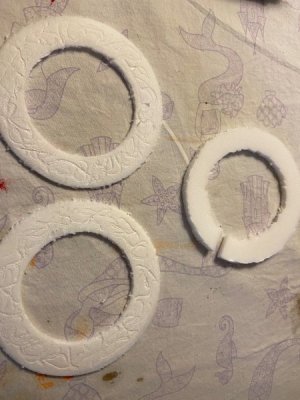
Two 4mm rings, and an inner core 8mm ring. I used the Dremel 4000-2/30 (link) with flex shaft attachment (link) with a small engraving tip to make random designs in each of the rings. This gave the appearance of inscriptions, writings, or designs on the sides of each of the rings. I cleaned up the inners and outers of each of the foam rings using the Dremel as well with a sanding tip.
For painting them, I used the same technique as the Ms. Marvel bracelet. First, I put on a layer of Flexbond primer (link). I did actually forget to do this on one set of rings, and it does make a difference. So don't skip this step. It makes the paint pop a little more, and it fills some of the small crevices that the paint just seems to skip over. Once the Flexbond dried, then I added a layer of Liquitex Basics Acrylic Mars Black paint (link). This would give it the appearance of an old finish. Skipping the black undercoat means the metallic gold overcoat doesn't pop as well. Once the black acrylic dried, then I put on a layer of Rub 'n Buff Metallic Gold Leaf (link). This stuff is oil based, so avoid getting it on your skin as much as possible. To add it to the rings, I placed a few layers of paper towel into an old sock. I then placed my hand into the sock so that I had the sock and multiple layers of paper towel between me and the paint. I added the gold leaf to the sock in small droplets, then dabbed those small droplets into multiple places around the ring. Then I spread it lightly over the ring, being cognizant of trying not to press too hard as to fill the gaps I had made with the dremel. This would leave the gaps with a more black appearance, and give the gold the appearance of being a surface paint to the ring. They turned out like this:
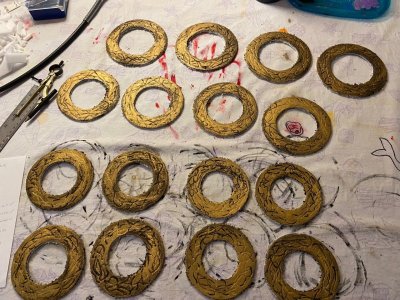
The gold leaf is a good choice because unlike the paint, it has a metallic shine to it. So it looks more realistic than straight up paint.
Next, I assembled each of the rings with each of their pieces (two 4mm outers and one 8mm inner). I used Barge All-Purpose Cement (link) to glue them together. I placed a layer of glue on all touching sides. Be wary of getting this glue on your skin, as it's quite potent. But I've found using make-up remover or nail polish remover does help take the glue off skin in those rare occasions it gets on you. Once assembled with the not yet dried glue, the rings were not quite holding shape. So I placed heavy books on to each set of rings and that compressed them into shape while the glue settled. I left them overnight to dry. The glue usually takes about 15-40 min, but I wasn't in a rush.
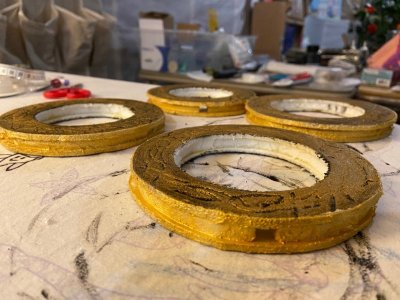
Instead of using the gold leaf paint for the inside of the ring where the EL wire will sit, I used the gold paint from the Liquitex Basics arcylic set (link). I also put a layer of Flexbond on the core ring before painting. They turned out like this:
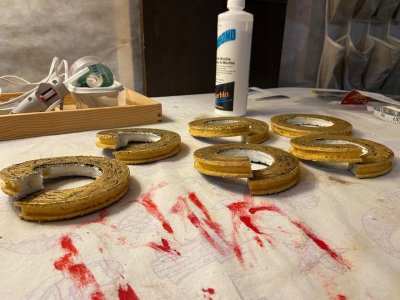
I anticipated that not all five rings would fit on my arm by placing them past my fist through the inner ring. I could get my fist through the first two rings (the largest ones) reasonably well. But the last three rings (the smaller ones) were a bit of a stretch to get on (the last two being impossible). My remedy for this was the use of magnets. So I found the center of the ring, and made a cut 90 degrees from the hole for the wire. I then drilled a small hole using the dremel, and placed a magnet on each opposite side of the cut ring. I started by only cutting one side of the ring to make a small cut-out rather than cutting both sides of the ring and making it a top/bottom. I could get my hand through each ring with just the single cut, so making a top/bottom was unnecessary. I made sure each of the magnets were matching by placing them together and then sharpie marking the sides I could see. Since I wanted the magnet to attract, then each of the sharpie sides should end up inside the ring. I filled the drilled holes with Barge cement, and then using a magnetic cuticle tool I placed the magnet into the hole. If the magnet tried to continue to follow my cuticle tool, then I'd use a non-magnetized pencil to keep it from moving. I then allowed each magnet to dry in its hole overnight.
I then confirmed that the five rings on each arm would fit on my arm as expected.
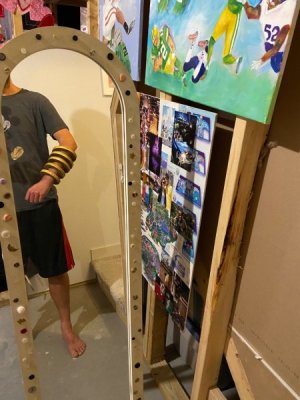
I haven't put all the pieces of the full costume together yet. We did a dry-run a few days ago, and learned that the 8ft EL wire can go around each ring a single time to cover all five rings. I ended up ordering the orange EL wire because I thought it might have more of a gold appearance, and I didn't want to clash too much with G's yellow EL wire on her Ms Marvel shirt. But the orange ended up being more orange, so the color of it is a little off. The starter pack that I ordered comes with a battery pack. I'll wear a black long sleeve (if cold enough), and then am wearing my grey stitch running sleeves folded on themselves on my bicep. The running sleeves are thick, and hold their position. So then I can use the clip attached to the battery pack of the EL wire and simply attach it to the running sleeve. Then I weave the EL wire through the ten rings. I anticipate I may need to find a way to attach the end of the EL wire to the final smallest ring, and at this moment anticipate using a twisty tie. But we can figure that out in the moment when the time comes.
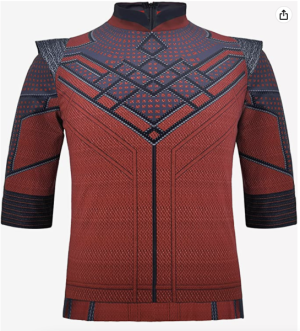
Over the top is this store bought Shang-Chi top (link). The quality is quite good. I wish it was a little tighter, and maybe a little longer in the torso, but it'll do the trick.
I'll wear black running tights for the bottom, and a pair of red shoes.
G's costume hit a bit of a snag because my MIL had some issues sewing the EL wire into the costume top material. It bunched up more than she liked. So to solve it, we sewed the yellow EL wire to a second shirt, then placed velcro tabs on the two shirts to align them so that the yellow EL wire shows through where the lightning bolt is. But I think it'll all work out.
So that's it. I'll be sure to include some final pictures of both of our costumes when we're finished and dressed.
See the final product -Finished!
This costume ended up being much simpler than G's Ms. Marvel costume. Which is a good thing since Ms. Marvel took me months, and I only had a few weeks before Halloween for Shang-Chi. So I should be able to cover most of the steps in a single post. The experience gained from Ms. Marvel made this one easier. Plus, since the Shang-Chi costume mainly consists of the ten rings (which is a repetitive exercise in making each one) it was fairly straight forward. The goal was to make the ten rings look similar to this:

As you can see from the image of Xu Wenwu, the rings are not all the same size and are form fitted to his arm. So that meant it was going to take some math to replicate these on my arm.

I started by measuring my arm from the elbow to the wrist to determine how much space the five rings could each take up. I also wanted to make sure that each ring had space between them too. The Plastazote LD45 foam (link) comes in three widths (4mm, 6mm, and 8mm). The rings will have two sides and a core. So they could be as thick as 24mm (3x8mm) or as thin as 12mm (3x4mm). With the distance of my elbow to wrist at 210mm, I had about 50mm for each ring space. Given this, and how things played out once I started, I ended up going with 4mm foam for the outside pieces of the ring, and 8mm for the core of the ring. I chose 8mm for the core because the width of the EL wire (link) is roughly 2.5mm. So if I wrapped twice on any ring, then it would be about 5mm across.
Once I knew how thick each ring was going to be, I tried to measure the circumference of my arm in five places where the five rings would sit. I wanted the inside of the ring to be reasonably snug against my arm so that there would be little incentive for it to move around much. Once I had the circumference, I could calculate the diameter of the inner circle of the ring. I settled on making the ring 2.5 cm in thickness when viewing in the lateral plane. So I added 5cm to the calculated diameter of each ring, which would give me the total diameter of the outer circle. I then halved that value, and it gave me the radius (or the ability to determine the center of the outer/inner ring. I could then use a compass set to those distances to trace both the inner and outer circles on the plastazote foam. It ended up being a lot of math, but once I figured out the pattern it wasn't terribly difficult to replicate it.

So for each of the ten rings, I would need two 4mm rings (to serve as the outers), and one 8mm ring (to serve as the inner core). The 8mm core ring was the same as the 4mm ring, except I reduced the size of the outer portion of the ring by 5mm (2.5 mm from each side of the radius). This would leave a gap around the ring for the EL wire to sit in.

The above is representative of an inner 8mm core ring. Then it came time to determine how to intermix the EL wire with the ten rings themselves. When I had originally come up with this concept, I thought the EL wire would be stiff like chicken wire. So I would put it into shape, it would hold that shape, and then I would clasp the foam rings around the rigid EL wire. But the EL wire is not rigid. It's more like weed wacker wire. It is flexible enough to go into shapes, but it won't hold that shape on its own. So I pivoted to the idea of weaving the EL wire through the rings instead. So what I ended up doing was cutting a small gap in the inner core ring of about 5mm. This would allow me to weave the EL wire into the inside of the core ring, come out on the outer edge of the core ring, follow along the circumference of the core ring, and then go back into the same hole to pass through to the next ring in succession. I could pull the wire taunt and it would hold its shape around the inner core foam ring.
So ultimately, this was what each of the ten rings consisted of:

Two 4mm rings, and an inner core 8mm ring. I used the Dremel 4000-2/30 (link) with flex shaft attachment (link) with a small engraving tip to make random designs in each of the rings. This gave the appearance of inscriptions, writings, or designs on the sides of each of the rings. I cleaned up the inners and outers of each of the foam rings using the Dremel as well with a sanding tip.
For painting them, I used the same technique as the Ms. Marvel bracelet. First, I put on a layer of Flexbond primer (link). I did actually forget to do this on one set of rings, and it does make a difference. So don't skip this step. It makes the paint pop a little more, and it fills some of the small crevices that the paint just seems to skip over. Once the Flexbond dried, then I added a layer of Liquitex Basics Acrylic Mars Black paint (link). This would give it the appearance of an old finish. Skipping the black undercoat means the metallic gold overcoat doesn't pop as well. Once the black acrylic dried, then I put on a layer of Rub 'n Buff Metallic Gold Leaf (link). This stuff is oil based, so avoid getting it on your skin as much as possible. To add it to the rings, I placed a few layers of paper towel into an old sock. I then placed my hand into the sock so that I had the sock and multiple layers of paper towel between me and the paint. I added the gold leaf to the sock in small droplets, then dabbed those small droplets into multiple places around the ring. Then I spread it lightly over the ring, being cognizant of trying not to press too hard as to fill the gaps I had made with the dremel. This would leave the gaps with a more black appearance, and give the gold the appearance of being a surface paint to the ring. They turned out like this:

The gold leaf is a good choice because unlike the paint, it has a metallic shine to it. So it looks more realistic than straight up paint.
Next, I assembled each of the rings with each of their pieces (two 4mm outers and one 8mm inner). I used Barge All-Purpose Cement (link) to glue them together. I placed a layer of glue on all touching sides. Be wary of getting this glue on your skin, as it's quite potent. But I've found using make-up remover or nail polish remover does help take the glue off skin in those rare occasions it gets on you. Once assembled with the not yet dried glue, the rings were not quite holding shape. So I placed heavy books on to each set of rings and that compressed them into shape while the glue settled. I left them overnight to dry. The glue usually takes about 15-40 min, but I wasn't in a rush.
Instead of using the gold leaf paint for the inside of the ring where the EL wire will sit, I used the gold paint from the Liquitex Basics arcylic set (link). I also put a layer of Flexbond on the core ring before painting. They turned out like this:

I anticipated that not all five rings would fit on my arm by placing them past my fist through the inner ring. I could get my fist through the first two rings (the largest ones) reasonably well. But the last three rings (the smaller ones) were a bit of a stretch to get on (the last two being impossible). My remedy for this was the use of magnets. So I found the center of the ring, and made a cut 90 degrees from the hole for the wire. I then drilled a small hole using the dremel, and placed a magnet on each opposite side of the cut ring. I started by only cutting one side of the ring to make a small cut-out rather than cutting both sides of the ring and making it a top/bottom. I could get my hand through each ring with just the single cut, so making a top/bottom was unnecessary. I made sure each of the magnets were matching by placing them together and then sharpie marking the sides I could see. Since I wanted the magnet to attract, then each of the sharpie sides should end up inside the ring. I filled the drilled holes with Barge cement, and then using a magnetic cuticle tool I placed the magnet into the hole. If the magnet tried to continue to follow my cuticle tool, then I'd use a non-magnetized pencil to keep it from moving. I then allowed each magnet to dry in its hole overnight.

I then confirmed that the five rings on each arm would fit on my arm as expected.

I haven't put all the pieces of the full costume together yet. We did a dry-run a few days ago, and learned that the 8ft EL wire can go around each ring a single time to cover all five rings. I ended up ordering the orange EL wire because I thought it might have more of a gold appearance, and I didn't want to clash too much with G's yellow EL wire on her Ms Marvel shirt. But the orange ended up being more orange, so the color of it is a little off. The starter pack that I ordered comes with a battery pack. I'll wear a black long sleeve (if cold enough), and then am wearing my grey stitch running sleeves folded on themselves on my bicep. The running sleeves are thick, and hold their position. So then I can use the clip attached to the battery pack of the EL wire and simply attach it to the running sleeve. Then I weave the EL wire through the ten rings. I anticipate I may need to find a way to attach the end of the EL wire to the final smallest ring, and at this moment anticipate using a twisty tie. But we can figure that out in the moment when the time comes.
Over the top is this store bought Shang-Chi top (link). The quality is quite good. I wish it was a little tighter, and maybe a little longer in the torso, but it'll do the trick.

I'll wear black running tights for the bottom, and a pair of red shoes.
G's costume hit a bit of a snag because my MIL had some issues sewing the EL wire into the costume top material. It bunched up more than she liked. So to solve it, we sewed the yellow EL wire to a second shirt, then placed velcro tabs on the two shirts to align them so that the yellow EL wire shows through where the lightning bolt is. But I think it'll all work out.
So that's it. I'll be sure to include some final pictures of both of our costumes when we're finished and dressed.
Last edited:

