This is the another of a series of posts focused on how to shoot different shows, attractions, rides, and events at Disney Theme Parks. The purpose is to help people learn how to shoot those things with their camera and what they can reasonably expect from their camera. If it works as well as I hope, it can also be a way for people to see what they might get for spending more money and learning time on different cameras.
On this forum, we run the gamut from cell phone cameras to high end DSLRs with ridiculously large lenses. I'm hoping that we'll get a variety of posts from people with cameras in all ranges. Even if you feel that your photos don't measure up to what others have posted, please post some samples anyway. We're all at different levels of gear and skill and we can all learn from each other. A typical S3 user will probably learn more from your S3 shot than they will from Todd H's latest masterpiece.
Other posts in the series include:
How To Shoot: Fireworks
How to Shoot: Parades
How to Shoot: Indoor Shows
How To Shoot: Cinderella's Castle
How To Shoot: SpectroMagic
How To Shoot: The Safari Ride
Dark rides are one of the greatest photographic challenges at the theme parks. Honestly, I've rarely been thrilled with the pictures that result from shooting dark rides. Taking them is often more compelling for the challenge of making it work rather than the aesthetic value of the pictures. They also fill that need to try to document a trip. It feels strange to have shots from some rides and then leave others off.
What constitutes a dark ride? It depends on your camera. Just about any indoor attraction can be a challenge for most pocket cameras. At the other extreme, I've yet to see a good shot from the action part of rides like the Rockin' Roller Coaster, Space Mountain, or Dinosaur.
I don't pretend to be an expert on dark ride shooting. I've tried a few techniques over the years and have gotten passable results. Please don't think that anything I suggest is the final word on how it should be done. The one thing that I won't back down on is that using flash is not the answer. First, the flash pictures are inevitably ugly. Second, the annoy the heck out of everyone around you. Finally, they are against park rules.
OK, enough rambling. How do you actually shoot on a dark ride? First, let's talk about general shooting technique. After that, we'll discuss camera settings.
One key to shooting on dark rides is to get the camera as still as possible. If you are a zealot, it might help to bring a monopod on the ride and use that to stabilize your camera. Stabilized lenses and camera bodies also help. Work on camera holding techniques to help you hold the camera as still as possible. Support your lens from the bottom, not the top. Keep your arms tucked in to your sides. Sometimes you can use part of the ride to help stabilize the camera by resting your elbow on a support bar.
You not only have to minimize camera movement, you've got to minimize ride movement. Timing is important. Even slow moving rides jerk and buck a little. Try to shoot during pauses in the motion. Try to shoot objects that you are moving towards rather than things passing along side you. Rides often stop briefly to help people that need extra time to get on or off the ride. Take advantage of those pauses.
Wide angle shots are easier than zoomed in shots. When you zoom in, you magnify motion. You have to keep a camera much more still when shooting at 200mm than you do when shooting at 20mm.
There are several ways to handle exposure on dark rides. One technique is to switch your camera to full manual mode. Adjust the ISO as high as it will go. Adjust the aperture as wide as possible (lowest f-stop number). Set your shutter speed as low as possible for the shooting conditions. If your shutter speed is too slow, your pictures will be blurry because the camera moved too much during the shot. I like 1/30 of a second. I'll go lower if I'm stopped and the subject needs it. You'll have to go higher if you or your subject are moving too much.
The good thing about this approach is that you are shooting at the extreme of your camera's capability. If your shot is too dark, you at least know that you did the best you could. The downside is that if it is momentarily too bright, you risk overexposing. You can keep an eye on your meter and boost your shutter speed or drop your ISO in those cases.
Another approach is to use shutter priority mode. You can put your ISO in auto mode or just set it manually. With shutter priority mode, your camera will help you out if the scene is too bright by adjusting either your ISO or your aperture.With my camera, it won't automatically switch to ISO 6400, so I often set it there manually.
If you use an automatic mode or rely on your meter in manual mode, I recommend that you underexpose your shots. Most dark rides are supposed to be dark. It sets the mood. If you could step out of your boat on Pirates of the Carribean, set up your tripod, and fire off a perfect exposure, the result would look like Pirates in the daylight. The mood would be wrong. I prefer to set my exposure compensation on dark rides at anywhere from -1 to -2 EV.
As for metering mode, I always left mine in matrix/evaluative mode. You might experiment to see what works best for you. You could make a good case for shooting in spot mode, but I find it too hard to do well on the fly. I also tend to forget about the metering mode and then botch shots for a while after the ride. That happens to me anyway. I have several 6400 ISO -1 EV shots taken in broad daylight after coming off a ride.
The biggest problem with most dark ride shots are motion blur and noise. For motion blur, the only cures are to find a better way to stabilize your camera and to use faster shutter speeds. You can't really fix blurry in post production. For noise, you can use noise reduction software. There is always a tradeoff between getting rid of noise and losing detail. Noisy is always better than blurry.
These same techniques also apply for dark shows as well as rides. The main differences are that you can stabilize yourself better for shows, but you usually have to worry more about your subject moving. In those cases, try to shoot when your subject is paused for a moment.
Here are a few sample dark ride shots and what I did to shoot them.
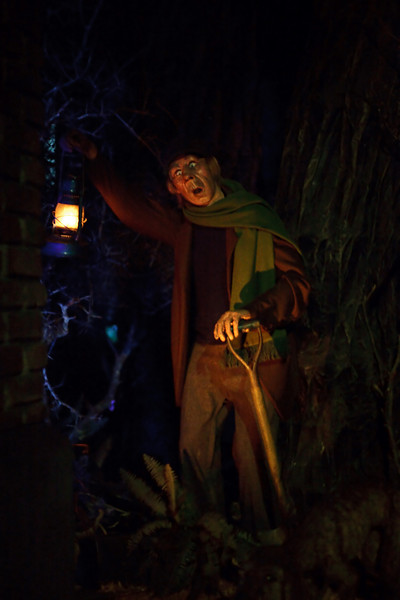
This is the caretaker in Haunted Mansion. It's probably my darkest capture. The ride happened to stop at this point, so I was able to shoot without concern for ride motion. There is no way that I could have captured him otherwise. I had my camera in manual exposure mode with the ISO set to 6400 and the aperture set to f/1.8. I tried several different shutter speeds. For this particularly snap, I was at 3/10s. To stabilize the camera, I braced my arms against the bar on the ride car. I fired a burst of shots as I often find that the second or third shot in a burst is sharper than the first. Notice that the picture is still really dark. A normal exposure would have lit the background. Not only would the shutter speed have been impossibly high, the resulting picture would have lost the moody, dark look.
Here is an It's A Small World shot. It's much lighter than the Haunted Mansion, so it is shootable to a much broader range of cameras. This shot was taken at ISO 1600, f/2.2, and 50mm. Even on IaSW, it's good to have a prime lens to get a wider aperture. You can usually find 50mm primes pretty cheap. This one was Canon's 50mm f/1.8 which sells for about $70.
Here is a shot from the Spaceship Earth ride in Epcot. I shot it in Shutter Priority with the shutter speed locked at 1/30s and the ISO at 6400. I set exposure comp at -2/3 EV. The aperture the camera chose was f/2.2. I probably would have gotten a better picture at f/1.8 and 1/50s. My logic for Shutter Priority over Aperture Priority is that I'd rather have an underexposed shot at an acceptable shutter speed than a well exposed but blurry shot at a ridiculous shutter speed.
So let's hear about your dark ride techniques and see samples of your work.
( knew i was going to upgrade my body and wanted to make sure it would work)

")


 Now I actually have to get my DSLR! But in the mean time I am having fun trying some things out with my bridge camera.
 . I can't wait to go back in September and utilize some of your pointers.
 )
)


