To Infinity and Beyond - Becoming a Better DopeyBadger (Comments Welcome)


This is so epic! I can't wait to see how it all comes together!

Thanks! After not planning on anything and then suddenly having these ideas, it was a whirlwind to get everything finished in time for the tanks to make it back to me. Projected delivery is early-mid February.


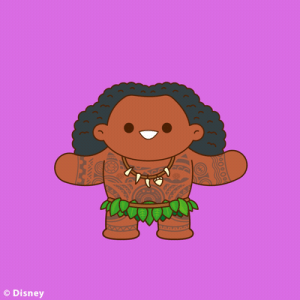
I've got final approval on the Maui Cosplay tank top. Here's the final art, and a 3D rendering (link).

Screen Shot 2023-01-12 at 8.39.54 AM.png


Screen Shot 2023-01-12 at 8.40.06 AM.png


Screen Shot 2023-01-12 at 8.40.14 AM.png


Screen Shot 2023-01-12 at 8.40.23 AM.png


Screen Shot 2023-01-12 at 8.40.31 AM.png
 
6 Weeks to go until Princess and 15 weeks remain in Spring Season - Week 3/18


mauibody+2.gif


1/9/23-1/15/23
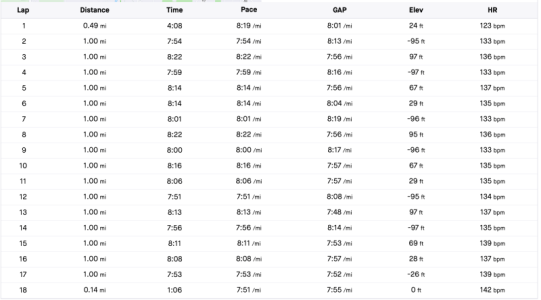
Tues (1/10): 4x30s + 6x90s + 4x30s @ R (GP-5:42, AP- 5:45)
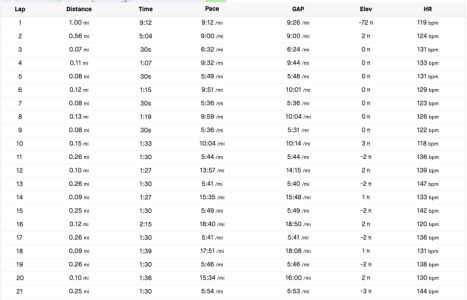
Wed (1/11): 1.25 miles w/ G + 5 miles @ Easy (9:13 min/mile, 129 bpm)
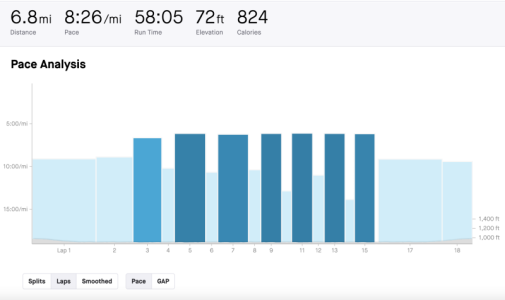
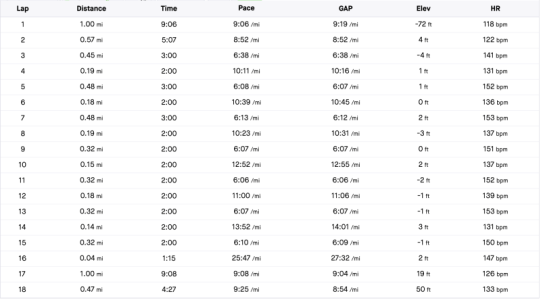
Thurs (1/12): 3x3 min + 4x2 min @ I (GP- 6:06, AP-6:08)
Fri (1/13): 6.5 miles @ Easy (9:15 min/mile, 130 bpm)
Sat (1/14): 1.25 miles w/ G + 5 miles @ Easy (9:09 min/mile, 129 bpm) + LIIFT4-Chest/Tri
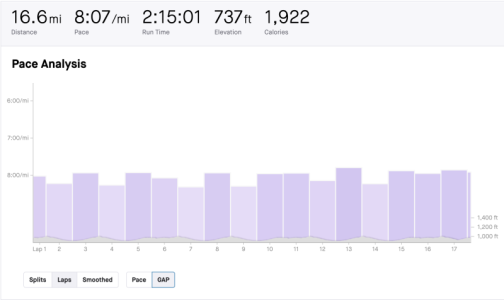
Sun (1/15): 135 min @ Easy/LR on Jack/Jill (8:07 min/mile, 135 bpm) + LIIFT4-Back/Biceps & Shoulders

Total Run Miles - 49.5 miles
Total Run Time - 7:21 hours
Total Strength Time - 1:16 hours
Total Training Time - 8:37 hours


Tuesday

Conditions - 🌫️ Mist, Wind 3mph to 4mph
Start: Temp+Dew = 31°F + 29°F; FL - 29°F
End: Temp+Dew = 30°F + 28°F; FL - 29°F

Originally I had this scheduled as a lesser workout, but I felt like I could handle something more. So, I increased the mid-intervals to 90s in length. Not quite a max level R duration, but a decent challenge.


Screen Shot 2023-01-16 at 6.29.45 PM.png
Screen Shot 2023-01-16 at 6.30.12 PM.png

Screen Shot 2023-01-16 at 6.30.19 PM.png


I'm pleased with the run overall. It wasn't wet and it wasn't snowing, so I could really get some good traction on each step. I didn't know how the 90s R reps would go, but they felt great. No more evident then me feeling easily ready to move on to the next rep in 90-100s. Felt really locked in throughout the workout. I stayed super relaxed in my face and that carried through into the rest of my body.


Wednesday
Conditions - ☁️ Broken clouds, Wind 5mph to ?
Start: Temp+Dew = 38°F + 35°F; FL - 35°F
End: Temp+Dew = 36°F + 33°F; FL - 35°F

Time to get G back out there. The weather was decent, so she was agreeable. We aimed for 30/30, and took it nice and easy. Lots of great convos.

Afterwards, I did 5 miles on my own, and I don't remember anything of importance.


Thursday
Conditions - ☁️ Overcast clouds, Wind 9mph to ?
Start: Temp+Dew = 34°F + 30°F; FL - 26°F
End: Temp+Dew = 33°F + 30°F; FL - 26°F

Daniels I. You got to love to hate it. This is a brutal pace, and it really ramps up in difficulty every minute past the second minute. But it's a really fruitful pace.
Screen Shot 2023-01-16 at 6.36.00 PM.png

Screen Shot 2023-01-16 at 6.36.09 PM.png


While I know what most paces feel like, I definitely didn't "feel" out the Daniels I pace out correctly. So the first rep was 6:38, and was like, "Umm nope, can't be doing that." So I adjusted and the remainder of the workout was much closer to the 6:07 goal pace. Happy with the effort. It was hard, but doable.
Friday
Conditions - ☁️ Overcast clouds, Wind 7mph to 8mph
Start: Temp+Dew = 24°F + 18°F; FL - 16°F
End: Temp+Dew = 23°F + 18°F; FL - 16°F

A little too cold for G, so we talked about running on Saturday instead. She said, "I don't run on the weekend. I sleep." LOL! I was able to convince her that it would be ok to run on the weekend instead of running in the cold weather on Friday. I don't remember anything specific about the run itself.


Saturday
Conditions - ⛅ Broken clouds, Wind 9mph to ?
Start: Temp+Dew = 29°F + 23°F; FL - 20°F
End: Temp+Dew = 28°F + 24°F; FL - 20°F

Ran with G again. Despite it being the weekend, she survived. We had fun. We did it at 30/30 again, but I picked up the pace a bit more on her and we did 12:36 pace.

Afterwards, I did 5 miles on my own. Nothing remarkable.

Came home and did LIIFT4-Chest workouts.


Sunday
Conditions - ⛅ Broken clouds, Wind 16mph to ?
Start: Temp+Dew = 38°F + 29°F; FL - 29°F
End: Temp+Dew = 40°F + 30°F; FL - 29°F

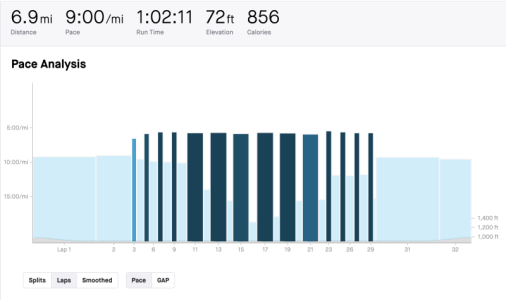
Despite doing 14.5 miles (120 min) last week at a relatively easy pace (because New Years Day got the schedule off target), I felt perfectly fine doing the originally scheduled 16 miles and getting back on track. I waited until mid-day to allow the temps to increase. I was aiming for 135 min on the Jack/Jill course around 8:26 pace.

Screen Shot 2023-01-16 at 6.45.56 PM.png

Screen Shot 2023-01-16 at 6.46.05 PM.png

The pace was a little hotter than I had planned, but it wasn't challenging in the least. I was never concerned with finishing, and pretty much felt perfectly fine within a few hours of being home. I took a Maurten 320 before running, ate my normal nutrition routine during the run itself.

Afterwards, I came inside and started up with LIIFT4-Back/Biceps workout. Finished that off, and then did the LIIFT4-Shoulders workout right afterwards.

Good week overall.

Making good progress on the Maui hook. Happy with how it's progressing and I should probably be finished with it by the end of the week. It's been so so so much easier to make the Maui Hook and Shang-Chi rings, then it was to make Ms Marvel's fist.

Steph has a Vegas conference this week, so some solo dad days and balancing that with running. Thankfully, I had already planned a down week and workouts on Wed/Sat instead of Tues/Thurs/Sun.
 
Maui (Cosplay) - Creating the Hook - Part 1
As I showed earlier (link), the Maui singlet that I designed using a variety of self-made art as well as art from the movie faithfully recreated is well on its way. The final art has been sent off to Germany, approved, and a scheduled delivery date of sometime in early February. So with the singlet all but finished, it was time to set my sights on re-creating Maui's hook.

I haven't run with a prop before. Let alone run a HM with a prop. So I had a few goals in mind when creating Maui's hook.

1) First and foremost, I still plan to run fast. Not a PR level, but still quite quick. So the item needed to be light.
2) I don't want to carry it in my hand all the time. So I needed to develop a method that would enable me to be hands-free at times when desired, but still keeping it light and ability to run fast.
3) It needed to be a decent sized hook, while also still being able to fit in my hard covered carry on luggage.
4) I want the hook to be lit up. So I needed to find a method that would light it, but stay light weight.

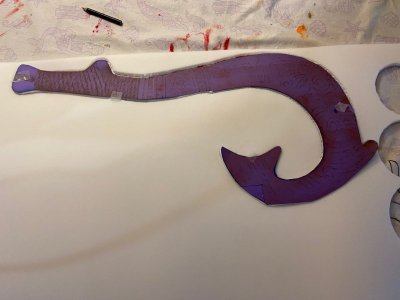
That's where I started in the design process, and then as time passed during the creation of Maui's hook there was (and still is) some trouble shooting. I started off by trying to find a good image of the hook and then printing it to size. I went through this process twice (once with a hook approximately 24 inches long and the second time at 30 inches long). The 30 inch long hook fits in the luggage and seems like a better size in proportion to me.

thumbnail_IMG_5155.jpeg

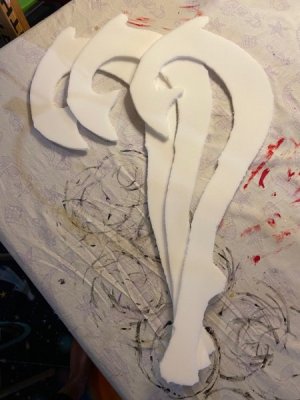
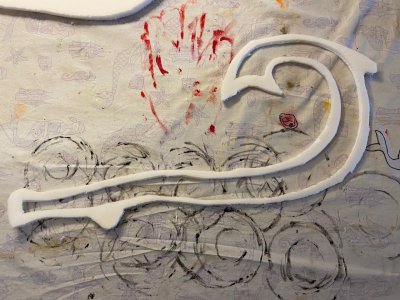
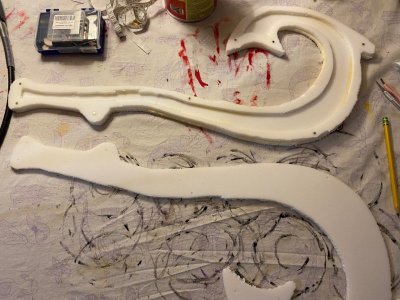
Next, I laid out the cut out of the hook on to the Plastazote LD45 (link). This is my go to translucent foam. And since most everything I do is lit up, it's my main go to for all my items I make. I wanted the hook to be thick, so I'm using 8mm foam and I'm cutting out the design three times to bulk it up. I considered making the hook in two pieces (the handle and the bone), but I worried whether the connection point would be a weak link. So I'm going with a whole single design.

thumbnail_IMG_5156.jpeg

thumbnail_IMG_5157.jpeg

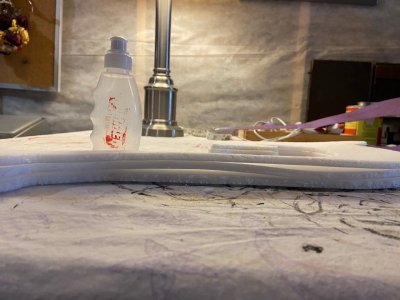
Three piece cut out into an identical size. I then stacked the three on each other and found the one that seemed the largest. This piece would be my middle. By being the largest, it would allow me to create a tiny bit of 3-D structure to it when I start to carve it out. Less boxy, and more like a real curved bone shape on the edges.

thumbnail_IMG_5158.jpeg

I hollowed out the middle piece to allow me some space to work with on the inside. Space for lights, space for magnets, and space for determining how I would attach the hook to me hands-free while not obstructing my stride.

thumbnail_IMG_5171.jpeg

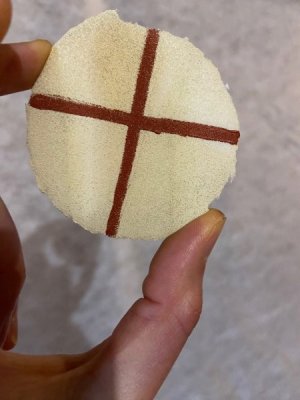
I glued the middle piece onto the bottom piece using Barge All-Purpose Cement (link). This stuff works great, but don't get it on your fingers and it's really strong glue. I went back and forth on how to attach the bottom/middle to the top. I wanted to allow easy access to the components because the LED batteries would need to be changed at some point. So I couldn't just seal it up. And in case anything goes wrong, having easy access is important. I considered using velcro, but the Scarlet Witch headband for G taught me that it would be really difficult to get the velcro to sit flush. And thus there would be a very visible seam between the two halves. So I went with the 4mm x 2mm magnets (link) that I used for the Ms Marvel fist. Even though they're small, they're mighty. I tried lining up the two by sight, but I missed on almost every magnet pair. Then, the second time, I tried marking each of the 1st set pairs of the magnets with sharpie, then pressing down the top half of the hook on top. This left faint marks on the top half where to drill the holes for the 2nd magnet of the pair. This worked well and everything lined up. I now had a hook in one piece.

thumbnail_IMG_5172.jpeg

I would the whole hook in Flexbond (link). It's a primer specifically made for foam that dries translucent and allows the foam to stay flexible. It'll also allow me to use less acrylic paint.

Next was testing out some paint choices. Since we're working with light again, I want the hook to look good both when the lights aren't visible, and when the lights are. So it's about balancing the appearance of the paint under both conditions. I went through my Liquitex Basicis Acrylic paint (link) and found the closest color to bone that I've got. Unbleached titanium. I tried several methods of painting on a couple of scrap pieces of foam. I used a paint brush, a foam brush, and an old sock. I painted in one or two layers. And I layered the hook in black, or not. The black paint ended up being too much for this project (it worked well for both Ms Marvel fist and Shang-Chi rings). The brush left more visible strokes when lit up then I was happy with. The foam brush and old sock were better methods. The one layer of old sock was definitely the lightest and let the most light shine through.

thumbnail_IMG_5173.jpeg

thumbnail_IMG_5174.jpeg

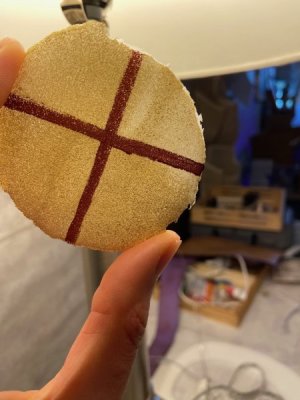
Going clock wise, this is one layer old sock, two layer old sock, two layer foam brush, one layer foam brush. The picture doesn't quite pick up all the detail you can see in person, but my preference was one layer old sock. I thought, I'll paint it with one layer old sock, finish building it, and then if I want to, I can always add a second layer once everything else is in place.

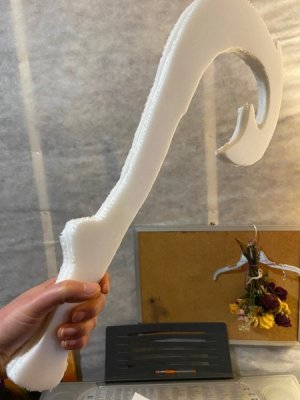
Before I started the primer or painting, I broke out my Dremel 4000 (link) and flex shaft (link) with the sanding head. I then smoothed out the edges from the 90 degree angle of the foam, into the 3-D structure of bone. It took a couple passes, but I smoothed it out nicely. Be warned. When carving out foam it creates a lot of particles in the air. You must wear a proper respirator and eye protection when doing this.

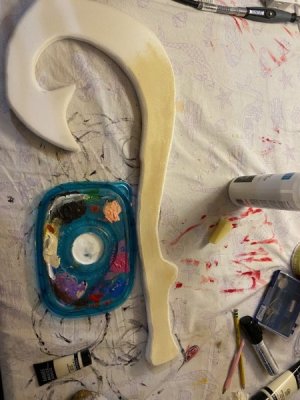
So here's an in-progress shot once I started painting with the old sock:

thumbnail_IMG_5175.jpeg

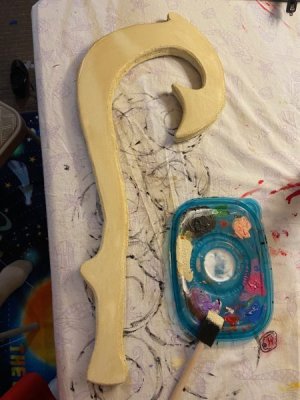
And then a more finished painted product.

thumbnail_IMG_5176.jpeg

I'll save the rest for a Part 2. I have a thin brown suede strap that I'm going to use for the handle to give me something to grip. I've got a pair of very strong rectangular magnets that will allow me to go hands-free. I've got to add the LEDs. Once the magnet and LEDs are in place, then I'll determine whether I want to add a galvanized steel bar to create some rigidity in the hook. And lastly I have the auburn red paint seen in the paint swatches that I'll use for some detailing.

Based on how the project has gone so far, I should be done by the end of the week. I'd say all-in, I'm probably at something like 8-10ish hours. That's so so small compared to the Ms Marvel fist which took months and countless hours to make.

Continued: Part 2
 
Last edited:
Maui (Cosplay) - Creating the Hook - Part 1
As I showed earlier (link), the Maui singlet that I designed using a variety of self-made art as well as art from the movie faithfully recreated is well on its way. The final art has been sent off to Germany, approved, and a scheduled delivery date of sometime in early February. So with the singlet all but finished, it was time to set my sights on re-creating Maui's hook.

I haven't run with a prop before. Let alone run a HM with a prop. So I had a few goals in mind when creating Maui's hook.

1) First and foremost, I still plan to run fast. Not a PR level, but still quite quick. So the item needed to be light.
2) I don't want to carry it in my hand all the time. So I needed to develop a method that would enable me to be hands-free at times when desired, but still keeping it light and ability to run fast.
3) It needed to be a decent sized hook, while also still being able to fit in my hard covered carry on luggage.
4) I want the hook to be lit up. So I needed to find a method that would light it, but stay light weight.

That's where I started in the design process, and then as time passed during the creation of Maui's hook there was (and still is) some trouble shooting. I started off by trying to find a good image of the hook and then printing it to size. I went through this process twice (once with a hook approximately 24 inches long and the second time at 30 inches long). The 30 inch long hook fits in the luggage and seems like a better size in proportion to me.

View attachment 732794

Next, I laid out the cut out of the hook on to the Plastazote LD45 (link). This is my go to translucent foam. And since most everything I do is lit up, it's my main go to for all my items I make. I wanted the hook to be thick, so I'm using 8mm foam and I'm cutting out the design three times to bulk it up. I considered making the hook in two pieces (the handle and the bone), but I worried whether the connection point would be a weak link. So I'm going with a whole single design.

View attachment 732793

View attachment 732792

Three piece cut out into an identical size. I then stacked the three on each other and found the one that seemed the largest. This piece would be my middle. By being the largest, it would allow me to create a tiny bit of 3-D structure to it when I start to carve it out. Less boxy, and more like a real curved bone shape on the edges.

View attachment 732791

I hollowed out the middle piece to allow me some space to work with on the inside. Space for lights, space for magnets, and space for determining how I would attach the hook to me hands-free while not obstructing my stride.

View attachment 732790

I glued the middle piece onto the bottom piece using Barge All-Purpose Cement (link). This stuff works great, but don't get it on your fingers and it's really strong glue. I went back and forth on how to attach the bottom/middle to the top. I wanted to allow easy access to the components because the LED batteries would need to be changed at some point. So I couldn't just seal it up. And in case anything goes wrong, having easy access is important. I considered using velcro, but the Scarlet Witch headband for G taught me that it would be really difficult to get the velcro to sit flush. And thus there would be a very visible seam between the two halves. So I went with the 4mm x 2mm magnets (link) that I used for the Ms Marvel fist. Even though they're small, they're mighty. I tried lining up the two by sight, but I missed on almost every magnet pair. Then, the second time, I tried marking each of the 1st set pairs of the magnets with sharpie, then pressing down the top half of the hook on top. This left faint marks on the top half where to drill the holes for the 2nd magnet of the pair. This worked well and everything lined up. I now had a hook in one piece.

View attachment 732789

I would the whole hook in Flexbond (link). It's a primer specifically made for foam that dries translucent and allows the foam to stay flexible. It'll also allow me to use less acrylic paint.

Next was testing out some paint choices. Since we're working with light again, I want the hook to look good both when the lights aren't visible, and when the lights are. So it's about balancing the appearance of the paint under both conditions. I went through my Liquitex Basicis Acrylic paint (link) and found the closest color to bone that I've got. Unbleached titanium. I tried several methods of painting on a couple of scrap pieces of foam. I used a paint brush, a foam brush, and an old sock. I painted in one or two layers. And I layered the hook in black, or not. The black paint ended up being too much for this project (it worked well for both Ms Marvel fist and Shang-Chi rings). The brush left more visible strokes when lit up then I was happy with. The foam brush and old sock were better methods. The one layer of old sock was definitely the lightest and let the most light shine through.

View attachment 732788

View attachment 732787

Going clock wise, this is one layer old sock, two layer old sock, two layer foam brush, one layer foam brush. The picture doesn't quite pick up all the detail you can see in person, but my preference was one layer old sock. I thought, I'll paint it with one layer old sock, finish building it, and then if I want to, I can always add a second layer once everything else is in place.

Before I started the primer or painting, I broke out my Dremel 4000 (link) and flex shaft (link) with the sanding head. I then smoothed out the edges from the 90 degree angle of the foam, into the 3-D structure of bone. It took a couple passes, but I smoothed it out nicely. Be warned. When carving out foam it creates a lot of particles in the air. You must wear a proper respirator and eye protection when doing this.

So here's an in-progress shot once I started painting with the old sock:

View attachment 732786

And then a more finished painted product.

View attachment 732785

I'll save the rest for a Part 2. I have a thin brown suede strap that I'm going to use for the handle to give me something to grip. I've got a pair of very strong rectangular magnets that will allow me to go hands-free. I've got to add the LEDs. Once the magnet and LEDs are in place, then I'll determine whether I want to add a galvanized steel bar to create some rigidity in the hook. And lastly I have the auburn red paint seen in the paint swatches that I'll use for some detailing.

Based on how the project has gone so far, I should be done by the end of the week. I'd say all-in, I'm probably at something like 8-10ish hours. That's so so small compared to the Ms Marvel fist which took months and countless hours to make.
Hey @DopeyBadger - I'm running in Febraury (1st timer) and my sister asked me wear a replica Maui shirt (not nearly as nice as what you are doing). Do you know if Disney is cool with it? I seemed to recall they pulled the costumes back in the day when the movie was released and I didn't know if they would object.
 
Hey @DopeyBadger - I'm running in Febraury (1st timer) and my sister asked me wear a replica Maui shirt (not nearly as nice as what you are doing). Do you know if Disney is cool with it? I seemed to recall they pulled the costumes back in the day when the movie was released and I didn't know if they would object.

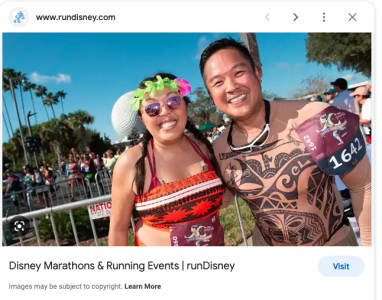
Good question. A quick google shows that runDisney used this image for advertising since the 2022 Princess Weekend. He appears to be wearing a tattoo replica shirt that doesn't 100% match the actual designs on Maui, but do resemble them.

Screen Shot 2023-01-17 at 2.45.19 PM.png

I also found a different runner wearing a Maui costume at a runDisney race. The picture was from pre-race (but past security), and I can't verify what race it was from because it's too blurry. He physically drew tattoos on his own body from the looks of it.

I think as long as it is tasteful and non-offensive, you should be fine. Always be prepared with any costume that there may be issues. But I think the chances are pretty low.
 
Thanks guys - that really helps me out.

Follow up Maui costume question - is there a way to do a wig that isnt going to lead to overheating? Not really a deal breaker for me, but maybe I could get away with it since I have so little hair anyway.
 
Follow up Maui costume question - is there a way to do a wig that isnt going to lead to overheating? Not really a deal breaker for me, but maybe I could get away with it since I have so little hair anyway.

Not that I’m aware of, but I haven’t looked into it. I would think it needs to be something that is very well ventilated. Are you really tall? Maybe something that is actually really thin on top but displays more hair on the sides? If you’re tall, most probably wouldn’t even be able to see. There may be some broader advice on the costumes thread.
 
Not that I’m aware of, but I haven’t looked into it. I would think it needs to be something that is very well ventilated. Are you really tall? Maybe something that is actually really thin on top but displays more hair on the sides? If you’re tall, most probably wouldn’t even be able to see. There may be some broader advice on the costumes thread.
I'm 6'. I've done some googling but didn't see anything particularly great. The closest I thought might work for fake hair I could run in was a baseball cap fake hair combo (see below) with the thinking a hat would be cooler than hair. But it would look dumb.

I fully expect to run with my head as is, but I thought I would ask you since you have but waayyyy more effort than I have and are much better at it than I am.

https://www.ebay.com/itm/134070006532

I’m skipping a wig, the bone necklace and the grass skirt because I feel like each would be more of an impediment to my running than the benefits for the costume. If I did consider some sort of wig, I would probably go the headband route. Affix some hair to the headband to give the appearance of full hair, and then put as minimal amount of hair over my own on the top. It’s all about keeping the top of the head open for ventilation. In winter running there’s about a 20-30F degree difference for me between when I go headband and when I go beanie. So I figure it would be much the same for a wig setup.
 
I would probably go the headband route. Affix some hair to the headband to give the appearance of full hair, and then put as minimal amount of hair over my own on the top. It’s all about keeping the top of the head open for ventilation.

I was going to suggest this. As someone who has run in wigs MANY times, it definitely will overheat you quickly, even in cool weather. I generally won't wear a wig for anything more than a 10K.
 

GET A DISNEY VACATION QUOTE

Dreams Unlimited Travel is committed to providing you with the very best vacation planning experience possible. Our Vacation Planners are experts and will share their honest advice to help you have a magical vacation.

Let us help you with your next Disney Vacation!


facebook twitter
Top