To Infinity and Beyond - Becoming a Better DopeyBadger (Comments Welcome)

Well that costuming break was short lived. Steph requested I make the Hei Hei costume, Maui Hook, Moana Necklace, and a glowing Heart of Te Fiti. So I guess it's time to get back at it since the play is in only five weeks.
I wish that I could find a GIF, but I have the visual from Pirates of the Caribbean where the pirate shouts "Back to work!"
 
On to the next phase! Although with the new College Football 2025 video game dropping today (it's been 11 years since the last one), I'm going to be taking a little bit of a break from costuming. G wants to create a player, and then a coach, and then take them through their crucial decisions about college life. So who am I to stop her?
I'm terrible at video games, so I've never played it, but I assume you're trying for dynasty mode using Wisconsin?
 
I'm terrible at video games, so I've never played it, but I assume you're trying for dynasty mode using Wisconsin?

I started with Road to Glory (where you play as a single character throughout their college experience) just to get a feel. Was a WR at Nevada then transferred to Wisconsin in Jr year. Just started Dynasty as an OC at UTSA Roadrunners but am getting crushed trying to play defense. Far harder than I remember back when I played in early 2000s regularly. Played in a regional tournament and almost made nationals back in the day. I’m definitely washed up by todays standards.
 
??? Weeks to go

7/8/24-7/14/24

Total Run Miles - 23.0 miles (4 runs)
Total Run Time - 3:28 hours
Total Strength Time - 0:52 hours (2 strength)
Total Training Time - 4:20 hours

7/15/24-7/21/24
Total Run Miles - 22.2 miles (4 runs)
Total Run Time - 3:15 hours
Total Strength Time - 1:00 hours (2 strength)
Total Training Time - 4:15 hours

I've now completed four weeks of uphill strides workouts.

7/3/24 - GAP of 5:45, 5:35, 5:37, 5:22, 6:39, 5:33, 5:08, and 4:28 (Avg. 5:31)
7/9/24 - GAP of 6:06, 5:39, 4:25, 4:55, 4:44, 4:49, 5:03, and 4:30 (Avg. 5:01)
7/15/24 - GAP of 5:44, 4:54, 4:30, 4:54, 4:52, 4:48, and 4:21 (Avg. 4:52)
7/23/24 - GAP of 4:33, 5:13, 5:04, 4:33, and 4:45 (Avg. 4:50)

I also pushed the pace a little more on 7/20/24.

Conditions - ⛅ Broken clouds, Wind 6mph to ?
Start: Temp+Dew = 79°F + 60°F; FL - 79°F
End: Temp+Dew = 79°F + 62°F; FL - 79°F


Screenshot 2024-07-24 at 9.01.51 AM.png

Average HR was 148 bpm, which is around HM effort level. So 7 miles (54 min) of "HM effort" based on HR is a pretty high level effort. But I think that's more a function of not currently being as fit as normal, than it is a reflection of anything else. T+D adjusted that's 7:33 pace. For comparison, the Disneyland HM was 7:26 pace (1:38 finish) and HR of 144 under ideal conditions. So all things considered, I'm not crazy off.

Overall the body has tolerated the sub-5 pacing well thus far. I feel like when I get the time to write something up, then I'll have the time to execute it. It'll need to be something with a lesser time commitment though. So probably aim for a mile or 5k training plan. Nothing solid at the moment though.
 
Amphibia Costumes - Anne Cape - Part 1

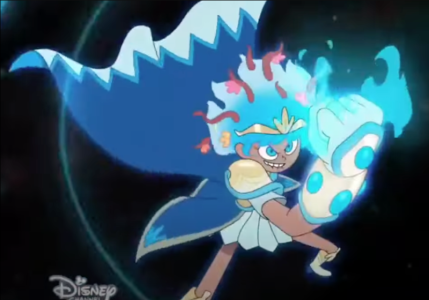
The cape was a simple and straightforward piece of the Anne costume.


Screenshot 2024-07-24 at 9.24.42 AM.png

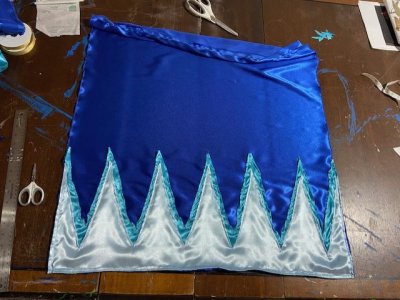
The cape's colors match the outer skirt, the outer skirt leaf, and then the light blue is similar to the inner skirt and gloves. So the same fabric was used for the base of the cape as it was for the outer skirt. Which this super shine metallic (link) was chosen specifically because there are two different blues depending on which side you look at. I'm using the high shine as the outside of the cape (facing outwards), and the matte blue as the inside (so it doesn't take away from the rest of the costume). The other two fabrics are satin.

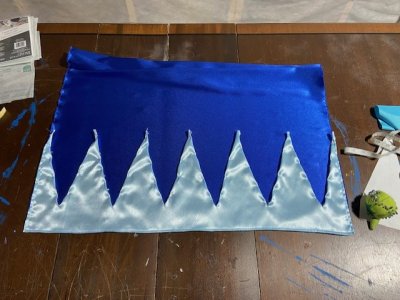
The measurements on the skirt just don't quite add up in real life. I think it has to do with the shape or something. Because I struggled to get the same number of peaks, but get the sizes right. So we'll chalk this one up as "inspired by" since I think I slightly missed the mark. After getting the necessary measurements, I folded over the high shine blue to make a pocket at the top of the cape. This will enable us to bunch it up like my cape. Then, this high shine blue fabric frays more than my velvet cape, so I went around the edges and did a zig zag stitch to help sure it up. Then I cut out a piece of the light blue satin fabric that's only to be at the base of the cape.


thumbnail_IMG_7899.jpg

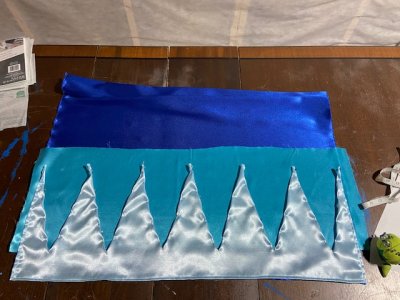
I pinned it down and then hemmed the edges. I didn't sew the light blue piece to the high shine blue just quite yet. Next, I got the turquoise blue and put a piece in between the other two blues.


thumbnail_IMG_7900.jpg

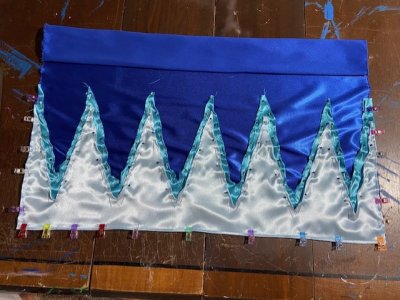
I traced out the necessary pattern, and then cut it out. I left the bottom of the turquoise as a single line of fabric so that it would make it easier in case I missed the exact measurements of the conjoining triangles. Once cut out, then I pinned all three pieces of fabric together.


thumbnail_IMG_7912.jpg

I went through with two passes to attach both the light blue and turquoise to the high shine blue.


thumbnail_IMG_7913.jpg

And done. I would say in total it probably took 2-4 hrs. It's about 3 feet long and 30 inches wide. It hits G just right above the back of the knee about where the skirt and boots will meet as well. All in all a nice easy quick project which is appreciated these days.

Next post - -Anne Armor - Part 1
 
Last edited:
Moana Jr Costumes - Heart of Te Fiti Prop

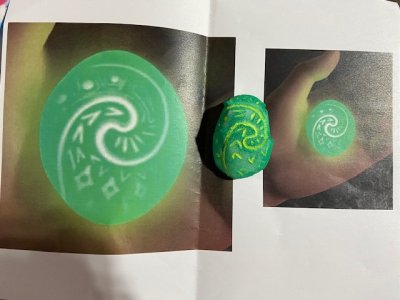
Alright, jumping around now (which seems to be the theme right now since I've got multiple irons in the fire so to speak). Next up was a super easy and quick Heart of Te Fiti prop. The prop was desired to be small enough to fit in a child's hand, look like a rock, and if possible be capable of lighting up green. Challenge accepted.

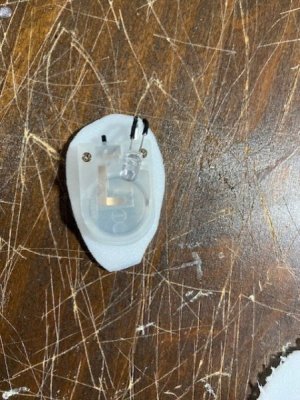
In order to make the light as small as possible and self contain the power source, I went with a CR2032 powered 5mm green LED. To connect the system, I used a 20mm Coin cell battery holder with switch. The only thing I found smaller was a lilypad CR2032 holder with switch and I could attach the two on a single side. So I could in theory cut a few mm off the design if I used the lilypad holder instead. But since I had a 20mm coin cell battery holder handy, I just went with convenience. I soldered the 5mm green LED to the coin cell battery holder with as small as wire length as I could possibly get away with. Then I folded over the wire so that it would rest on the top of the coin cell to minimize the space it takes up.

Next, I cut out a small piece of 2mm Plastazote LD 45 translucent foam (link) just barely bigger than the battery itself.


thumbnail_IMG_7902.jpg

Then I cut a second piece of the foam to place overtop. I cut slits along the side of the top piece to allow it to fold in over the bottom piece. I used All Purpose Barge cement glue to seal the top and bottom together. I had considered using magnets, but decided to make this a one time use prop. So it'll work for about 10hrs (it has an on/off so can be switched off in non-use times) based on the CR2032 battery life. I cut a very small hole on the backside of the rock to be able to access the on/off switch with a pair of tweezers.


thumbnail_IMG_7903.jpg


thumbnail_IMG_7904.jpg


thumbnail_IMG_7906.jpg

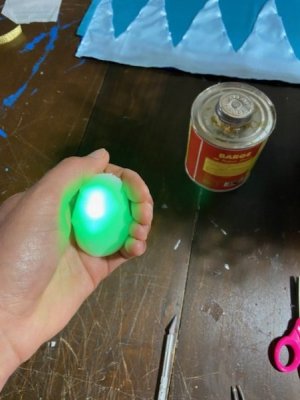
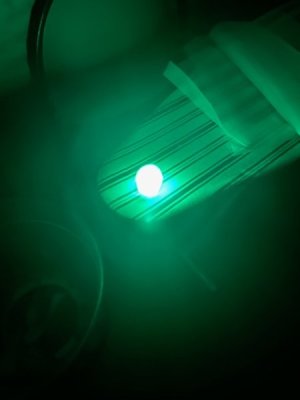
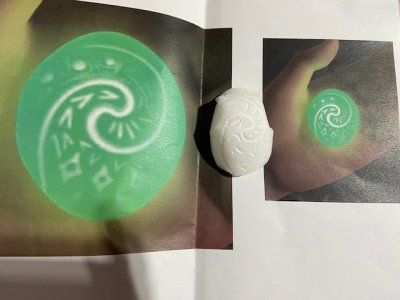
Even a single CR2032 battery powered LED can still be pretty bright. Especially the green one. So despite it being a single LED, it's visible during normal lighting, and very visible in the dark. So I think people will be able to see it on stage from the crowd. Next up was dolling it up. I used the Dremel 4000 with flex shaft rotary tool (link and link) with tip 191 (link) to carve out small intricate designs. to match the movie image.


thumbnail_IMG_7907.jpg

And then this is how it looked illuminated before being painted.


thumbnail_IMG_7908.jpg

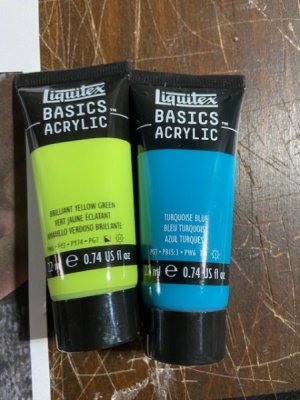
For paint, I didn't put any Flexbond (primer) on. I just went straight to the acrylic paints. I tested out a few different colors and also two different painting techniques (paint brush or old sock). G and I agreed that none of our greens were quite the right color. So we ended up mixing a bright green/yellow with some blue and got the color we were aiming for.


thumbnail_IMG_7911.jpg

The ratio was about 3 parts yellow green and 1 part blue. We also determined that the old sock method gave a better overall appearance. So I painted the rock with this house made green, and then did the detailing in the brilliant yellow green.

thumbnail_IMG_7910.jpg

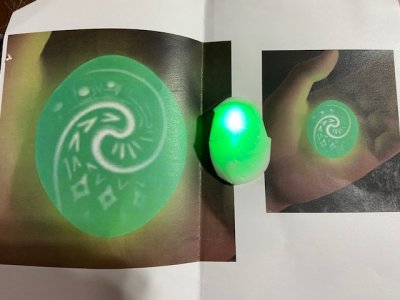
Not perfect, but pretty good. Especially since it's highly unlikely anyone will actually be able to see it up close. Then I turned on the green LED to see the rock illuminated.


thumbnail_IMG_7909.jpg

Looks pretty spot on to me.

In all, the project took less than an hour of work. If you don't include all the non consumables (like the Dremel or the soldering equipment), then I'd estimate the total project at less than $5. So it's a quick, easy and relatively cheap project that anyone could do for a Moana cosplay.

Next up -
 
Moana Jr Costumes - Maui Hook Prop

So the theater asked me to make the Maui Hook prop. I've made Maui's hook once before about a year ago (link). That particular hook had a fatal flaw in that it was too flimsy. So it wasn't possible to hold the hook at the handle and not have it slunk over. But you could hold it in the middle and it would stay structurally sound. So I wasn't heartbroken about getting a second chance at this one as I had a few ideas on how to fix it. The original had a bendable wire core, and instead I would go for bamboo or PVC for something that was even more rigid. The question to the theater was whether they wanted it to light up like my first attempt, or if they wanted just normally. I told them I could probably do the non-lighted one for $25-35 and the lighted one for $80. The difference in cost of materials mainly comes from the foam itself. The Plastazote LD45 translucent foam is nearly 2.5x the cost as the nice high density foam. They chose the non-lighted version.

I already had the pattern made from the first attempt, but I essentially just blew up an image from the movie itself to make the hook roughly 3 feet long. Then I traced the pattern on 8mm high density foam (link) three times. This would give me a final thickness of 24mm or just about an inch. I cut out the pieces. For the middle piece, I used my Dremel 4000 with shaft attachment and carved out a path for some 1/4 inch bamboo sticks. I had considered PVC as well, but I couldn't find anything that was 8mm or less in outside diameter that was fairly rigid. We had the bamboo sticks on hand because Steph and the costume team are making fans for the water characters.


thumbnail_IMG_7915.jpg

Once the bamboo stick holes were carved out, then I used Barge cement glue to affix the first and middle pieces together. Once they were attached, I added the bamboo sticks in, and then glued those down as well.


thumbnail_IMG_7916.jpg

Lastly, I added the third piece on top, and glued it down as well.


thumbnail_IMG_7917.jpg

The edges weren't perfect, and they weren't intended to be.


thumbnail_IMG_7918.jpg

I used the Dremel 4000 to smooth out the edges, and also give it a tapered appearance. Then I filled the cracks with DAP Kwik Seal (link). After letting the caulk dry overnight, I hand sanded the edges going from 180 grit to 220 grit to 400 grit. So it gave me a nice smooth to the touch finish, and had no noticeable defects.

Once the base of the hook was finished, and in satisfactory condition, I added one layer of Flexbond primer. The hook isn't overly flexible, but on the off chance it could show cracks in the acrylic paint, I just decided to do the primer. After the primer dried overnight, I put on a single layer of unbleached titanium acrylic paint.


thumbnail_IMG_7924.jpg

This gave it a nice bone color appearance.

I purchased two yards of wound brown rope from JoAnn's (link). I decided to go with something that had a soft finish that would feel nice on the handle instead of something that was more authentic and scratchy. So it has the right appearance, but won't bother Maui on stage. I cut the rope into 1 yard pieces, and then hot glued it to the hook. Since I didn't need to be able to access the inside of the hook ever, then I could permanently seal it up. This is unlike the illuminated hook which was held together with magnets, and then the leather around the handle was affixed using velcro. For this hook, as I went around each rotation I added a dot of hot glue to hopefully make the overall bond strong and able to withstand a child's wildness.


thumbnail_IMG_7929.jpg

In retrospect, it probably would have been nice to have 3 yards instead of 2, but I think it still works. It took me a while to figure out how to wrap it and have the piece cross over the notch on both sides. That's when I realized to cut it in half and do the top half of the handle, and then the bottom half of the handle separately. This enabled me to be able to cross the notch on both sides, without having to double over any area of the handle. So final thickness was around 2 inches given the 1 inch foam, and two rotations of the 3/8inch rope.

The last step was painting on the images. I used the smallest paint brush I had, and red oxide colored acrylic paint. I tried to secure images from the movie itself of the hook, but wasn't able to find any good clear images. But I did find a youtube video of someone else making Maui's hook, and was able to grab some images that looked correct from theirs. I penciled on the image first, and then traced over it with the paint brush. It was tough to make the lines so small, but it all worked out.


thumbnail_IMG_7931.jpg

I wasn't able to find any images of the other side of the hook. So I couldn't be sure whether it just repeated on both sides, or was uniquely designed on each. I ended up pulling out the Maui tank I made, and used some of the images from that. Those images were things that appeared in the movie, but not necessarily were found on the hook. But I think it fits the spirit of what's going on.

thumbnail_IMG_7930.jpg

So overall, I'm pleased with the second attempt at the Maui hook. The hook is very rigid compared to the first version. The handle will also be nice for a child to hold with the soft rope. It was a fairly quick project. I would say actual work time was under 3 hours, but it did take several days because I had to wait to allow it to dry for the glue, flex bond, caulk, and paint. Total cost wise it ended up being around $35 or so for the materials (foam and rope) as I had most of the other items on hand (paint, glue, small amount of flexbond, dremel, etc.). So another reproducible project for others with a minimal time commitment and minimal cost compared to other projects I've done/am doing. Excited to see it up on stage.

Next up is the Hei Hei costume and the Moana necklace. Or should I say necklaces. As it was just revealed that they want two Moana necklaces because there's a young Moana who first gets the heart from the ocean, and then a quick transition to older Moana. So there's no time to hand off the necklace from one person to the other. The Hei Hei costume is coming together well to this point, but not to the point that I've got enough to discuss yet. I'm finding it far harder to make a costume for someone who isn't just in the house and I can get them to try things on for 1-3 minutes. So I've sort of half built pieces that are adjustable on the off chance they don't fit right. I'm trying to get it to a good place by Monday because that's when the person playing Moana is back from vacation, and hopefully I can get some feedback.

Next up -
 
Moana Jr Costumes - Maui Hook Prop

So the theater asked me to make the Maui Hook prop. I've made Maui's hook once before about a year ago (link). That particular hook had a fatal flaw in that it was too flimsy. So it wasn't possible to hold the hook at the handle and not have it slunk over. But you could hold it in the middle and it would stay structurally sound. So I wasn't heartbroken about getting a second chance at this one as I had a few ideas on how to fix it. The original had a bendable wire core, and instead I would go for bamboo or PVC for something that was even more rigid. The question to the theater was whether they wanted it to light up like my first attempt, or if they wanted just normally. I told them I could probably do the non-lighted one for $25-35 and the lighted one for $80. The difference in cost of materials mainly comes from the foam itself. The Plastazote LD45 translucent foam is nearly 2.5x the cost as the nice high density foam. They chose the non-lighted version.

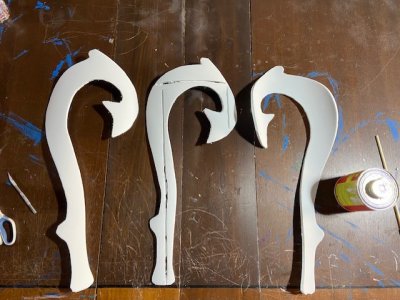
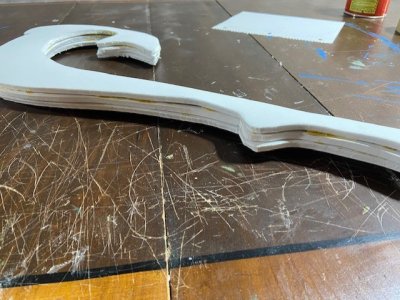
I already had the pattern made from the first attempt, but I essentially just blew up an image from the movie itself to make the hook roughly 3 feet long. Then I traced the pattern on 8mm high density foam (link) three times. This would give me a final thickness of 24mm or just about an inch. I cut out the pieces. For the middle piece, I used my Dremel 4000 with shaft attachment and carved out a path for some 1/4 inch bamboo sticks. I had considered PVC as well, but I couldn't find anything that was 8mm or less in outside diameter that was fairly rigid. We had the bamboo sticks on hand because Steph and the costume team are making fans for the water characters.


View attachment 880108

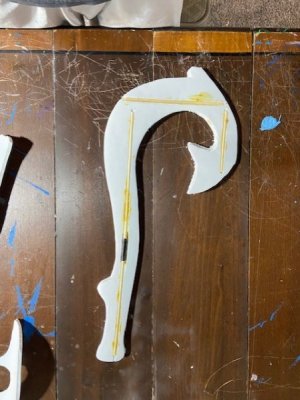
Once the bamboo stick holes were carved out, then I used Barge cement glue to affix the first and middle pieces together. Once they were attached, I added the bamboo sticks in, and then glued those down as well.


View attachment 880107

Lastly, I added the third piece on top, and glued it down as well.


View attachment 880106

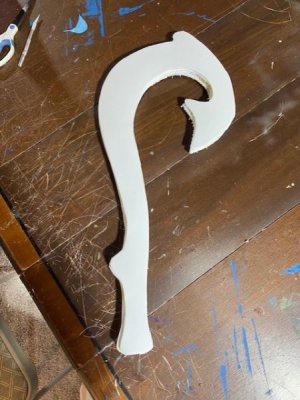
The edges weren't perfect, and they weren't intended to be.


View attachment 880105

I used the Dremel 4000 to smooth out the edges, and also give it a tapered appearance. Then I filled the cracks with DAP Kwik Seal (link). After letting the caulk dry overnight, I hand sanded the edges going from 180 grit to 220 grit to 400 grit. So it gave me a nice smooth to the touch finish, and had no noticeable defects.

Once the base of the hook was finished, and in satisfactory condition, I added one layer of Flexbond primer. The hook isn't overly flexible, but on the off chance it could show cracks in the acrylic paint, I just decided to do the primer. After the primer dried overnight, I put on a single layer of unbleached titanium acrylic paint.


View attachment 880104

This gave it a nice bone color appearance.

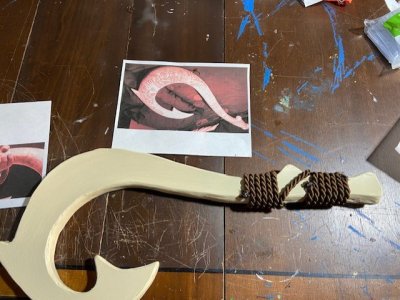
I purchased two yards of wound brown rope from JoAnn's (link). I decided to go with something that had a soft finish that would feel nice on the handle instead of something that was more authentic and scratchy. So it has the right appearance, but won't bother Maui on stage. I cut the rope into 1 yard pieces, and then hot glued it to the hook. Since I didn't need to be able to access the inside of the hook ever, then I could permanently seal it up. This is unlike the illuminated hook which was held together with magnets, and then the leather around the handle was affixed using velcro. For this hook, as I went around each rotation I added a dot of hot glue to hopefully make the overall bond strong and able to withstand a child's wildness.


View attachment 880103

In retrospect, it probably would have been nice to have 3 yards instead of 2, but I think it still works. It took me a while to figure out how to wrap it and have the piece cross over the notch on both sides. That's when I realized to cut it in half and do the top half of the handle, and then the bottom half of the handle separately. This enabled me to be able to cross the notch on both sides, without having to double over any area of the handle. So final thickness was around 2 inches given the 1 inch foam, and two rotations of the 3/8inch rope.

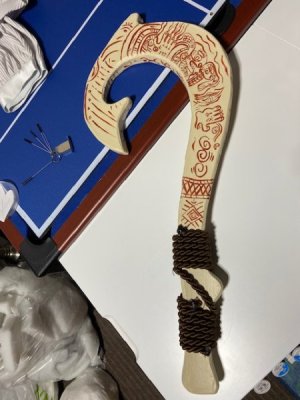
The last step was painting on the images. I used the smallest paint brush I had, and red oxide colored acrylic paint. I tried to secure images from the movie itself of the hook, but wasn't able to find any good clear images. But I did find a youtube video of someone else making Maui's hook, and was able to grab some images that looked correct from theirs. I penciled on the image first, and then traced over it with the paint brush. It was tough to make the lines so small, but it all worked out.


View attachment 880101

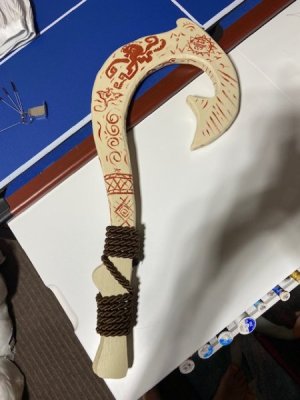
I wasn't able to find any images of the other side of the hook. So I couldn't be sure whether it just repeated on both sides, or was uniquely designed on each. I ended up pulling out the Maui tank I made, and used some of the images from that. Those images were things that appeared in the movie, but not necessarily were found on the hook. But I think it fits the spirit of what's going on.

View attachment 880102

So overall, I'm pleased with the second attempt at the Maui hook. The hook is very rigid compared to the first version. The handle will also be nice for a child to hold with the soft rope. It was a fairly quick project. I would say actual work time was under 3 hours, but it did take several days because I had to wait to allow it to dry for the glue, flex bond, caulk, and paint. Total cost wise it ended up being around $35 or so for the materials (foam and rope) as I had most of the other items on hand (paint, glue, small amount of flexbond, dremel, etc.). So another reproducible project for others with a minimal time commitment and minimal cost compared to other projects I've done/am doing. Excited to see it up on stage.

Next up is the Hei Hei costume and the Moana necklace. Or should I say necklaces. As it was just revealed that they want two Moana necklaces because there's a young Moana who first gets the heart from the ocean, and then a quick transition to older Moana. So there's no time to hand off the necklace from one person to the other. The Hei Hei costume is coming together well to this point, but not to the point that I've got enough to discuss yet. I'm finding it far harder to make a costume for someone who isn't just in the house and I can get them to try things on for 1-3 minutes. So I've sort of half built pieces that are adjustable on the off chance they don't fit right. I'm trying to get it to a good place by Monday because that's when the person playing Moana is back from vacation, and hopefully I can get some feedback.

Next up -
That looks so good! Your dedication and talent are damn impressive, Billy.
 
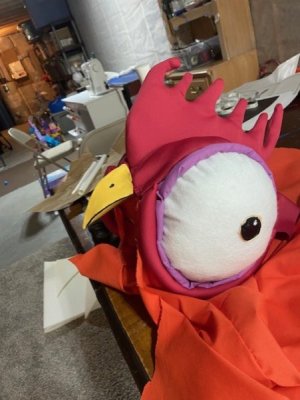
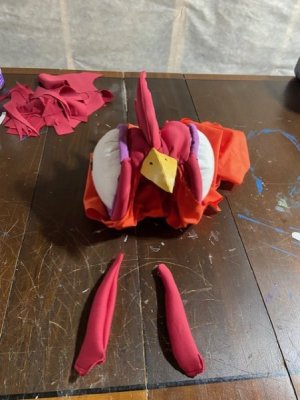
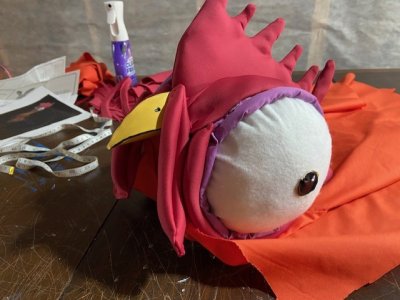
Moana Jr Costumes - Hei Hei - Part 1
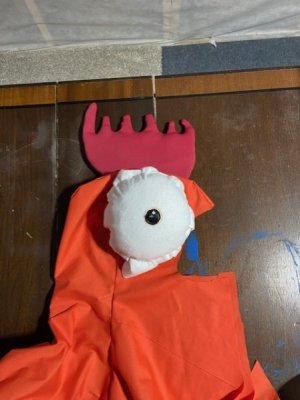
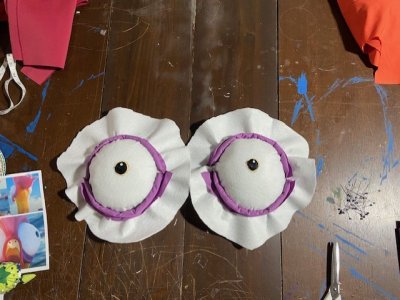
See the final product - Link

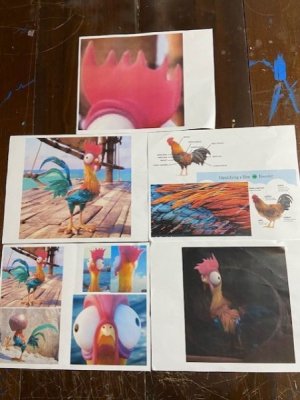
Let's dive into a Hei Hei costume! First off was the look book I was working with.


thumbnail_IMG_7914.jpg

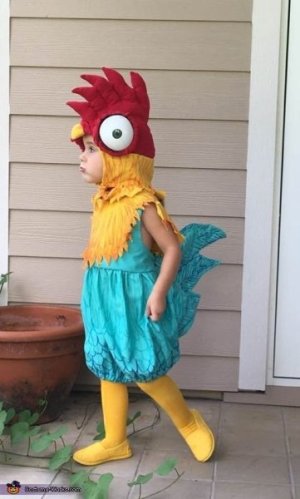
I found several images of Hei Hei from the movie, and also did some educating myself about the physiology of a bantam rooster. One thing that was evident in my research was that rooster's feathers are long, straight, narrow, and shiny. Next up was finding other Hei Hei costumes to inspire my own. The theater director liked this one for inspiration:


8c36338ebc868af5e317b4bd055771f9.jpg

(link)

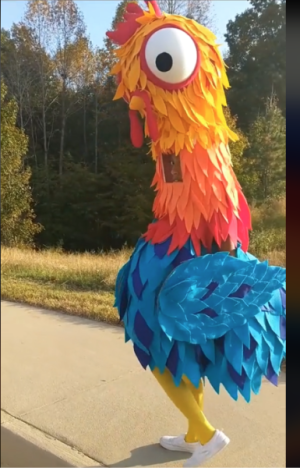
And I liked the idea of feathers along the costume from this one I found on TikTok (link).

Screenshot 2024-07-29 at 10.14.03 AM.png

So the goal was to merge the looks of each of these into my own Hei Hei creation.

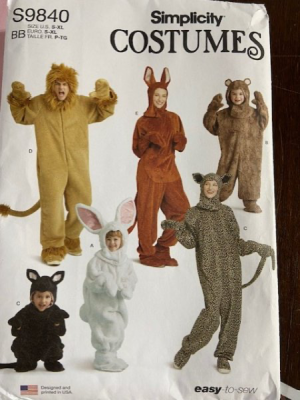
I started by using the same S9840 Simplicity pattern as I used for Pua. This would give me the jumpsuit base of the costume. It actually worked in our favors that I kept unintentionally getting the adult sized costumes because the girl wearing the Hei Hei costume is a size medium.

1722266126924.png

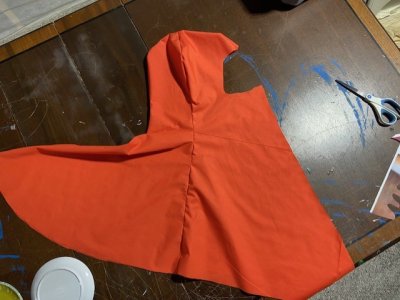
Without any edits, I made the base of the costume as written using simple cotton fabric. The base is a green cotton, and the hood is an orange cotton. Neither of these will be visible in the final costume, so I just went with something that was nice to the touch, but also inexpensive. Then for the hood piece I extended the length of the hood about 18 inches. This will give me a lot of leeway on making the heckle for Hei Hei.


thumbnail_IMG_7919.jpg

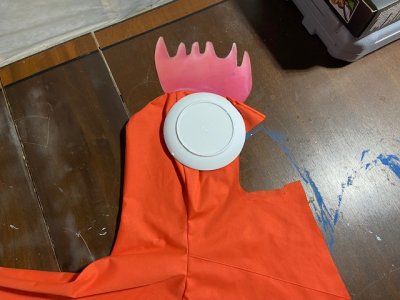
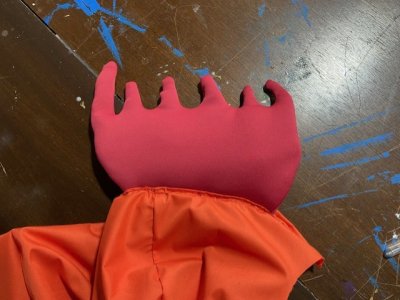
Next up was the comb. I printed off an exact match of Hei Hei's comb, and the blew it up to be larger to cut it out and trace.

thumbnail_IMG_7920.jpg

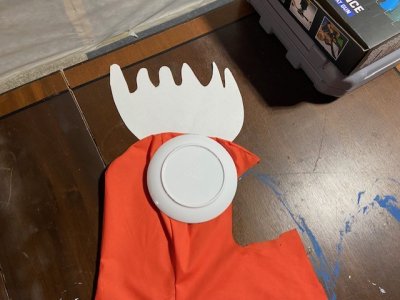
It wasn't quite as large as I wanted it to be, so I traced an even larger version.

thumbnail_IMG_7921.jpg

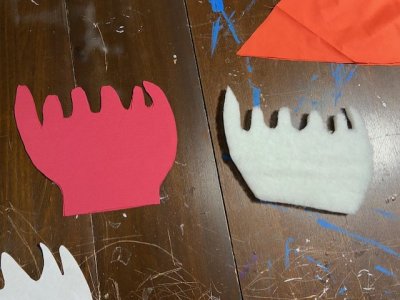
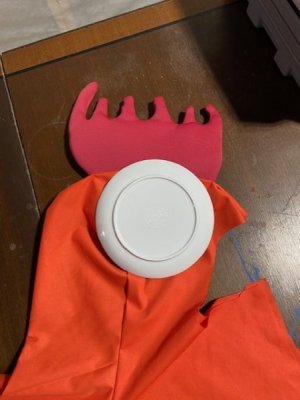
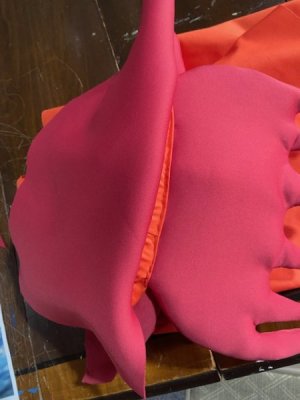
Once I was satisfied with it, then it was time to trace it to fabric. I used the same scuba fabric that I used for the pink inner ear for Pua (link). It's not too hard to work with, and has a nice appearance that resembles that of a comb of a rooster. I sewed two right sides of the fabric together, then turned it inside out to hid the seams. Then I traced the same shape of the comb onto a piece of outdoor furniture batting that's relatively stiff/rigid (the same stuff I used for the Mike/Marty Wazowski costumes). My recollection is it's this NuFoam stuff (link). I've got a lot of batting selections from those Monster's costumes, and nothings labeled. But the key part is that it's not like a soft cloud batting, and instead has some shape structure to it to help encourage the comb to stay upwards.


thumbnail_IMG_7922.jpg

Next - -Hei Hei - Part 2
 
Last edited:
Moana Jr Costumes - Hei Hei - Part 2

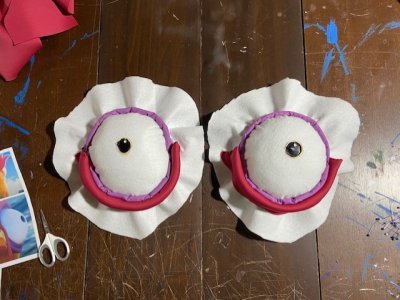
With the comb finished, it was time to take on arguably the most important part of Hei Hei, the eyes.


thumbnail_IMG_7923.jpg

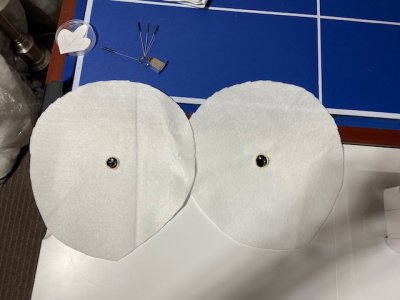
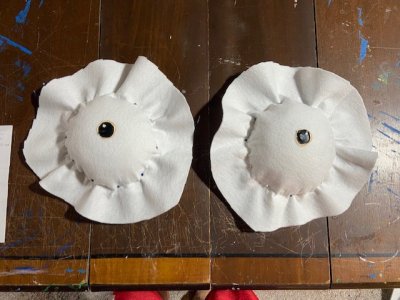
I took some measurements of Hei Hei's eyes and they're approximately the same length as the comb horizontally as the eyes are in diameter. So since the comb was about 6 inches, that was the goal for the eyes. Next up was the protrusion of the eyes themselves. Which according to measurements was about 4-6 inches or so based on the same ratios. So I decided to use the same technique I used for the runDisney version of the Monster's inc costumes, by stuffing batting into the eyes and then sewing two pieces of fabric onto each other while leaving a large excess around the edges for the eyelids. So the top piece of eye needs to be significantly larger than the bottom piece to account for it covering a larger distance. For the pupil, I used a shiny black fabric, and shiny beige fabric at a little less than an inch (or 1/6th the diameter of the eye). For the white of the eye, I had originally planned on using the same white satin I used for the Monster's Inc Google eye, but I decided against it because it freys quite a bit more. I ended up going with a thick quality white felt instead, which was the right choice as I moved further into the project because the denseness helped hold everything together.


thumbnail_IMG_7925.jpg

Then I took the NuFoam batting and stacked ever decreasing sizes of concentric circles. This gave me a tour of circled pieces of foam that got smaller and smaller. To get something that was about 4-6 inches in final height, I needed to stack about 7-9 inches of foam and then compress it. I then went around the edges and pinned the bottom and top pieces together.


thumbnail_IMG_7926.jpg

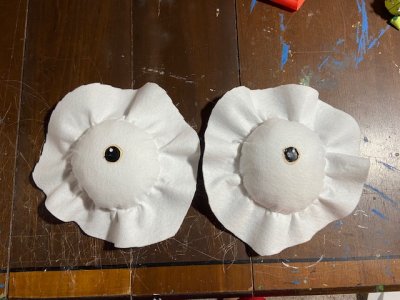
When I did the Monster's Inc version, I struggled through machine stitching it. But the machine had problems with the high height of the eye/foam so close to the stitch. So this time around I opted for hand stitching. I used a back stitch and just went around the edges.


thumbnail_IMG_7927.jpg

This gave me a good look.


thumbnail_IMG_7928.jpg

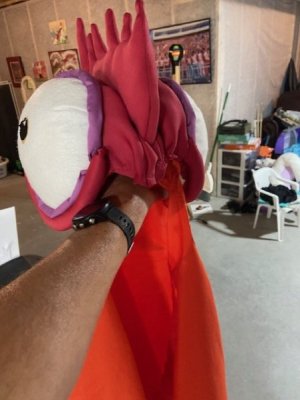
Next up was the eyelids. Hei Hei has two sets of eyelids. A purple inner one, and a red outer one that is the same color as the comb. I used a simple purple cotton for the inner eyelid. Since this wasn't going to be very visible in the final form, I just rolled the fabric over a piece of soft pillow batting, and then sewed the piece into a tube. I left a 1/2 inch edge along the seam so that I could then use that edge to hand stitch to the eyeball itself.

thumbnail_IMG_7932.jpg

Then I just cut away any excess purple fabric that wasn't sewn down. Then for the bottom eyelids, I followed the same technique using the red scuba fabric.


thumbnail_IMG_7933.jpg

The upper eyelid is different because it weaves itself into the comb, so I thought I couldn't do these exactly the same.

Next - -Hei Hei - Part 3
 
Last edited:
Moana Jr Costumes - Hei Hei - Part 3

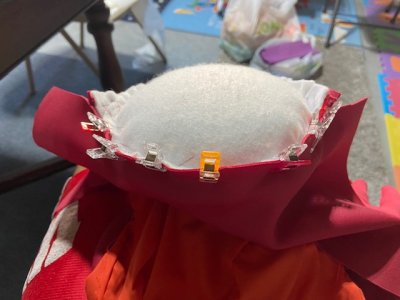
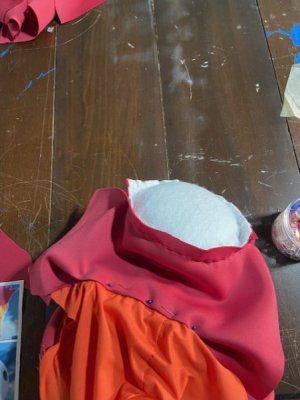
So once the comb and eyes were finished, then it was time to attach it to the base hood. I opened up the seam along the top of the hood, inserted the comb, and then hand stitched the two together. I left some extra fabric and extra batting at the base of the comb inside the hood in case adjustments might be needed on how it sits on the girl's head.


thumbnail_IMG_7935.jpg

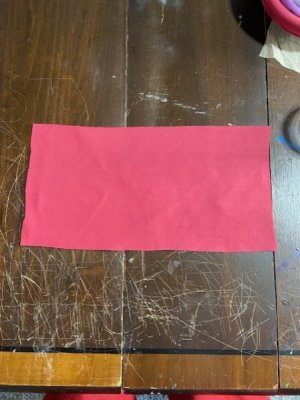
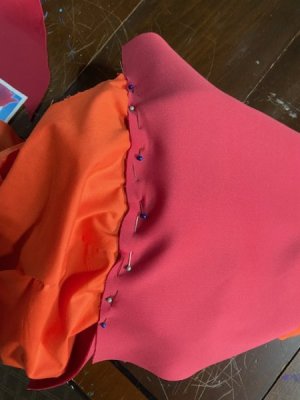
Then I took a large piece of the red scuba fabric and attached it along the base of the comb to start to make the upper eyelid.


thumbnail_IMG_7936.jpg


thumbnail_IMG_7937.jpg

Once that was hand stitched on, I flipped it over, and saw that it was about a 1/4 inch too low. So I sewed it a second time onto the comb itself.


thumbnail_IMG_7938.jpg

Next I sewed the bottom of the piece to the eye with the right sides together.


thumbnail_IMG_7939.jpg

Then I folded that over and sewed it again to the hood to make two compartments (the upper eyelid and a fold along the comb).


thumbnail_IMG_7940.jpg

I stuff the compartment that was the upper eyelid with some soft pillow batting, and then sewed the back and front of it shut.


thumbnail_IMG_7948.jpg

Next - -Hei Hei - Part 4
 
Last edited:
Moana Jr Costumes - Hei Hei - Part 4

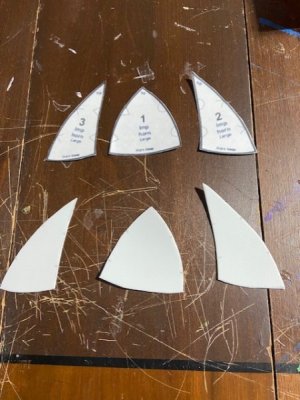
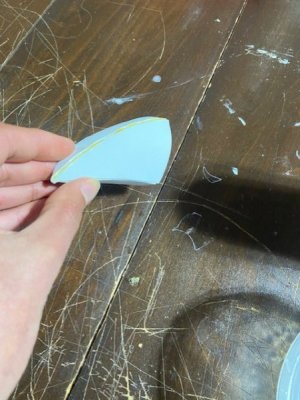
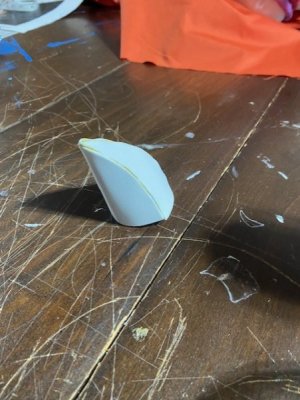
The last key piece to the face was the beak. I used the same imp horn pattern I used from the Monster's Inc horns. I traced the pattern onto 2mm EVA foam, cut it out, then glued it together with Barge All-Purpose cement glue.

thumbnail_IMG_7941.jpg

thumbnail_IMG_7942.jpg

thumbnail_IMG_7943.jpg

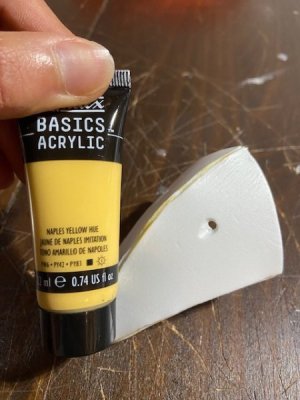
I used the caulk to seal the upper bridge of the beak, but didn't do that on the other two sides to give it small depth like the beak halves would have. Then I used the dremel and drilled in really small breathing holes.

thumbnail_IMG_7947.jpg

I painted it with Flexbond, and then with Naples Yellow Hue acrylic. I went around the edges and the nose hole with black acrylic.

thumbnail_IMG_7949.jpg

I stitched the beak onto the front of the piece and pulled all the excess fabric into it to give it a little stability. I left the underside open in case I needed to stuff it. I also pulled the top of the beak and stitched it to the comb to keep the beak up a little more. The last part of the face was the waddle. I made the waddle out of the same scuba red fabric.


thumbnail_IMG_7954.jpg

I sewed them right sides together, turned it inside out, and then decided not to stuff it because it didn't need it based on how the fabric sits. I wasn't originally going to make the waddle, but then I figure it was a really neat way to cover up the seams in that area. So I just lightly hand stitched the waddle to the front of the face along the exposed seams from the eye and hood.


thumbnail_IMG_7956.jpg

Next up is taking the whole thing to practice and making sure it actually fits on the girl. Please help me if it doesn't actually fit... I spent about 15-20 hrs on this head piece on Fri, Sat, Sun.

Next - -Hei Hei - Part 5
 
Last edited:
Just crossed three quarters of a million views on this training journal after 8.5 years. Kind of crazy since it passed half a million on Sept 18, 2022 on post #7596. That means it's gone from 65 views per post up through 2022 to 240 views per post since, and 204 views per day to 367 views per day. So, I guess thanks to all of you that are reading this, and taking an interest in what I'm saying and doing!


Save Up to 30% on Rooms at Walt Disney World!

Save up to 30% on rooms at select Disney Resorts Collection hotels when you stay 5 consecutive nights or longer in late summer and early fall. Plus, enjoy other savings for shorter stays.This offer is valid for stays most nights from August 1 to October 11, 2025.
CLICK HERE


New Posts


DIS Facebook DIS youtube DIS Instagram DIS Pinterest

Back
Top