MarkBarbieri
Semi-retired
- Joined
- Aug 20, 2006
- Messages
- 6,172
I was recently at a disc golf tournament, taking pictures of players. I wanted to capture the sense of motion when they throw their drives. I used two different techniques, resulting in two very different types of images.
In the first case, I used a long shutter speed. I tried several variations on this before I got something I liked. With my first attempts, I had the camera perfectly still. I thought I'd get a motion-free background with a moving player set against it. The result was a player who was nearly invisible as they moved through the exposure. Not the look I was going for.
41mm, ISO 50, f/22, 1/5s

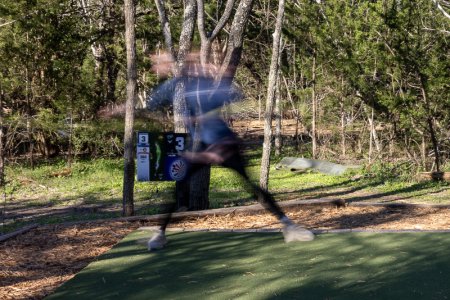
My answer was to pan with the player as I took the shot. That reduced the blur of the player's body and increased the blur of the background. That was better, but I still didn't like it. The player didn't stand out from the background enough and I wasn't getting the sense of motion I wanted.
70mm, ISO 100, f/32, 1/6s

My answer came in the morning when a player with very long, very blond hair showed up wearing a black outfit. Now I had the contrast I wanted to make her stand out. I particularly like how the arc of her arm motion shows up.
119mm, ISO 320, f/32, 1/4s

I liked that image as an abstract representation of a person throwing a disc off the tee pad. But I also wanted shots in which the player throwing was more recognizable. For that, went with a composite shot showing the throwing motion. To get that, you want to set your camera in full manual mode - set the ISO, shutter speed, and aperture yourself. This insures that the exposure won't adjust between shots. You also want to set your camera to a very high speed shooting mode. Then you take a quick burst of shots.
Once you have your shots, load them into Photoshop and stack them on different layers. Use the auto-align function to line up the different layers based on the background. Then, for each layer except the bottom, select the subject and create a mask that reveals just the subject. You'll probably have to do a little cleanup to get the exact parts of each mask you want visible to show through.
41mm, ISO 200, f/2.0, 1/8000s

I posted more about my shooting at the tournament on my rarely used Photography substack. If you are interested, you can read my article here.
In the first case, I used a long shutter speed. I tried several variations on this before I got something I liked. With my first attempts, I had the camera perfectly still. I thought I'd get a motion-free background with a moving player set against it. The result was a player who was nearly invisible as they moved through the exposure. Not the look I was going for.
41mm, ISO 50, f/22, 1/5s
My answer was to pan with the player as I took the shot. That reduced the blur of the player's body and increased the blur of the background. That was better, but I still didn't like it. The player didn't stand out from the background enough and I wasn't getting the sense of motion I wanted.
70mm, ISO 100, f/32, 1/6s
My answer came in the morning when a player with very long, very blond hair showed up wearing a black outfit. Now I had the contrast I wanted to make her stand out. I particularly like how the arc of her arm motion shows up.
119mm, ISO 320, f/32, 1/4s
I liked that image as an abstract representation of a person throwing a disc off the tee pad. But I also wanted shots in which the player throwing was more recognizable. For that, went with a composite shot showing the throwing motion. To get that, you want to set your camera in full manual mode - set the ISO, shutter speed, and aperture yourself. This insures that the exposure won't adjust between shots. You also want to set your camera to a very high speed shooting mode. Then you take a quick burst of shots.
Once you have your shots, load them into Photoshop and stack them on different layers. Use the auto-align function to line up the different layers based on the background. Then, for each layer except the bottom, select the subject and create a mask that reveals just the subject. You'll probably have to do a little cleanup to get the exact parts of each mask you want visible to show through.
41mm, ISO 200, f/2.0, 1/8000s
I posted more about my shooting at the tournament on my rarely used Photography substack. If you are interested, you can read my article here.