Tie Dye Instructions for Spiral Mickey Shirt
- Thread starter MNRMommy
- Start date
 I wouldn't want to chance any of that getting caught up in my washing machine somewhere and coming back to visit me in my next load.


 Now I want to try it and see how it turns out.


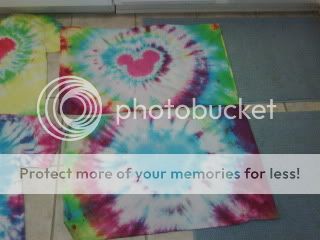


") You can tell on those I didn't and those I did (mine!)
You can tell on those I didn't and those I did (mine!)
Share this page
-
Last-Minute Disney Cruise Line Deals We're Seeing This Week
-
Trailer Drops for 'Hannah Montana 20th Anniversary Special' on Disney+
-
New Disney Loungefly Drop: Winnie the Pooh + Picnic Series
-
Is the New Pop Century Lobby Better... or Did Disney Lose Some Nostalgia?
-
DIS Unlimited: Weekly Disney News & Discussion Podcast
-
Ranking of the Best Original Shows on the Disney Adventure
-
Disney's Robotic Olaf Appears at NVIDIA AI Conference
Disney Vacation Planning. Free. Done for You.

Our Authorized Disney Vacation Planners are here to provide personalized, expert advice, answer every question, and uncover the best discounts.
Let Dreams Unlimited Travel take care of all the details, so you can sit back, relax, and enjoy a stress-free vacation.
Start Your Disney Vacation