MarkBarbieri
Semi-retired
- Joined
- Aug 20, 2006
- Messages
- 6,172
Ever want to remove an object from a picture? There are many ways to do it. Here are some that I've used along with their pros and cons.
Layering
If the thing you want to remove isn't staying in one place, you can do it by taking several pictures and combining them. Let's say that you want a picture of the Magic Kindgom's Main Street but with absolutely no people. Go when there aren't many people. Put your camera on a tripod. Take a picture every minute for 20 or 30 minutes. Then stack the images in Photoshop on different layers. Whenever there is someone in the picture you want to remove, use a mask to erase that part of the layer so that the layer below it shows through. This trick only works when the things you want move. If someone stays in the same place during all of your pictures, you won't have a layer that doesn't include them. This trick is also much harder when the light changes significantly between your pictures because the different layers will look different.
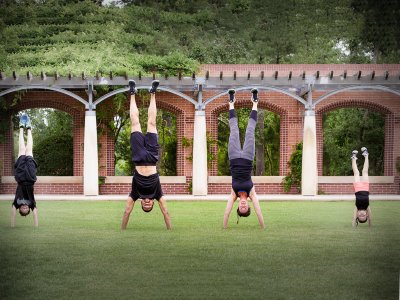
In the example below, I took 5 pictures with the camera on a tripod. One picture had no people in it. The I took one picture for each person doing a handstand along with two people standing beside them holding up their legs. I masked out the helpers to reveal the picture with nobody in it.

Cloning
If the thing you want to get rid of is over an area with very little detail, you can often "clone" over it. The clone tool, let's you pick an area in a picture and copy that over the object you want to remove. For example, let's say that there is an errant soccer ball on the field that you want removed, you can just clone similar parts of the field over it. When you don't have to worry about details, it's easy, When you have details to replicate, it can get very tedious or difficult. You can do this in Photoshop, Lightroom, or any decent image editing tool.
Content Aware Fill
Adobe has a tool called Content Aware Fill. It works like the cloning tool, but it does it automatically and somewhat intelligently. You tell it what parts of the photo to sample from and then it fills in the area to be removed with what it finds in those sample areas. Once again, it works well when there aren't any details. If the details are regular (like a pattern of bricks), it sometimes does a great job. If the details aren't regular, it occasionally works but usually botches it. But it can give you a starting point that you can clean up with some tedious cloning.
Remove Tool
The latest Photoshop tool is the Remove Tool. You draw over the object you want removed and then it uses artificial intelligence to figure out what should be there. From what I've seen so far, it works much better than Content Aware Fill.
Cropping
This is the simplest and often the best approach. If you can, just crop your image so that the unwanted object is no longer in the image.
This is a nice enough picture, but I don't like the trash cans on the bottom right. I could clone them out, but that would take me 20 minutes.

Here is the same image using Content Aware Fill on both the text and the trashcans. You can see that it did a bad job with the details for both areas.

Here is the same image with the trashcans removed using the Remote Tool. Not perfect, but good enough for most purposes. I could clean it up a bit with clone tool (maybe 1 minute) and it would look good.

Here's what I think is the best approach for this picture. Just crop out the trashcans. Problem solved.

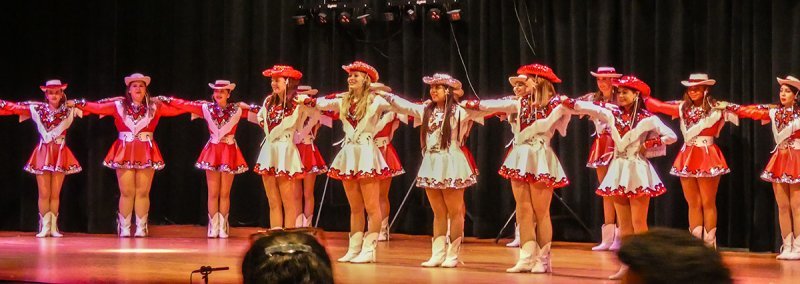
Here is a dance picture with some distracting heads in front of the subject.

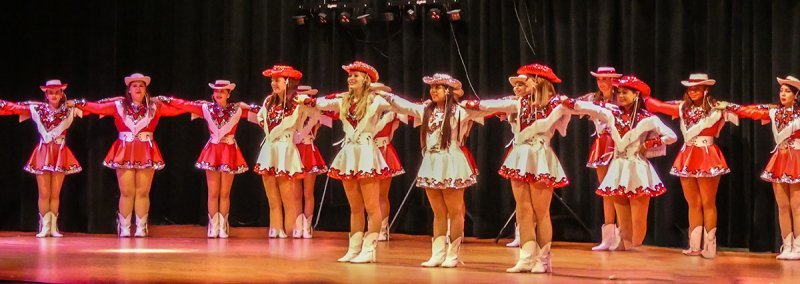
Here's what it looks like after the heads and microphone were removed using the Remove Tool. The heads and the microphone area gone. At first glance, it looks great. Then you notice that the cheerleaders where the heads were lost their feet!

To bring back their feet, I copied similar booted feet from other dancers. If there weren't other dances to copy from in this picture, I could have gotten them from another picture, but the further removed you are, the harder it is to match the look. I used the Free Transform tool to size the new boots reasonably and then used the clone tool to blend the old lens into the new legs. It's not perfect, but it's good enough that it doesn't draw your eye to it (I hope).

I do this "borrowing" technique on a lot of group pictures. In the most trivial case, I take 3 pictures of every group picture. If someone is blinking in picture 1, I copy their eyes from picture 2 or 3. In more complex cases, like family portraits with squirming kids, I've had to grab faces from several different photos to get one picture where everyone is looking at the camera and smiling. In some cases, it is as easy and copying and pasting. In other cases, it is a complex job of dealing with shifted limbs, moved hair, and other differences.
Layering
If the thing you want to remove isn't staying in one place, you can do it by taking several pictures and combining them. Let's say that you want a picture of the Magic Kindgom's Main Street but with absolutely no people. Go when there aren't many people. Put your camera on a tripod. Take a picture every minute for 20 or 30 minutes. Then stack the images in Photoshop on different layers. Whenever there is someone in the picture you want to remove, use a mask to erase that part of the layer so that the layer below it shows through. This trick only works when the things you want move. If someone stays in the same place during all of your pictures, you won't have a layer that doesn't include them. This trick is also much harder when the light changes significantly between your pictures because the different layers will look different.
In the example below, I took 5 pictures with the camera on a tripod. One picture had no people in it. The I took one picture for each person doing a handstand along with two people standing beside them holding up their legs. I masked out the helpers to reveal the picture with nobody in it.

Cloning
If the thing you want to get rid of is over an area with very little detail, you can often "clone" over it. The clone tool, let's you pick an area in a picture and copy that over the object you want to remove. For example, let's say that there is an errant soccer ball on the field that you want removed, you can just clone similar parts of the field over it. When you don't have to worry about details, it's easy, When you have details to replicate, it can get very tedious or difficult. You can do this in Photoshop, Lightroom, or any decent image editing tool.
Content Aware Fill
Adobe has a tool called Content Aware Fill. It works like the cloning tool, but it does it automatically and somewhat intelligently. You tell it what parts of the photo to sample from and then it fills in the area to be removed with what it finds in those sample areas. Once again, it works well when there aren't any details. If the details are regular (like a pattern of bricks), it sometimes does a great job. If the details aren't regular, it occasionally works but usually botches it. But it can give you a starting point that you can clean up with some tedious cloning.
Remove Tool
The latest Photoshop tool is the Remove Tool. You draw over the object you want removed and then it uses artificial intelligence to figure out what should be there. From what I've seen so far, it works much better than Content Aware Fill.
Cropping
This is the simplest and often the best approach. If you can, just crop your image so that the unwanted object is no longer in the image.
This is a nice enough picture, but I don't like the trash cans on the bottom right. I could clone them out, but that would take me 20 minutes.

Here is the same image using Content Aware Fill on both the text and the trashcans. You can see that it did a bad job with the details for both areas.

Here is the same image with the trashcans removed using the Remote Tool. Not perfect, but good enough for most purposes. I could clean it up a bit with clone tool (maybe 1 minute) and it would look good.

Here's what I think is the best approach for this picture. Just crop out the trashcans. Problem solved.

Here is a dance picture with some distracting heads in front of the subject.

Here's what it looks like after the heads and microphone were removed using the Remove Tool. The heads and the microphone area gone. At first glance, it looks great. Then you notice that the cheerleaders where the heads were lost their feet!

To bring back their feet, I copied similar booted feet from other dancers. If there weren't other dances to copy from in this picture, I could have gotten them from another picture, but the further removed you are, the harder it is to match the look. I used the Free Transform tool to size the new boots reasonably and then used the clone tool to blend the old lens into the new legs. It's not perfect, but it's good enough that it doesn't draw your eye to it (I hope).

I do this "borrowing" technique on a lot of group pictures. In the most trivial case, I take 3 pictures of every group picture. If someone is blinking in picture 1, I copy their eyes from picture 2 or 3. In more complex cases, like family portraits with squirming kids, I've had to grab faces from several different photos to get one picture where everyone is looking at the camera and smiling. In some cases, it is as easy and copying and pasting. In other cases, it is a complex job of dealing with shifted limbs, moved hair, and other differences.


