Mickey Lamp Posts

The painter's tape on the globe sounds like a great idea. I'm planning on making a second, so I'll try that next time.

As far as cutting the hole in the top of the milk can - do you have any tips?

I'm using an 18V cordless drill with a Milwaukee bi-metal hole saw, but I'm not making much progress.

ETA: Yours looks great BTW and I'm digging the Mickey head by your front door!

Thanks rab 1022. I actually did not cut a hole in the lid for much the same reason you are running in to. I used a hole saw and cut a wooden disk from a piece of 2x6 that would fit inside my post. I bolted the disk to the lid using the hole made by the hole saw. It is easier to drill a hole for a carriage bolt than cutting a large hole using the hole saw.
I then slid the post over the disk and put a couple of screws through the post to hold it to the disk. I am able to take the lamp apart at the lid for transport.
 
Just realized I didn't put a picture of my finished light on here. Notice the green glow to match my Dis sign.

 
Just realized I didn't put a picture of my finished light on here. Notice the green glow to match my Dis sign.


Looks great!

2 questions for you:

- How is your post secured to the bottom of the can? Did you use the post mount and just slip the post over it?

- Is that chain for security? Have there been reports of these lamps "walking away"?
 
When drilling plastic with the hole saw, run the drill in reverse. The teeth on the hole saw are too aggressive to run forward. This will keep from cracking the plastic.:wave2:


Looks great!

2 questions for you:

- How is your post secured to the bottom of the can? Did you use the post mount and just slip the post over it?

- Is that chain for security? Have there been reports of these lamps "walking away"?

Originally I just stuck the post in the can secured by the white landscape rocks. I eventually used epoxy to make it semi-permanent. I plan to add a lid when I locate one.

Yes the chain was for security for the lamp post and the cart charger. I haven't heard of any thefts of lights but yes definitely of chargers. I think I was a little paranoid since I had just made the lamp. It was also Halloween and there was so many extra people driving around. I just felt better with the chain.
 
I just bought my metal milk can for my base and look forward to building our Mickey Lamp Post for our up coming FW trip.
 
rab1022 said:
Looks great!

2 questions for you:

- How is your post secured to the bottom of the can? Did you use the post mount and just slip the post over it?

- Is that chain for security? Have there been reports of these lamps "walking away"?

Flametamr,
FYI, I ran across a lid only on Ebay. It's the flat lid so you will be able to modify it for your pole.


I used a Dremel with a small disc to cut the holes for mine. It melted the plastic more than cut, but no problem with cracking. That was years ago and other than re chalking they are still going strong.
 
Flametamr said:
Thanks I will look again.

Your welcome!
My Milk can and multi colored light bulb arrived yesterday. I will be constructing mine soon. I chose aluminum parts for longer life while exposed to the Florida elements . If all goes well with this one I will offer to build these for those who are not construction savvy!!
 
myjourney said:
Where can I get a milk can?

Well you can try an antique shop, craigslist, Ebay or even Etsy. I found mine on Ebay at 40.00 plus 40.00 for shipping. They range from 30.00 up to 150.00. I would like to suggest you look for the 10 gallon size which is the larger one. This will give you a bigger base for stability.
 
Finally completed our Mickey/Minnie Lamp Post. One side is Mickey and the other is Minnie. I am available to make either one of these for those who can not. If anyone is interested in having one built by me then feel free to PM me. See you at the Fort!
Screenshot_2014-08-07-09-30-44-1_zps411cc82c.png
[/URL][/IMG]
 
We had a great time at Loop 2012 this past week and even though it rained everyday. We are selling our tents and buying a Pop Up....:thumbsup2

20140811_181459-1_zps7c22fe01.jpg
[/URL][/IMG]


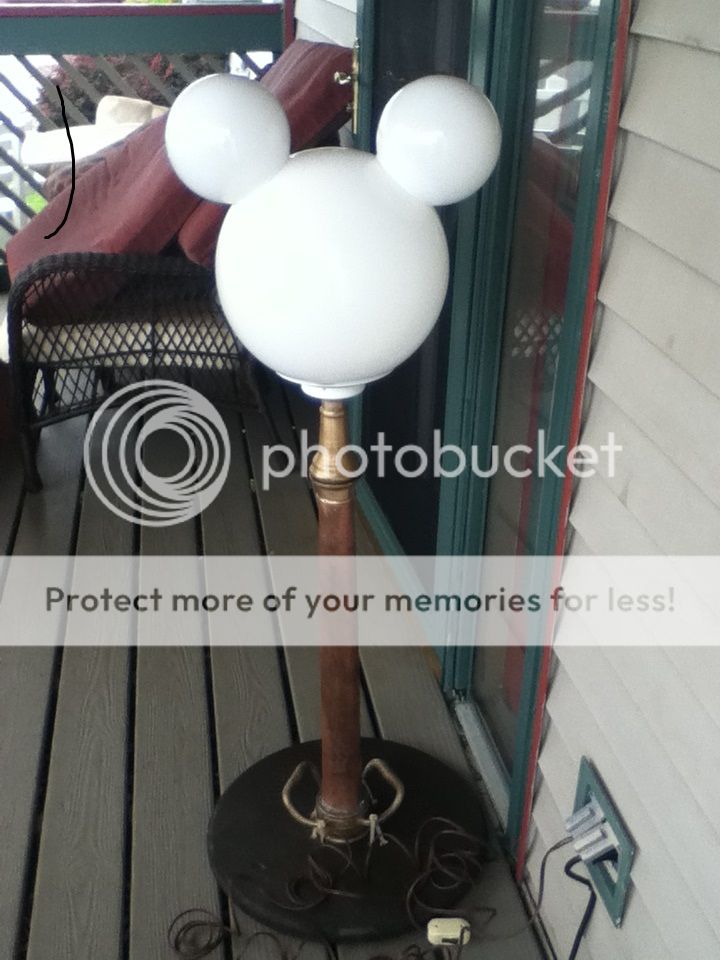
Thanks for all the tips on making the lamp. Being a retired firefighter I mounted the lamp on a nozzle I received from a flea market. I also put a on off switch in the cord for ease of use. The lamp contains a plug inside the nozzle. This way I can break the whole lamp down for easy storage. Thanks again!


Thanks for all the tips on making the lamp. Being a retired firefighter I mounted the lamp on a nozzle I received from a flea market. I also put a on off switch in the cord for ease of use. The lamp contains a plug inside the nozzle. This way I can break the whole lamp down for easy storage. Thanks again!

Nice use of the antique nozzle.
 
After years of talking about it My husband made me my light today. Can't wait for our next Disney trip to show it off :cool1:
 
Thanks, it was all the great tips I received. Be down for two weeks in Sept. showing it off lol.
 

GET A DISNEY VACATION QUOTE

Dreams Unlimited Travel is committed to providing you with the very best vacation planning experience possible. Our Vacation Planners are experts and will share their honest advice to help you have a magical vacation.

Let us help you with your next Disney Vacation!


facebook twitter
Top