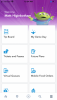
Ok now on the app if you click on the 3 lines on the bottom right corner this screen with a bunch of things to click on will come up. I’ll just briefly describe what all these things are.
Tip Board- I’ll discuss in detail later but this is where you can see a list of all the rides with their wait times and
lightning lane return times.
My Genie Day- this is where you can tell the app what you want to do that day and what you want to see first on your tip board, where your lightning lanes to redeem show up, and where a bunch of completely useless recommendations will show up LOL. More on that later
Tickets and Passes- this is where you can most easily link all your park tickets and you can use this part of the app to scan your ticket at the park gate. With a normal park ticket when they scan this they’ll give you a paper ticket. But with a magic key (which is what I have) they don’t. So I use this part of the app to scan my magic key every time I enter a park, although I have a screenshot of it just in case.
Future Plans- honestly you don’t really need this, it just shows what park reservations, dining, etc you have for the future. The only use for this is really just to make sure your reservations haven’t been deleted
Virtual Queues- you won’t need this. Virtual queues used to be for Rise and WEB Slingers, but they just do standby/lightning lane there now. They can technically turn VQ on for either of them at any time but that hasn’t happened yet even during Christmas break. So just assume it’s standby/LL only.
Mobile Food Orders- this is obviously where you go to make a mobile order. You select a time window to go pick it up. Definitely use this, you save a lot of time
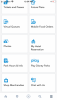
Photos- one HUGE perk of genie+ is you get free photos! This is where you link them. Whether or not you bought genie+ you can link them here but if you didn’t buy genie+ that day there’s a watermark on your photos. Just click on photos and then “link photos.” There are 3 ways to link photos (one is for rides, the others are for photos you get in front of the castle, the Falcon, etc):
1. Attraction photo ID. For Space, Splash, Racers, Guardians, and Incredicoaster when you get off and see your photo on the screen there will be an ID (a letter followed by several numbers). Take a photo with your phone of the ID and then you can type that ID into the app.
2. Show photopass code. When you get photos taken have the photopass photographer scan your QR code from the app (I don’t want to post mine for obvious reasons but it’s under “show photopass code.”
3. If you don’t have that QR code available to scan the photographer will give you a photopass card that you can scan through the app under “link photopass card.”
(Note this will likely change later this year when magic bands come)
My Hotel Reservation- I’ve never personally used this since I think paying thousands of dollars to stay at a hotel I’m just gonna sleep at and have no perks whatsoever is a waste. But if you do have a hotel reservation it’ll show up here
Park Hours & Info- this is just where you can see a calendar with park hours, ride closures, and the entertainment schedule for today. Park hours on the website are much more detailed (the entertainment schedule shows for every day for the next 6 weeks). You can get to this on the main page of the app
Play Disney Parks- this is just basically a link to download the Play Disney Parks app
Shop Merchandise- this is just a link for
Shop Disney
Chat with Us- this opens a chat with a Disney cast member. This was helpful when on my first day this last trip I couldn’t buy genie+ at first and I was able to get help fairly quickly.