zackiedawg
WEDway Peoplemover Rider
- Joined
- Aug 5, 2008
- Messages
- 3,882
A few of you have seen my past experimentations at Disney with the ND400 filter...an 8-stopper...and I had been waiting for a trip to Disney in cooler weather to whip it out and try some more.
This past Mousefest weekend was the perfect time - a cool front brought highs in the 60s and lows in the 40s, crisp, clear, and cool sunny skies, good light, and lots of crowds to streak their way through the shots.
It does take a little time to do these shots...since they require tripod setup and exposures of 5 to 30 seconds or more. But they're a lot of fun and the results are usually sharp, detailed, and nicely colored with the streaky, ghostly effect typically seen in night shots...but in broad daylight. These shots can be used two ways - one to intentionally show streams and rivers of people beaming through the shot, and the other to expose for so long that people effectively disappear from the shot making the parks look less crowded than they are. I like the streaky ghost shots, so I take those the most. I was traveling with a friend, so I was a bit more limited - I couldn't shoot absolutely everything I wanted to shoot, but threw in shots wherever I could as we walked around.
I started in Epcot...Mission:Space seemed like a spot that was tailor-made to have people beaming and transporting at warp speed through the shot:

The crowds streaming through the Innoventions east gateway:

We were at Epcot late in the day, and it quickly moved to night...so no more ND400. The next day, I went to Magic Kingdom, and out came the filter again. Here's Town Square, bustling as usual as seen from Main Street Station's 2nd floor deck:

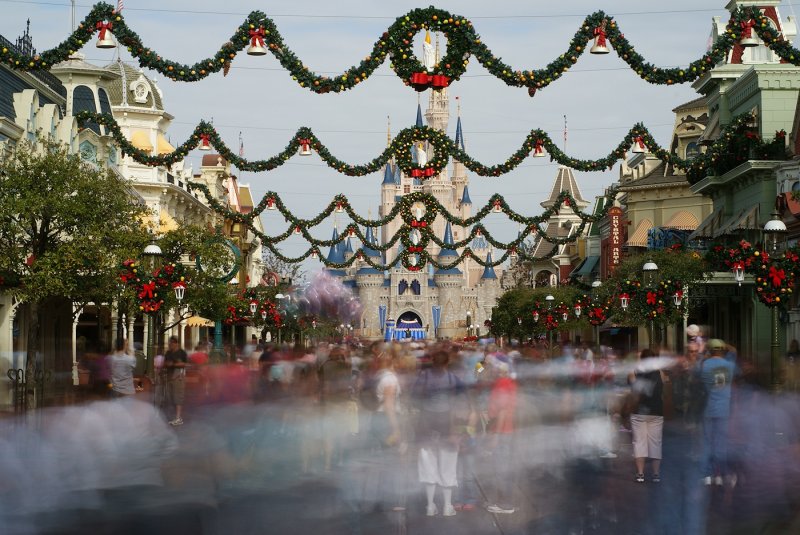
Looking up a Christmas-decorated Main Street to the castle, through the ceaseless crowds:

Here are some ghosts going over Tom Sawyer island's barrel bridge:

Here's an example of using the filter and a long exposure to eliminate people from a shot. 13-second exposure here of Haunted Mansion was enough to erase the entire line of people waiting under the red tarp, as they slowly kept moving forward during the exposure and were shaded from the sun:

Here's another - a 25-second exposure almost eliminated all the people - and believe me, there were alot of them! - from in front of the castle:

30-seconds virtually eliminated everyone from the bridge to Liberty Square...just a hint of ghosting can be seen across the bridge from bright colored shirts:

Here's another 25-second shot of the masses on Main Street, taken from a lower perspective and looking back towards Town Square:

This gives you an idea of how crowded Casey's Corner is, with a 25-second exposure:

A 25 second exposure at the Tomorrowland entrance makes it seem like alot of people in the future will be teleporting around instead of walking!:

There they all go...the late-day commuters teleporting into Tomorrowland:

Of course, the ND400 also gives you ice-glazed water surfaces and silk-ribbony waterfalls:

Camera used was the Sony A300, and the lens was a Minolta 50mm F1.7, stopped down quite a bit. I hope to soon pair the ND400 with another lens, but due to the filter threading, I'm limited to only the 50mm until I get a step-down ring!
Comments, questions, critique always welcome.
This past Mousefest weekend was the perfect time - a cool front brought highs in the 60s and lows in the 40s, crisp, clear, and cool sunny skies, good light, and lots of crowds to streak their way through the shots.
It does take a little time to do these shots...since they require tripod setup and exposures of 5 to 30 seconds or more. But they're a lot of fun and the results are usually sharp, detailed, and nicely colored with the streaky, ghostly effect typically seen in night shots...but in broad daylight. These shots can be used two ways - one to intentionally show streams and rivers of people beaming through the shot, and the other to expose for so long that people effectively disappear from the shot making the parks look less crowded than they are. I like the streaky ghost shots, so I take those the most. I was traveling with a friend, so I was a bit more limited - I couldn't shoot absolutely everything I wanted to shoot, but threw in shots wherever I could as we walked around.
I started in Epcot...Mission:Space seemed like a spot that was tailor-made to have people beaming and transporting at warp speed through the shot:
The crowds streaming through the Innoventions east gateway:
We were at Epcot late in the day, and it quickly moved to night...so no more ND400. The next day, I went to Magic Kingdom, and out came the filter again. Here's Town Square, bustling as usual as seen from Main Street Station's 2nd floor deck:
Looking up a Christmas-decorated Main Street to the castle, through the ceaseless crowds:
Here are some ghosts going over Tom Sawyer island's barrel bridge:
Here's an example of using the filter and a long exposure to eliminate people from a shot. 13-second exposure here of Haunted Mansion was enough to erase the entire line of people waiting under the red tarp, as they slowly kept moving forward during the exposure and were shaded from the sun:
Here's another - a 25-second exposure almost eliminated all the people - and believe me, there were alot of them! - from in front of the castle:
30-seconds virtually eliminated everyone from the bridge to Liberty Square...just a hint of ghosting can be seen across the bridge from bright colored shirts:
Here's another 25-second shot of the masses on Main Street, taken from a lower perspective and looking back towards Town Square:
This gives you an idea of how crowded Casey's Corner is, with a 25-second exposure:
A 25 second exposure at the Tomorrowland entrance makes it seem like alot of people in the future will be teleporting around instead of walking!:
There they all go...the late-day commuters teleporting into Tomorrowland:
Of course, the ND400 also gives you ice-glazed water surfaces and silk-ribbony waterfalls:
Camera used was the Sony A300, and the lens was a Minolta 50mm F1.7, stopped down quite a bit. I hope to soon pair the ND400 with another lens, but due to the filter threading, I'm limited to only the 50mm until I get a step-down ring!
Comments, questions, critique always welcome.
")
 - the one of the Haunted Mansion with "no one" in line is great, I would have thought no matter how long the exposure there would always be at least some ghosting if people were around. Can't wait to try mine out (whether in Disney or elsewhere) - couldn't justify the 77mm so I stuck with the 52mm.