Photo Sharing: Photoshop Wonders

BirdsOfPreyDave

Disney Lover, DVC Member, SSR Fanatic
DIS Lifetime Sponsor
Joined
Jul 22, 2006
Messages
5,539
(I went back 5 or 6 pages and don't see a similar thread. If it's out there, please feel free to pelt me with rocks and garbage.)

Photos that have had a lot of post processing done on them aren't always welcome in other threads, but that's not the case here. This is the place to show us the true wonders you've worked with Photoshop, Paintshop, or other software products. Amaze us with your digital darkroom miracles!

We want to see the full range of what can be done, so feel free to post everything from simple cropping and color corrections to full-out image manipulation. Was that really you in the 3 O'Clock parade that day, or are you really good at cutting and pasting? Is that abstract piece of art something out of the Metropolitan Museum, or the result of a cool technique you've mastered with Photoshop filters? Show us how striking B&W can be. Have a shot that was absolutely awful -- until you breathed new life into it with your computer? Post it! Bring on the HDRs, too! (There's love for them here.)

Please show us both the before and after photos, when possible. Also please tell us what software you used and describe any special techniques.
 
Ok, I'll go first. But I'm really just learning the software.

BirdsOfPreyDave.jpg


From:

Magic_Kingdom11.jpg
Epcot4.jpg


Edited in Photoshop CS5.1. Content aware fill to remove lamp post and chain from castle photo. Content aware fill and clone stamp to remove lanyard, camera strap, name tag, and some sweat from the picture of me. Smart edge selection and edge refine to cut myself out of the Epcot photo.
 
I hope more will post. I'm looking at getting into photography. I have always been into it. Recently, I have been messing around with my own pictures in something like Picnic. When I get my 1st Dlsr in a few days )Likely the Nikon 3100, I would be looking at software next.) This could be a GREAT learning thread! Especially if you all list what you did in post and what software.
 
This could be very interesting... did you only want Disney pics? Or does anything go?
 

Not to sound crazy but DH says that he is impressed especially with the chest portion, it is hard to get details like that to look good, especially with skin colors and transition from skin to shirt, you even added some sweat.
 
Those who foresake Photoshop are missing out on opportunities to turn something bland into something useful. It doesn't have to mean manipulation, but that's handy when you need it.

I took this shot of the Beanstalk on a bland, overcast day.

Camera_Shot.jpg.scaled.1000.jpg


I could just say, "Well, the weather sucked, but those are the rules of photography!" Maybe I could go back another time when the weather is great? Another option would be to take pictures of the sky on nice days and use it to replace the bland, overcast sky.

The_Beanstalk.jpg.scaled.1000.jpg
 
I took this shot of the Beanstalk on a bland, overcast day.

Talk about adding interest to a photo. Nicely done!

And no, I haven't forgotten to post to this thread. Having computer troubles and haven't found the time to get my photo files off the old 'puter yet.
 
Did you specifically add some blue to the leaves, or was that just a result of the overall brightening of the image?
 
Did you specifically add some blue to the leaves, or was that just a result of the overall brightening of the image?

Nope, I didn't add any blue. However, I did some other post processing on the final image and that may have added some of the blue cast on the leaves.
 
Okay, this one is giving me a real challenge. It was taken at a playground, and she's crawling through a yellow plastic tunnel. So of course, the white balance is horrible. I don't want to take away all the yellow, but I also would rather her not look like an Umpa Lumpa.

Exploring the jungle gym at the playground by BirdsOfPreyDave, on Flickr

The problem is that a normal white balance shows through for the circle of playground behind her. If I adjust the white balance for her, it totally blows out the background.

Exploring the jungle gym at the playground by BirdsOfPreyDave, on Flickr

I've created a virtual copy of the image in Lightroom, and adjusted two different white balances (the two photos, above)... one image balanced for inside the tunnel, and the other balanced for the circle of sunlight behind. I've then merged them as layers into Photoshop CS6, and used a mask to cut her out of the tunnel layer so the photo white-balanced for her shows through. It looks much better, but I'm still seeing some glowing blue around the edge of her coat. I've touched it up a little by warming up and desaturating those spots a little with brush back in Lightroom, but I'm still not satisfied. Maybe also a 3rd layer for her fingers. It looks a little like she's been finger painting with pink paint.

Exploring the jungle gym at the playground by BirdsOfPreyDave, on Flickr

Back to Kelby Training to re-watch the videos on Photoshop selections and masks, again. I think I'm on the right track, just need to hone my skills some more.
 
Here's one.
I thought the tractor shot had potential but the background was awful.

tractof150orig.jpg


I Went into my archives and found a barn/foliage shot I had taken where the sun was at a similar angle.
Took some time doing the extraction with the pen tool. I paid attention to the details to make the composite as convincing as possible. Each of the tines on the roller at the back of the trailer, all of the control levers, the openings in the engine bay were all had to look right.
In the final I removed some of the background blur I had introduced and in a 12x18 print I made there is virtually no tell-tale that this is photoshopped.

tractor150done.jpg
 
Very nice. Lot of work in that one. If I ever get my photos off my almost dead computer, I'll post too. :sad2:
 
Here's one.
I thought the tractor shot had potential but the background was awful.

tractof150orig.jpg


I Went into my archives and found a barn/foliage shot I had taken where the sun was at a similar angle.
Took some time doing the extraction with the pen tool. I paid attention to the details to make the composite as convincing as possible. Each of the tines on the roller at the back of the trailer, all of the control levers, the openings in the engine bay were all had to look right.
In the final I removed some of the background blur I had introduced and in a 12x18 print I made there is virtually no tell-tale that this is photoshopped.

tractor150done.jpg
That's an exemplary job of compositing. The tractor image is a good candidate for it (despite the tedious path-building you had to use to make the mask or selection); it allowed you to completely hide the transition "behind" the foreground elements of the tractor, the wagon, and the stacked wood. And the background image is a good match as well. Not only does it fit the foreground in terms of subject matter and "emotional tone" (i.e., the background looks like it really could have been the real background to the scene), but there's just enough sunlit grass visible in the lower left third to match the grass in the foreground.

Kudos!

SSB
 
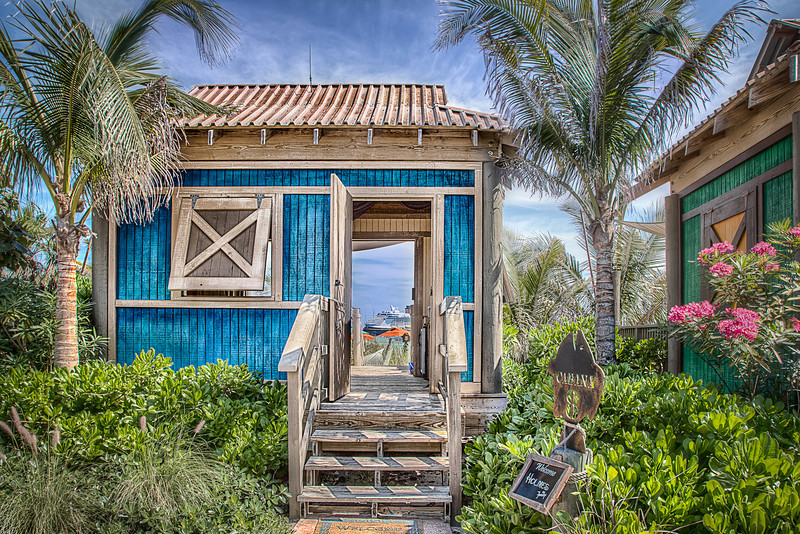
From our recent visit to Castaway Cay. This is a 3-exposure handheld HDR. Tonemapped in Photomatix, then further processed by blending layers in Photoshop. Finished in Nik Color Efex Pro 4 to bring out the detail in the cabana. A little cheesy perhaps, but it makes a very nice print, and I find the family likes this type of processing:


CabanaHDR-8-L.jpg
 
I'll post. I don't know much, but I'm learning and trying to learn. I don't know if the OP had this in mind, but please feel free to critique and offer something constructive.

I shoot in raw+jpeg because I know I'll want to improve as I learn... :rotfl: meaning that I may not know how to fix something now, but later on I might want to! And I do know how to adjust the exposure a little bit and the white balance, so I like to be able to do that if my trusty "auto white balance" doesn't do the job as well as I'd like it to.

So here's the jpeg version.


Eeyore 1 by disneyfreak0306, on Flickr

I adjusted the white balance, maybe the exposure and I did up the contrast and sharpen a little. (Took maybe 5 seconds, really not much editing in the DPP program).


Eeyore 2 by disneyfreak0306, on Flickr

Then I opened in Photoshop Elements and I cropped and then used the Topaz plug in. I liked the more faded (desaturated?) look for Eeyore.


Eeyore 3 by disneyfreak0306, on Flickr
 
This is a picture form Flower and Garden. I did not like the background so I took it out and replaced it with some clouds I saw one night I was running.

7061608389_f6eb162d46.jpg
 
Bumping this thread up again... I'll try another one. (Just posted about this in another thread, so I figured I'd put it here, too.)


I wished there was a little more separation between the subject and the background in this picture, so I attempted to alter the depth of field. There are actually three separate layers applying different levels of gaussian blur. The first is a gradiant going diagionally up and to the right to give a small amount of blur to the bushes. The second is up the tree trunk on the left, giving it a very slight blur. And the third, the strongest, is applied to the torii gate itself. The bonsai tree also has layers to separate it from the various blurs and to apply curves to brighten it a bit.

Here are the before and after:


Bonsai Trees at the Japan Pavilion by BirdsOfPreyDave, on Flickr


Bonsai Trees at the Japan Pavilion by BirdsOfPreyDave, on Flickr


Receive up to $1,000 in Onboard Credit and a Gift Basket!
That’s right — when you book your Disney Cruise with Dreams Unlimited Travel, you’ll receive incredible shipboard credits to spend during your vacation!
CLICK HERE


DIS Facebook DIS youtube DIS Instagram DIS Pinterest DIS Tiktok DIS Twitter

Back
Top