Magic Kingdom Sketch Swap~CLOSED

Oh, that's awesome Buffy!

As far as bagging, I don't think there needs to be anything special done for your extra pieces, it should be fairly obvious what goes with what, right?

I'm very disappointed in SYT. I really love their papers for this set of swaps especially. At this point, I ordered over three weeks ago and my order hasn't even shipped. :furious:
 
OMG Storybook Circus is done!!!!!

I put the gallon bag on top, the finished page in the middle and the blank page on the bottom. Let me know if you want me to change them. I just need to slide a page with all the photo layout options in the ziplocs but I want to print those in color which means dragging the printer out to plug it in to the computer. I will do all of those at once.

Sketch
photo1-2.jpg


Layout:
photo2-2.jpg

Buffy, just checking...Are you including photo mats with your sketch, or are those just there to show where the photos will go and which size?
 
Buffy, just checking...Are you including photo mats with your sketch, or are those just there to show where the photos will go and which size?

The red on the left is an adhered mat. (some of the other pages have different colors) the rest are just to show placement. I was back and forth on the mats or no mats. Nothing really looked right, but no mat looked best when I tried it out with pics I had.
 

Jen, just to clarify, I can add photo mats say 4 1/2 x6 1/2 or just a place holder 4x6 that the pic would cover up?

I'm still deciding in sketches....
 
Honestly, I would prefer photo mats if at all possible.

You should have at least a 4x6 piece (for a 4x6 photo, for instance) for each photo, if possible. Then the person can just cut down to 3 3/4 x 5 3/4. You may double mat them (make your bottom mat a 1/4 larger), or single mat them (4x6 is fine), but there should be a mat, I think.

A lot of people are already done. What is the consensus here?

ETA: By placeholder, I meant a "usable" photo mat that the person could just cut their photo down to fit.
 
I made 4.25 x 6.25 mats on mine (or .25 x .25 larger if it was another size)... but that was just what worked best with my LO..

It doesn't matter to me either way... I don't always use photo mats on LOs even if the sketches show them... I also figured if they didn't send mats and I wanted to make them since the instructions I thought included supplies, then I could go buy a piece to make mats if I wanted them... but that is just my 2 cents...
 
I did 4.25 x 6.25 also and included PM for all on my LO's okay if some don't/didn't
 
Ok, cause when I see photo mat I think 4.25x6.25 min. To have the .25 inch border. Place holder is 4x6 to me. So if you want to cut your pic down you can or just use a 4x6 and cover it up if it fits/looks better.

That's why I needed to clarify. :goodvibes that and I am really lazy and didnt want to search the whole thread :rolleyes2
 
I also made my mats 4.25 x 6.25 for the most part. My one layout has an 8 x 12 space for pics so I made it 8.5 x 12 so there would be a .25 border on each side KWIM.
 
haunts.jpg
[/IMG]
partners.jpg
[/IMG]
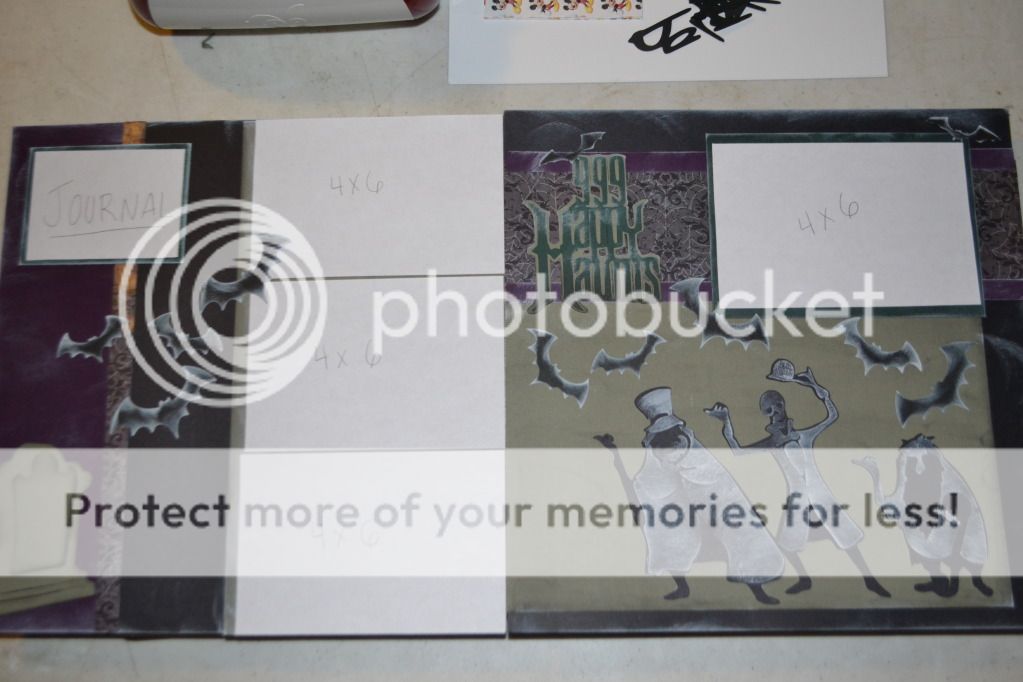
My one layout has mats included, the other doesn't. Do I need to go back and make mats? I didn't like the layout with mats, so I just cut white placeholders to show how the layout would look.

I also went rogue on my layouts. Had sketches picked, but tinkered with them and now they aren't so much like the original layouts. Would you like me to print pictures of what they should look like, or the orginal sketch?

I really hope I did these right. On the haunted mansion page: left side background papers are all glued down. In the bag will be the tombstone and bats (no photo mats on this one - unless you decide you want just white papers to show placement). The right side title page is completely assembled.

On the partners page (I'm using a couple different papers for this one, but all red/black/yellow/white), left side background papers all glued down. The bag will hold the photo mats and any additional embellishments (do you think it needs anything else?). Right side is completely assembled.
 
OMG Storybook Circus is done!!!!!

I put the gallon bag on top, the finished page in the middle and the blank page on the bottom. Let me know if you want me to change them. I just need to slide a page with all the photo layout options in the ziplocs but I want to print those in color which means dragging the printer out to plug it in to the computer. I will do all of those at once.

Sketch
photo1-2.jpg


Layout:
photo2-2.jpg

Love this layout! Can't wait to see the new fantasyland in person.....10 years from now! :rotfl2: Maybe Publishers Clearinghouse will show up at my door?
 
They look awesome Danielle. It seems like with or without mats is fine.

And, no worries on sketches and tinkering, they're supposed to be "inspiring." If you want to post the sketches here I'll post them in the first few posts of the thread. No biggie either way.

I'm home with a sick kid. Hoping to get a little computer file designing done.


Receive up to $1,000 in Onboard Credit and a Gift Basket!
That’s right — when you book your Disney Cruise with Dreams Unlimited Travel, you’ll receive incredible shipboard credits to spend during your vacation!
CLICK HERE


DIS Facebook DIS youtube DIS Instagram DIS Pinterest DIS Tiktok DIS Twitter

Back
Top