boBQuincy
<font color=green>I am not carrying three pods<br>
- Joined
- Nov 26, 2002
- Messages
- 5,086
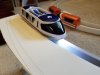
Disney's 50th Anniversary monorail is a nice model with a lot of new features. But... the lack of headlights is a "fail". Not that I ever liked the old green headlights and usually replaced them with white ones so of course I am going to add white headlights to the new monorail.
It takes less wiring and parts than the older monorails but disassembly is more work. One note: keep track of all the screws, they are not all the same!
* it is not necessary to uncouple the cab from the rest of the train but it sure makes the job easier.
parts: two 0603 white LEDs with wires
150 ohm 1/4 watt or (smaller) resistor
a few inches of wire, 26 to 30 awg
a connector if you want to get fancy and/or make life easier
tools: soldering iron, pin vise, drills (1.5 mm, 2.5 mm)
Level of Difficulty - high
1 - remove the screw from the underside of the coupler between the cab and the first car
2 - remove four screws from the bottom of the first car
2a - remove the top shell of the car and the gray plastic diaphragm
3 - disengage the coupler by pressing in and down on the two semicircular clips
3a - press the clips down/cab down/car up to disengage the coupler
4 - remove five screws from the lower shell of the cab
5 - gently separate the upper and lower shells
it is best to have some sort of stand to hold the monorail so it does not separate too far
the wires are probably fragile and break easily if bent too much
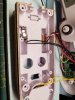
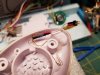
6 - remove the screws holding the circuit board in front (upper shell)
7 - solder 40 mm long wires to the two points on the circuit board shown in the photo
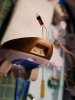
8 - solder a 150 ohm resistor in series with one of the wires (doesn't matter which one)
cover the resistor with heat shrink tubing
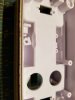
9 - drill holes for the headlights
I drilled 2.5 mm holes (centered on the white circles) and installed 0603 white LEDs with 150 ohm resistors.
the holes were drilled in stages: 1.5 mm; 2 mm; 2.5 mm
3 mm LEDs (a standard size) may not fit as the holes would be into the bottom of the shell
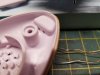
10 - assemble two LEDs to fit into the headlight holes - be mindful of the polarity - secure with silicone adhesive
11 - solder the + wire to the + of the LEDs, - wire to the -, resistor in one of the leads
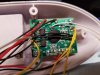
12 - put it all back together
It takes less wiring and parts than the older monorails but disassembly is more work. One note: keep track of all the screws, they are not all the same!
* it is not necessary to uncouple the cab from the rest of the train but it sure makes the job easier.
parts: two 0603 white LEDs with wires
150 ohm 1/4 watt or (smaller) resistor
a few inches of wire, 26 to 30 awg
a connector if you want to get fancy and/or make life easier
tools: soldering iron, pin vise, drills (1.5 mm, 2.5 mm)
Level of Difficulty - high
1 - remove the screw from the underside of the coupler between the cab and the first car
2 - remove four screws from the bottom of the first car
2a - remove the top shell of the car and the gray plastic diaphragm
3 - disengage the coupler by pressing in and down on the two semicircular clips
3a - press the clips down/cab down/car up to disengage the coupler
4 - remove five screws from the lower shell of the cab
5 - gently separate the upper and lower shells
it is best to have some sort of stand to hold the monorail so it does not separate too far
the wires are probably fragile and break easily if bent too much
6 - remove the screws holding the circuit board in front (upper shell)
7 - solder 40 mm long wires to the two points on the circuit board shown in the photo
8 - solder a 150 ohm resistor in series with one of the wires (doesn't matter which one)
cover the resistor with heat shrink tubing
9 - drill holes for the headlights
I drilled 2.5 mm holes (centered on the white circles) and installed 0603 white LEDs with 150 ohm resistors.
the holes were drilled in stages: 1.5 mm; 2 mm; 2.5 mm
3 mm LEDs (a standard size) may not fit as the holes would be into the bottom of the shell
10 - assemble two LEDs to fit into the headlight holes - be mindful of the polarity - secure with silicone adhesive
11 - solder the + wire to the + of the LEDs, - wire to the -, resistor in one of the leads
12 - put it all back together
Attachments
-
 20220220_180823_resized.jpg48.7 KB · Views: 5
 -
 20220220_181916_resized.jpg28.4 KB · Views: 5
 -
 20220221_110824_resized.jpg52.5 KB · Views: 6
 -
 20220221_110838_resized.jpg47.6 KB · Views: 6
 -
 20220221_160456_resized.jpg78.1 KB · Views: 6
 -
 20220222_095456_resized.jpg65.6 KB · Views: 6
 -
 20220222_095521_resized.jpg31.4 KB · Views: 7
 -
 20220222_170955_resized.jpg49.3 KB · Views: 7
