Taking Night Pitures at Disney?

ValinWV

DIS Veteran
Joined
Mar 27, 2009
Messages
658
I am not sure if I am posting this in the correct place. Sorry if I have not.;)

I have a Koday Easy Share P880 digital camera and for the most part I do not have any problems taking pictures. However, anytime I try to take a picture at night say of Spaceship Earth at Epcot or Main Street at the MK they either come out blurry or too dark. I have tried several settings on my camera and I don't know what I am doing wrong. Of course pictures that I take close up with a flash come out fine when it is dark, but its those shots that are far enough away that flash won't work. I used to take these pictures at Disney with my old camera that you had to load film into, you know one of those antiques, but I can't do it with this much nicer camera.

Can anyone help? Advice? or where to look (which thread) to get some of my questions answered?

TIA:goodvibes
 
You have to keep the camera still because the shutter stays open longer to let enough light in, so any little tiny movement will cause blur. Find a trashcan, put the camera on it, set up the shot using the two second timer, then hit the shutter release button. It should work pretty well. (Make sure nobody's shaking the trash can and do not use flash.)

You can experiment a bit with different settings (and possibly raise the ISO a little if you can or must). If you want to to make it a little easier to see what you're doing, buy one of those tiny tripods and screw it into the bottom of your camera before you place it on the trash can. You may also consider a gorillapod for a little more flexibility in where to place the camera to keep it still.

BTW, when I first read this tip here on the Dis, it opened up a whole new world to me. Good luck.
 
Blurry pictures come from 4 possible reasons:

1 The camera is broken
2 The lens is not focusing properly ie: the camera is broken
3 The subject of the picture moves while the camera is taking the picture. I doubt Spaceship Earh moves that much!

4 The camera moves while the picture is being taken.

A well trained professional can sometimes take a hand held at around 1/15th of a second and have it come out acceptable. Maybe a little slower if the camera/ lens has image stabalization.

For a point & shoot at Disney at night even set on night if the camera has thant setting you are probably getting camera shake by you! Even pushing the shutter causes the camera to move! You will probably need a tripod or at least something to put the camera on. If the camera has a delay setting use that so you are not touching the camera while the shot is being taken. It is probably the limitation of the camera and your practice rather than something wrong with the camera. I could get in to manual settings and Fstops etc. but that is the simple answer to your question.
 

You have to keep the camera still because the shutter stays open longer to let enough light in, so any little tiny movement will cause blur. Find a trashcan, put the camera on it, set up the shot using the two second timer, then hit the shutter release button. It should work pretty well. (Make sure nobody's shaking the trash can and do not use flash.)

You can experiment a bit with different settings (and possibly raise the ISO a little if you can or must). If you want to to make it a little easier to see what you're doing, buy one of those tiny tripods and screw it into the bottom of your camera before you place it on the trash can. You may also consider a gorillapod for a little more flexibility in where to place the camera to keep it still.

BTW, when I first read this tip here on the Dis, it opened up a whole new world to me. Good luck.


Okay I plan to purchase one of these. Now my next question. Should I set the camera to auto or to night? I never know which one would be the best setting. Or should I just try them to see which takes the best picture?
 
Okay I plan to purchase one of these. Now my next question. Should I set the camera to auto or to night? I never know which one would be the best setting. Or should I just try them to see which takes the best picture?

The ideal answer would be neither. However, we have to understand that some people don't want to deal with all the ins and outs of camera controls.

Night mode is made for capturing a close subject in the dark. It dials down the flash as it figures there is someone fairly close to the camera and the entire scene doesn't need to be exposed...just them. So if you are taking a picture of main street you would probably leave it in auto. You may find the camera has trouble focusing and/or getting the right exposure at night though and so you may want to eventually learn about Tv mode(if available on your model).
 
You use night mode when you want the finished picture to look like night!

Using regular auto exposure the camera will endeavor to make the picture look like daytime (if outdoor) or a reasonably brightly lit room (if indoor). How the camera accomplishes night mode is to intentionally underexpose the picture, usually automatically selecting a faster shutter speed in the process.

Usually night mode gives better pictures of Christmas lights and city skylines at night. You will need to experiment when taking pictures of illuminated building facades (such as on Main St.) at night where illuminated subject matter makes up a large amount of the field of view and you don't want that to look too dark.

Exposure compensation can be used to fine tune either night mode or regular auto exposure if the main subject comes out too bright or too dark. Plussing the exposure compensation makes the picture as a whole brighter. Note that the camera also does automatic adjustments by averaging out the scene (you can choose to give the middle of the picture more weight) so in order to get an apples to apples comparison of what more EC or less EC did, you have to frame the scene exactly the same way each time you re-shoot.

Without a tripod you will probably want to use at least ISO 400 to get the camera to select a shutter speed fast enough so most of the time you don't end up with a blurry picture.

Now that you are back home, you can still experiment with nighttime shots to get a better feel for what ISO and what other camera adjustments you need to make.

If you got better results way back when with your old film camera than you are getting now, your film camera must have had more low light capability, notably a faster lens. Alternatively you may have been using an unusually low ISO (like 80 or 100) nowadays for your night shots.

Digital camera hints: http://www.cockam.com/digicam.htm
 
The ideal answer would be neither. However, we have to understand that some people don't want to deal with all the ins and outs of camera controls.

Actually I would love to learn and deal with all of the ins and outs of camera controls. I take lots of pictures and some are not of the quality that I am sure the camera can do. I just don't know what some settings are for and what some of the buttons are for on my camera. I definately would not mind getting more technical, however I may need the technical terms broken down for understanding.

Thanks
 
Okay if someone would be willing to educated me on what some of the following features or settings are and what they should be used for I would be very grateful.

BTW I read the manual that came with the camera several times and I couldn't find the answers to the questions that I have.

1. I have seveal settings to choose from. I usually use the SCN setting and select sport since I usualy am taking pictures of the kids who never stop moving. Under SCN I also have the following settings Sunset, Backlight, candlight, text, manner/museum, snow and beach.

I also have Flower, Night Landscape,Landscape, Antishake night portrait, Portrait, Night Portrait,Auto, P-general picture taking with exposure and flash compensation, A-aperture priority settings, S-shutter priority settings, M - Manual Settings

2. The ISO I can choose from are 50, 100, 200, 400

3.There is a button labled WB ( I have no idea what this is) the options when pushed are: Auto, Daylight, Cloudy, Open Shade, Sunset, Tungsten, Florescent, click WB

4. For picture sizes I have 8.0Mp, 7.1MP(3.2), 5.0, 3.1 and 0.8

5. File tyep Fine JPg, Standard JPG and BAsic JPG, ( I am set to Standard)

6. Low Light AF Led ( no idea what this is, should it be on or off)

7. MF assist AF ( no idea what this is either, should it be on or off?)

8. Set AE/AF lock button - AE Lock - AF lock - AE/AF lock (don't know which of these it should be set on.)

9. accessory Lens On or Off

10. AF control - Continuous AF or Single AF

11 AF Zone - Muti zone, Center Zone, Selectabel Zone

12 Sharpeness

13 Contrast

14 Slow Flash Sync - Front Sync, Front Sync Redeye, REar sync

15 Custom White Balance.

Thank you for any help you can give.
 
Generally, there are two ways to take night shots without a flash.

1. Open the camera's aperture as big as it will go (represented by the 'F' number, with a smaller number being a bigger opening...such as 'F2.8'). Raise the ISO number as high as you can stand (when you raise the ISO, you are turning up the sensitivity on the sensor - like raising the gain on a CB radio...the result is you get more statis, or noise, in your shot. How high you go with the ISO depends on how much noise you are OK with seeing in your shot, or how much loss of detail you can deal with when the camera's noise reduction smooths it all away to try to remove that noise). This will allow the camera to use a faster shutter speed - so that you can hand-hold the camera. Downside? Dark photos, lots of noise, and unless you have a very big aperture lens (not usually present on P&S cameras), you'll probably STILL not have a fast enough shutter to freeze all motion. Example: ISO800, with a lens that could only go to F3.5, handheld, straight from camera:

101086681.jpg


See all the 'texture' in the shot? Noise. It's badly underexposed, too dark, and the ISO is way up, so the noise came out.

Sometimes though, you need to get the shot, and this is the only way.

2. The other way to get a night shot without flash is to use the slow shutter technique. Use the lowest ISO setting your camera has, put the camera on a tripod or level surface, use the self-timer, press the shutter to line up the shot, then hands OFF and let the timer take the picture. Note that the camera could take many seconds to complete the shot - and it cannot move even a hair's breath during this exposure. The advantage to this kind of shot is that there will be little or no noise, the colors will be nice and rich, the camera will pick up more light than you could see with your own eyes, and things should come out nice and sharp. Example:

107208520.jpg


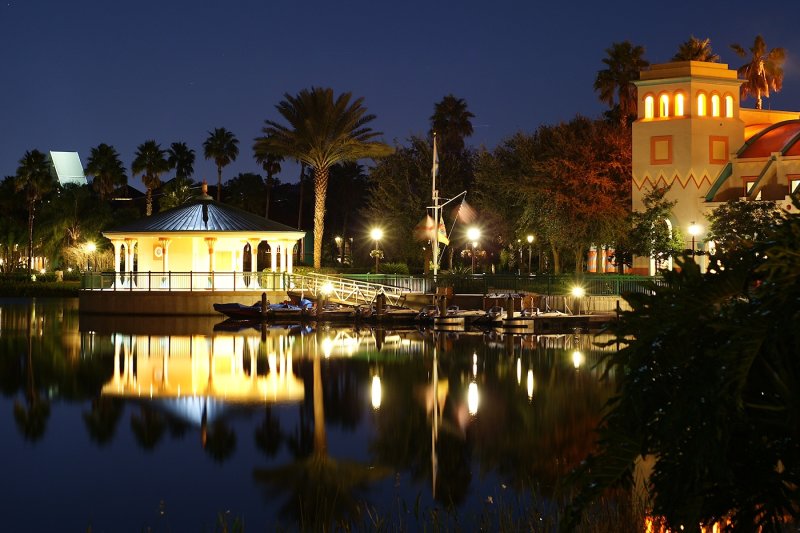
OK...so the second method is always better...right? Well, not necessarily. If anything moves through or in the frame while taking those longer shutter shots...it will be a blur. That could be cool...but maybe you didn't want that. It's up to you which method to use. Example...here's a shot taken with method #2, where people were moving through the shot as it was exposing for the buildings in the background:

108793096.jpg


See the ghost streaking through on the right? Someone moving. Not a totally uncool effect for me, and it didn't bother me. But what if I wanted to freeze the people in motion so they weren't streaky? Then I'd have to use method #1 - high ISO:

108793097.jpg


I didn't want the band to be a blur...because they were what I was taking a shot of. At night, the only option was high ISO.

Now...as for the 'scene' modes on your camera: everyone has been right in describing most night modes to be designed for taking a low level flash portrait of a person. However, some cameras may be different, and you really should check yours out. See, Sony has night modes on their P&S cameras...and there are two different kinds...Night Portrait, and Night Scene. Night Portrait has a moon icon with a flash icon...it is for taking a flash photo of a person at night and trying to expose mostly for the person and some background lights. Night Scene on the other hand is a slow-shutter mode that attempts to leave the shutter open as long as needed to get a nicely exposed landscape or scenic shot at night. It's the simple version of what skilled photographers do in Manual or Aperture Priority modes. Your camera may have a night mode like this, in which case it would be a very good, easy option for you. Of course, it would still require you to tripod the camera, or place on a level surface...and you'd still do better to take the shot with the self-timer.

I hope that helps - feel free to ask any other questions and we'll see if can help!
 
And since you posted while I was typing my book...I'll now add - your camera DOES have the night mode that will be best for you - Night Landscape. If you enter this mode, you should be able to go into the camera's menu and choose your lowest ISO setting (instead of 'auto ISO')...the Night Landscape mode will use a longer exposure to get the scene you need without the bad noise effects and dark appearance....you'll get that brighter, lighter, saturated look as in my sample #2 above. Put the camera down when using this mode...and use the self timer - point where you want, press the shutter, and get your hands OFF. The results should blow your socks off. :)
 
Thanks for all of the information. I am going to start trying these out now so I will be familiar with them before our trip in June.

Two more questions what is AE and AF?

And what is Slow flash setup?
 
AE should be automatic exposure, and AF should be autofocus. That button allows you to lock exposure and/or focus once they've been set by half-pressing the shutter, to allow you to then recompose the shot before fully pressing the shutter. I wouldn't worry about those just yet.

2. The ISO I can choose from are 50, 100, 200, 400

Generally, you want to choose 50 or 100 for any slow shutter stuff. If you're going to put the camera down and give it time to get a proper exposure, you should keep the ISO as low as possible. Only raise the ISO if you need to shoot with a faster shutter in low light, such as when you need to try to freeze motion (the band shot above).

3.There is a button labled WB ( I have no idea what this is) the options when pushed are: Auto, Daylight, Cloudy, Open Shade, Sunset, Tungsten, Florescent, click WB

This is your white balance. Generally, auto will do just fine for you most of the time. This basically controls how 'white' the color white looks in your shot. Of course, if your whites are leaning more towards the blue spectrum, that's going to throw off all the other colors too - so white balance is fairly important. If you ever take a shot, and find that it looks too blue, too red, or too yellow, try changing the white balance setting to some of those options and see how it affects the shot.

4. For picture sizes I have 8.0Mp, 7.1MP(3.2), 5.0, 3.1 and 0.8

Generally, unless you are having space issues with a small memory card, most anyone would recommend you shoot at the highest MP size - or 8MP. This will give you the most resolution for your prints, or give you room to crop the photos and still have printable results.

5. File tyep Fine JPg, Standard JPG and BAsic JPG, ( I am set to Standard)

I'd recommend Fine setting, but again, if you are having space issues or have a small memory card, then maybe you can lower it. I figure you might as well get the most out of the camera, so I'd recommend buying a plenty-large memory card and setting the camera to the Fine setting.

6. Low Light AF Led ( no idea what this is, should it be on or off)

This is that orange light that beams out when you are taking indoor photos, to help the autofocus system have some light to help it focus (when it's too dark, the camera can't 'see' well enough, and may have trouble focusing). It's fine to use when taking shots in situations where the light won't be distracting...you might want to turn it off if you are taking photos with plenty of light in the scene where it isn't necessary, or in very dark conditions like a low-light ride where it might be distracting to others.

7. MF assist AF ( no idea what this is either, should it be on or off?)
I suppose this allows you to manually adjust the focus after the autofocus has tuned in. Generally, you probably won't need it.

8. Set AE/AF lock button - AE Lock - AF lock - AE/AF lock (don't know which of these it should be set on.)
Again...don't really worry about this one. I'd probably set it to AE lock, but you really aren't likely to use or need it at this point.

9. accessory Lens On or Off

Off. This is only for when you've attached a wide-angle or tele-photo extension lens on the end of the camera.

10. AF control - Continuous AF or Single AF

Generally, you should be on single AF. The camera will focus only when you half-press the shutter button, and no other time. With continuous AF, the camera is constantly focusing, even when you aren't holding it up to your face or taking a shot. It just eats up battery for very little reason. This is really only usable when trying to shoot a moving subject that is constantly moving, and you want to take a series of shots. Set it to Single and you'll be fine.

11 AF Zone - Muti zone, Center Zone, Selectabel Zone

This tells the camera what to focus on. Multi-zone will use a 'grid', covering probably the central half of your scene, and look all over that zone for something to focus on. Good for landscapes, wide shots with nothing in the foreground. Center focus will tell the camera to not look quite so wide - it basically looks just at the middle 10th of the screen or so to find something to focus on. This lets you point the camera center box or crosshair on a subject you want to focus on, and it will focus only there. I generally would recommend this mode. Selectable just lets you move the little center box to a different location in the screen to focus on...it really won't serve you much purpose at this point.

12 Sharpeness

Generally, leave at 0...unless you don't like to do post-processing work, and find your shots a little soft. Then maybe try 1 position up.

13 Contrast

Again, best to generally leave at 0.

14 Slow Flash Sync - Front Sync, Front Sync Redeye, REar sync

This only applies when using the flash in synch mode. Don't worry about this now...you likely won't need it.

15 Custom White Balance.

Best to just stick with the auto for now...you'll be OK most of the time!


Receive up to $1,000 in Onboard Credit and a Gift Basket!
That’s right — when you book your Disney Cruise with Dreams Unlimited Travel, you’ll receive incredible shipboard credits to spend during your vacation!
CLICK HERE


New Posts


DIS Facebook DIS youtube DIS Instagram DIS Pinterest DIS Tiktok DIS Twitter DIS Bluesky

Back
Top