Apologies if something like this post already exists, but I couldn't find anything.
Back in 2018 I was quite neurotic about losing my MB because that 2-nib fixing just doesn't seem safe and found a fob adapter in a Disney shop to instead attach it to my belt. I could then pull it out of my pocket to show to (eg) Fastpass readers.
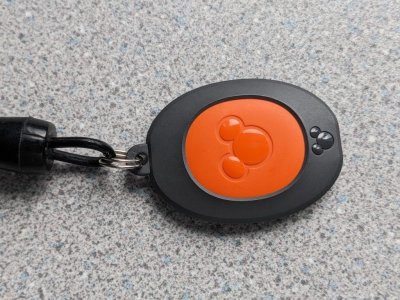
This wasn't actually all that convenient, so for my trip just gone I got tooled up for something better for my needs.
Basically a zip-tie.
Before going further I will say my neurosis was justified a week or so ago when boarding Slinky Dog Dash. A man in the row next to me lost his while we were boarding. I caught a glimpse of something blue near the ground for a moment but it immediately disappeared into the gap between the platform and train - Murphy's Law is still a winner. He realised immediately but it was gone and I saw him talking to CMs after the ride.
My initial idea was to just wrap a zip-tie round the overlap, much like the sliders you can buy) but I felt that during the day that it (or they) could shift without being noticed. So I decided on a more certain solution of which this is a walkthrough. (I didn't get my band until onsite so I had to guess a bit on what I'd need.)
You'll need zip-ties (at least one per day) and some tools:
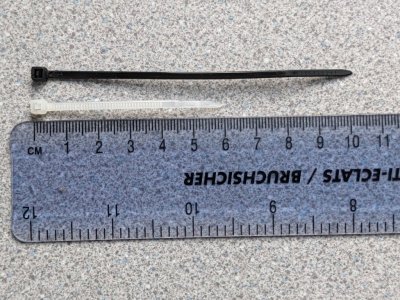
These are 2.5mm ties (ebay).
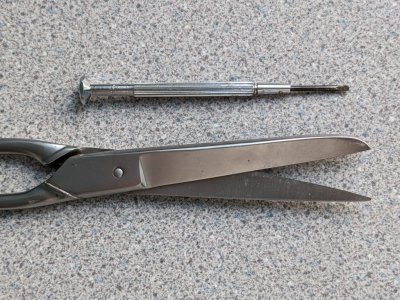
I thought a small screwdriver would punch the band but that stuff is really tough, so I ended up using the pointy end of the scissors I took. Even then it was hard and you need to be careful not to damage furnishing or yourself.
The hole for the zip-tie needs to be exactly one spot back from the official fastening nibs. You could eyeball it but I fastened it up and pushed the tool, or something, through the hole next to the two official fixing nibs and mark that position. Open the band to get working space and make the tie opening with your tool. It won't be a hole like the existing one but as long as your tool has gone right through it should be enough. (I used the taper on the scissors to make it a little more slot like to suit the shape of the zip-tie - the slot needs to be along the strap not across.)
It all closes up as soon as you remove the tool, but that's OK.
Before inserting the tie decide on how loose/tight you want the worn band. It'll be all day because it's not coming off without sharp tools, so looser is probably better.
Now push a tie through:
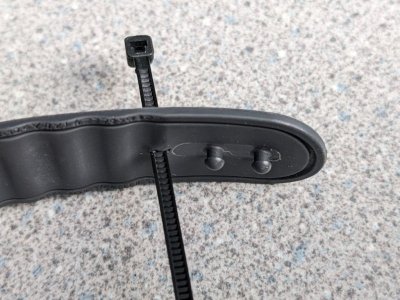
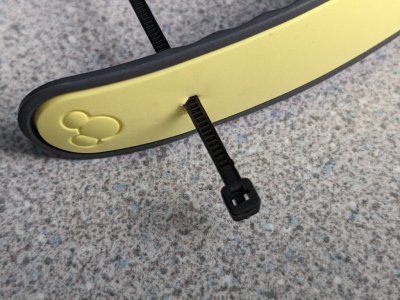
Getting it on the wrist is tricky if you are alone, but if you have someone to help it should be easy. With the band on your wrist you need to feed the end of the tie through the hole next to the ones the nibs will go in (as you decided up the page), then push it all together until the nibs are locked. Now feed the end of the tie through the locking part:
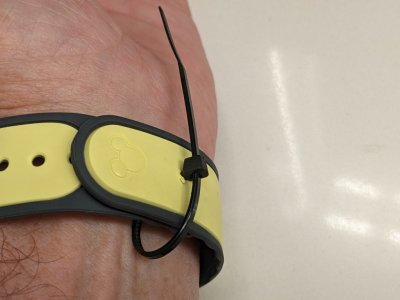
(I was alone and getting the shorter (60mm) tie to work was difficult. The 100mm was better - I'd rest the 'face of the MB on a table/counter and then get the tie end through the appropriate hole, grab the protruding end and gently use that to pull the straps closer together. Then I could press the nibs into their holes.)
Pull the tie up snug - it doesn't need to be very tight - and cut the excess off.
Initially I used the scissors but because of the way they cut it left a little bit of tie sticking out that could snag threads. I had nail clippers with me, so I used those to cut it flush.
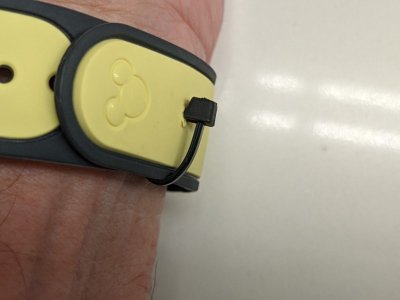
Job done.
When I got back to the resort for the night I used the scissors to cut the tie and get the band off. New tie for the next day.
I've not handled one but I think the MB+ uses the same fastening, so this should work for them too.
Obviously if you want a pristine collectible/memento this might not make you happy - but at least you will still have it
Very occasionally the protruding tie would just catch my clothes while walking, but it was only a couple of times in 12 days.
You could possibly feed the tie through the other way if you have an assistant, and/or position the square lock body differently (eg. on the edge of the strap), but this worked well for me.
Back in 2018 I was quite neurotic about losing my MB because that 2-nib fixing just doesn't seem safe and found a fob adapter in a Disney shop to instead attach it to my belt. I could then pull it out of my pocket to show to (eg) Fastpass readers.

This wasn't actually all that convenient, so for my trip just gone I got tooled up for something better for my needs.
Basically a zip-tie.
Before going further I will say my neurosis was justified a week or so ago when boarding Slinky Dog Dash. A man in the row next to me lost his while we were boarding. I caught a glimpse of something blue near the ground for a moment but it immediately disappeared into the gap between the platform and train - Murphy's Law is still a winner. He realised immediately but it was gone and I saw him talking to CMs after the ride.
My initial idea was to just wrap a zip-tie round the overlap, much like the sliders you can buy) but I felt that during the day that it (or they) could shift without being noticed. So I decided on a more certain solution of which this is a walkthrough. (I didn't get my band until onsite so I had to guess a bit on what I'd need.)
You'll need zip-ties (at least one per day) and some tools:

These are 2.5mm ties (ebay).

I thought a small screwdriver would punch the band but that stuff is really tough, so I ended up using the pointy end of the scissors I took. Even then it was hard and you need to be careful not to damage furnishing or yourself.
The hole for the zip-tie needs to be exactly one spot back from the official fastening nibs. You could eyeball it but I fastened it up and pushed the tool, or something, through the hole next to the two official fixing nibs and mark that position. Open the band to get working space and make the tie opening with your tool. It won't be a hole like the existing one but as long as your tool has gone right through it should be enough. (I used the taper on the scissors to make it a little more slot like to suit the shape of the zip-tie - the slot needs to be along the strap not across.)
It all closes up as soon as you remove the tool, but that's OK.
Before inserting the tie decide on how loose/tight you want the worn band. It'll be all day because it's not coming off without sharp tools, so looser is probably better.
Now push a tie through:


Getting it on the wrist is tricky if you are alone, but if you have someone to help it should be easy. With the band on your wrist you need to feed the end of the tie through the hole next to the ones the nibs will go in (as you decided up the page), then push it all together until the nibs are locked. Now feed the end of the tie through the locking part:

(I was alone and getting the shorter (60mm) tie to work was difficult. The 100mm was better - I'd rest the 'face of the MB on a table/counter and then get the tie end through the appropriate hole, grab the protruding end and gently use that to pull the straps closer together. Then I could press the nibs into their holes.)
Pull the tie up snug - it doesn't need to be very tight - and cut the excess off.
Initially I used the scissors but because of the way they cut it left a little bit of tie sticking out that could snag threads. I had nail clippers with me, so I used those to cut it flush.

Job done.
When I got back to the resort for the night I used the scissors to cut the tie and get the band off. New tie for the next day.
I've not handled one but I think the MB+ uses the same fastening, so this should work for them too.
Obviously if you want a pristine collectible/memento this might not make you happy - but at least you will still have it

Very occasionally the protruding tie would just catch my clothes while walking, but it was only a couple of times in 12 days.
You could possibly feed the tie through the other way if you have an assistant, and/or position the square lock body differently (eg. on the edge of the strap), but this worked well for me.

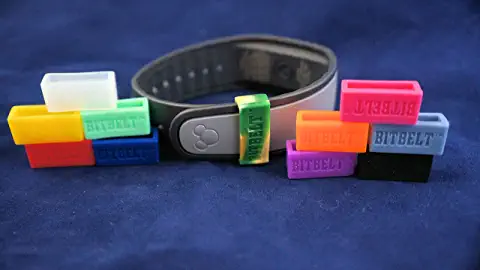

 They are very comfortable, soft and do a great job. You forget they are there. We only wear the design/collectible MBs - my one is a Dooney - and we don't want to spend that much and lose them. Before we got BitBelts I can't tell you how many times our MB popped off when barely clipping something. Luckily we mostly caught them but losing on a ride is goodbye forever.