Fish Extenders?


A zip lock bag with bandaids, rubber bands, paper clips, zip ties, safty pins etc. It was a little bag with the little things you might not know you would need. (it actually came in handy. )
We have also been given, a little note pad, pens, pencils, candy with stickers or home made wrappers with cruise motto wrapped around the outside and magnets. A special homemade necklace for one of the special nights like pirate or tropical. The thing I didnt do that I will for the next cruise was to print stickers with our disboard name to attach to the gift. Lots of people use the return address stickers for this. I thought it was a cute idea. I would suggest you check out the dollar store for disney items such as stickers that people could use when they scrapbook. Some of the gifts came with a little note which made it personal.
The gifts overall went from expensive to home made but all were equally great to recieve and made us wish we had brought more to give away. I think that was my favorite part. Dropping off the home made magents and then seeing them on peoples doors.
On our cruise a wonderful gentleman organized lanyards and made inserts for everyone. It was just awsome to see so many dis'ers. If it;s done on our next cruise. I want to make pins for our lanyards.

Just have fun with it!:grouphug:
Hello! Can you tell me how often you are supposed to give gifts to each person/stateroom? Is it just once per cruise or every night? Also I assume you put a gift in each persons pouch....or is it 1 per family? Sorry if this is a repeated question, I have been reading this board for a while tonight and still havent come across the answer to my question (although I now have a lot of ideas for making my FE) LOL
Thanks so much!:goodvibes
 
I LOVE :love:your FE Wildforgoofy!! Did you embroider on your lettering? Also is there a pattern somewhere that you used. I am not a great sewer and need something that shows step by step.
TY!
 
We had a great group for our FE on the Dream a few weeks ago. People did all kinds of things -- one package for the whole room, something in each pocket, something each day, a gift just once, etc!! Everything was great and really appreciated by all.

Do what works for you and for the gifts you want to give. Have fun!!!
 
And finally figured out how to post a picture (albeit, a fuzzy one).

MVFE-1.jpg
 
OurFE-1.jpg


Here's the FE I made but I have to admit I got the idea off of etsy.com. It was so cute, and I knew if I could find someone to do the embroidery I could sew one myself. I convinced a local shop owner to join in my madness, and he said he was up for a challenge. Normally he's stitching names on shirts and I had him stitching Mickey heads.

It turned out to be very long, so depending on how high the fish is our FE might just hit the floor. I figured I'd give the little babies walking by something to grab at. :lmao:

OMG! This is ADORABLE!! I'm in love!! I haven't seen a FE yet that really "grabbed me" until now!! Now I have to convince my mom and aunt that they need to use their sewing talents to recreate this!! :love:
 
What is the widest you can made your FE? Mine is 11 1/2 inches right now and if I have to start all over AGAIN I just may cry! I'm already on my second sewing machine. My DH bought me one for valentines day so we could make our own and it was all messed up, was returned and wasn't told it was jamming. Someone please help so I can finish this thing. We sail in 49 days and I would like to get this done and packed. Thanks!

I just finished making my first FE last week then saw your post. I was freaked because I forgot about the limited width I read about. I had an FE that we bought off Etsy last year for our first cruise (didn't use it again because it said "First Cruise" on it). I measured that one and it was a finished width of just over 9". The knobs on the end of the hanging dowel made it just slightly too wide for our fish/seahorse hanger on the Dream. See? The end knobs hang out past the doorway and off the side of the wall just a tad.

91626.jpg


My new one, the first I've ever made, came out at a finished width of 10". It was kinda a PITA to do it but I removed the top seam (for the hanging rod), cut 1/2" off both sides, refinished the edges, then sewed the top seam back for the rod. That brought my finished width back to 9". When I laid it over the top of the FE I bought off Etsy mine is actually about 1/4" narrower. Good deal. It's important to keep the width under control so I can utilize the balls on either end of my dowel hanger as part of my design. Hubby has to finish prepping the wood elements tomorrow then I can get the finishing touches done. I'm absolutely itching to show this bad boy off. It's everything I can do to keep from posting pics before it's 100% done! It's very different from any FE I've ever seen! :cool2:


Hello! Can you tell me how often you are supposed to give gifts to each person/stateroom? Is it just once per cruise or every night? Also I assume you put a gift in each persons pouch....or is it 1 per family? Sorry if this is a repeated question, I have been reading this board for a while tonight and still havent come across the answer to my question (although I now have a lot of ideas for making my FE) LOL
Thanks so much!:goodvibes

The beauty of the FE exchange is that there aren't really set rules. The FE groups make their own rules as needed but I think most are really laid back as to how often or how much to gift. Do as little or as much as you want. You can do a gift for the family, for the kids, for each person, whatever you want to do. You could do gifts every night, just once, or spread it out. I like doing something for the family then a little something for each person. I like to spread out my delivery, too. Like I'll take the family gift 1 night then the individual gifts another night. Do what works for you and have fun with it. :)
 
I LOVE :love:your FE Wildforgoofy!! Did you embroider on your lettering? Also is there a pattern somewhere that you used. I am not a great sewer and need something that shows step by step.
TY!

I don't have an embroidery machine, so I thought maybe I could find an embroidery shop that would embroider on the lettering then I could sew it up after they finished. That's exactly what I did. Using the picture I had I figured out how many pockets I wanted then used tissue paper to make a pattern. I cut all the pieces and then took it to the embroidery shop with the pattern attached to it, so they could see exactly where I want them to stitch. I think I found some generic instructions on this thread because it's almost impossible to find a video of someone making an FE. Here's what I found instruction wise. I hope this helps you. I fell in love with the bias tape, it's the perfect way to cover the raw edges. Let me know if you have any questions. The skirt for Maya's pockets requires you to cut the top band of the skirt separate at 11"wide x 2 1/2" long. Then you'll cut a piece of fabric 22" wide x 4 1/2 long then you gather it until it's 11" wide. Sew the bottom pleated part of the skirt to the top band of the skirt to make the dress pocket. I just overlaid the dress on top of a regular pocket on the FE. Just let me know if you have any questions. :)

Making an FE

You need 1/4 yard of fabric, iron interfacing, wide double fold bias tape, and a 3/8" dowel 8" long. The amount of fabric also depends on how many pockets you're making and how long your FE will be.

Pockets are 11" X 5 1/2"
Back is 32" X 8"


Cut out FE back fabric 8" x the length you want your FE, and FE pocket fabric 11" x 5 1/2"

Iron on the interfacing to the back of the fabric pieces. The pockets are wider then your FE right now because you'll be pleating the bottoms of the fabric to 8" later.

Cut bias tape 11" and sew to the top of each pocket. The bias tape will cover the raw edge and give a nice finished look to the top of the pockets.

Now for the bottom of the pocket. Make two pleats on the bottom of your pocket so the pocket width is 8" wide. This matches the 8" width of your FE back fabric.

Baste the bottom of the pocket to hold your pleats in place.

Cut a piece of bias tape 8" wide then pin bias tape on the bottom of your pocket and sew it on. The bias tape will cover the raw edges and give the bottom of the pocket a nice finished look. You now should have a pocket that is 11" wide on top and 8" wide on the bottom.

Pin pocket onto your FE back fabric and sew only the bottom of pocket to the FE. Repeat for each pocket you're making.

When you're finished sewing the bottom of your pockets to the FE pin the sides of your pockets to the sides of the FE. This will create the bowing effect the pockets have since they're pleated at the bottom. Everything should now be 8" wide.
Baste stitch around entire outside of project. At this point you're almost done. Yeah! You just need to attach the bias tape to the outside of the FE.
Pin then sew bias tape around outside edge of whole FE.
Now that your FE is finished you need to create the pocket on top for the dowel rod. Just fold the fabric over to the back of the FE and stitch along the bottom to create the rod pocket.

I am not a professional! These are just my notes on how I made mine. Good luck

OMG! This is ADORABLE!! I'm in love!! I haven't seen a FE yet that really "grabbed me" until now!! Now I have to convince my mom and aunt that they need to use their sewing talents to recreate this!! :love:

I thought the same thing! :lovestruc I was on a mission to find someone to do the embroidery for me!

My new one, the first I've ever made, came out at a finished width of 10". It was kinda a PITA to do it but I removed the top seam (for the hanging rod), cut 1/2" off both sides, refinished the edges, then sewed the top seam back for the rod. That brought my finished width back to 9". When I laid it over the top of the FE I bought off Etsy mine is actually about 1/4" narrower. Good deal. It's important to keep the width under control so I can utilize the balls on either end of my dowel hanger as part of my design. Hubby has to finish prepping the wood elements tomorrow then I can get the finishing touches done. I'm absolutely itching to show this bad boy off. It's everything I can do to keep from posting pics before it's 100% done! It's very different from any FE I've ever seen! :cool2:

Can't wait to see it!:)
 
Thank you everyone for answering my questions & for the FE pattern instructions wildforgoofy :) Cant wait! I am so happy to find something to help pass the time before we sail!
 
Can't wait to see it!:)

I'm absolutely itching to show it off but I want to wait until it's completely done. The last little detail is giving us fits and it's making me insaaaaane! I swear it's all because I'm *this* excited to get pics and post them that this last thing is giving us such a hard time. Grrrr!!!! pirate:
 
I realize this isn't free but for those who really want a pattern there is an option for you. I have a sneaking suspicion that this was made with a certain demographic in mind if ya know what I mean.

https://www.youcanmakethis.com/products/featured-products/wallpocketorganizer.htm

I haven't used this pattern because I could easily figure out how to make a FE. I sew a good bit. I can't say if it's good, bad, easy to follow, or has video or pictures of the different steps. It's just something I came across on my favorite crafty/inspiration websites. Thought I'd share just in case it might help someone else.

:goodvibes
 
BACK STORY

Our first FE from our first cruise this past September I ordered from Etsy (I think stitchesnbows/stephanie???). We never intended to reuse our first one because I sorta knew if we continued cruising I'd probably make more. So our first FE said "The Sutton's First Cruise". Yep, not using that again. I don't have one of the super-cool embroidery machines so I can't do all the cool Disney font stuff or the fun embroidered appliques/graphics. Because of that, I knew I didn't want to make an FE that was remotely based on those beautiful designs. It would turn out looking like I tried to produce the same FE without the right tools. I understood that. So I knew from the start I had to come up with a theme or a design that I could really work for a lot of detail and utilize different techniques. And then my inspiration hit me. Pixar Up! One of our favorite Disney/Pixar movies.

The design elements evolved as my material arrived and I started working. I'll explain more as I go thru the details below.

So, I proudly present to you my completely from-my-brain (no laughing) Pixar Up! inspired FE!!!

file-5.jpg


file.jpg


THE DETAILS

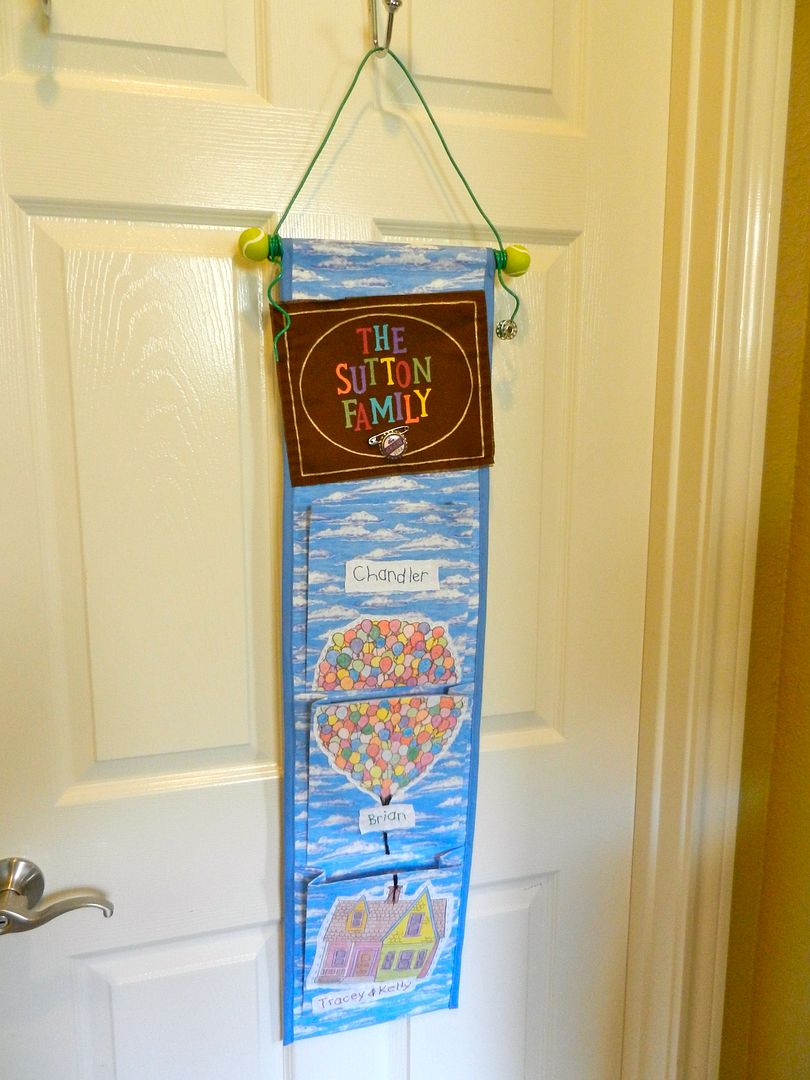
The "cover" or as I seemed to dub it, The Name Plate (& hanging assembly). Like I said, I don't have a fancy embroidery machine. I have a nice sewing machine that I adore with my whole heart. ((I used hand-me-downs and borrowed for 15 years before I bought my very own.)) I have always had an artistic streak, an innate ability to find scale, sketch, paint, create, etc. If I couldn't embroider I had to rely on what I could do. I bought 1/2 yard of brown upholstery-weight fabric. I cut it to the dimensions I needed per my initial sketches of of my FE and ironed a chunk of interfacing to the back leaving 1/2 inch raw all the way around the edges. This was to stabilize the fabric (no more stretching or shifting) and give a more solid backing for the paint that was to come. I actually cut & prepped 2 of the name plates in case I didn't like the 1st one. I spent about an hour working out how to get my lettering the way I wanted it, make an elipse template, then do the actual to-scale sketch. I had some yellow transfer sheets (they sell these for quilting, I think) and simply traced the design onto the fabric. It looked like this:

DSCN0059.jpg


Then I gathered up all the fabric paints I had, a few fine-tip paint brushes, mixed the colors to what I needed them to be, and painted away. There are 4 coats on each letter.

file-4.jpg


I know Ellie's adventure book has a little applique globe thing under the lettering and that was something I really struggled with. Initally I was going to find a graphic online that would work, size it to what I needed, print it on an iron-on transfer, then tranfer it to a little piece of fabric to stitch on. While I was sketching the name plate I needed a circle to give me a representation of the globe. I was digging around my craft stuff for anything the right size I could trace in it's place when I came across the extra leftover Ellie badges I made for one of my FE gifts last September. Those looked like this:

91627.jpg


Well, the Ellie badge was exactly the right size to fit the space I had to fill on my name plate and it was one of those **duh!** moments. An Ellie Badge it would be!

When thinking of the hanging apparatus for the FE (this all actually came to mind when the whole thing was near completion) it wasn't hard to be hit by some fun details I could include. The dowel rod that you can't see is actually painted silver like Carl's cane. The tennis ball ends are wooden balls I got at Hobby Lobby then hand-painted. My poor little dog sat at my feet patiently waiting for me to give her back the tennis ball I borrowed to see the scale. LOL! Then there was the thought that the string that the FE hangs from should be a representation of the hose Carl tows his house around with. Miniature green hose is not easy to come up with. We ended up at Lowe's having the ever-patient employee roll the dozens of spools of wiring around to us for closer inspection over and over until we analyzed everything green and made our best selection. 6 feet of green wiring was purchased because I had no idea how much I'd need. I didn't end up using that much. Maybe 4 feet or so. So I have the hose but how do you make it look more like what it's supposed to be? I need a hose reel. Again, not something you readily find a miniature version of. I used a metal sewing machine bobbin. Yep, had to buy that package special for this project. My machine only uses plastic drop-ins. It's hard to tell but I did barely dip the opposite tail end of the "hose" in silver model paint for the hose tip.

file-1.jpg


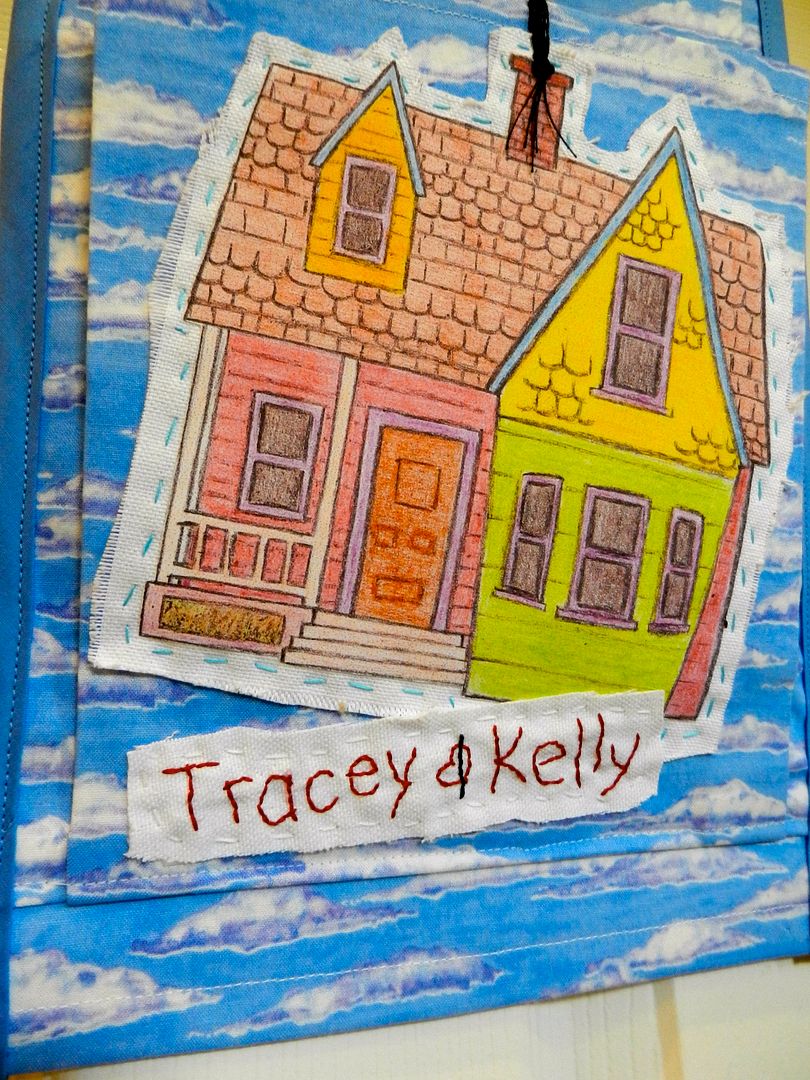
Carl & Ellie's house was actually the very first thing I sketched for this FE. I printed a few screen shots off the computer to use for scale & color reference then completely free-hand sketched the house. I copied my sketch, resized it for my needs, then dug out my crayons (yes, I have my own crayons and coloring books that are MINE). I colored the house and outlined it. Then I did a high-res scan to capture the texture of the crayon. I played with the color levels a bit in the computer until I got it how I wanted it. Then, I printed the house onto a fabric inkjet printer sheet that had an iron-on backing (I did NOT know these existed until a week ago). Fabulous. I cut the house out all the way to the crayon line edges, pressed the picture onto a white upholstery-grade fabric, then cut out around it leaving a void to hand-stitch the house onto the FE later in the process. I stitched the balloon and house appliques on after all the pockets were attached by their bottom seams to the FE backing but not before the sides were attached. This made it possible for me to lay out the pieces where I wanted the to be (in relation to the pockets & other elements) and still maneuver my hands to hand-stitch. I deliberately used a contrasting thread and scattered, uneven stitch pattern because the FE needed to look like a little girl made it. It's a very intentional part of the theme.

file-3.jpg


Then there's the balloons. I thought the balloons were going to kill me. Originally I purchased a small remnant piece of fabric off eBay that had a graphic of balloons floating in the air. I was going to use this piece of fabric to make the top pocket out of thus representing the balloons that carry the house. When the fabric piece arrived I was in for a heckuva kink. The orientation of the balloon fabric was wrong. It was a rectangular piece. Instead of the balloons floating up, they would've been floating sideways. This forced me to make the balloons the way I should've done them from the start. Same way as the house. No shortcuts. Sketch, copy, resize, color, scan, print, press, and....oops....the balloons are not going to fit on just 1 pocket. Dangit! Time to improvise. I cut the balloon piece in half (I felt sick when doing it, actually). The balloons are stitched where you see stitching and then liquid stitch lines the cut edges all the way across. None of it was a fast process. It took a long time and the balloons were extremely tedious. Also, after attaching the balloons my oldest son commented that they needed some string. Oh yeah. So on the balloon pieces themselves, the little lines are drawn in with a fine-tip Sharpie. I initially drew the lines in from the chimney up to the balloons but didn't like how cheesy it looked. So I dug out some charcoal-colored upholstery thread and drove myself nuts for a few hours with actual strings. The stings are probably the element I'm least happy with in the end. I think I could've done better but by that time I was thoroughly irked with them and was tired of fooling with it. I'm not about to redo them either. So the strings are what they are. The world can just deal with it. LOL!

file-2.jpg


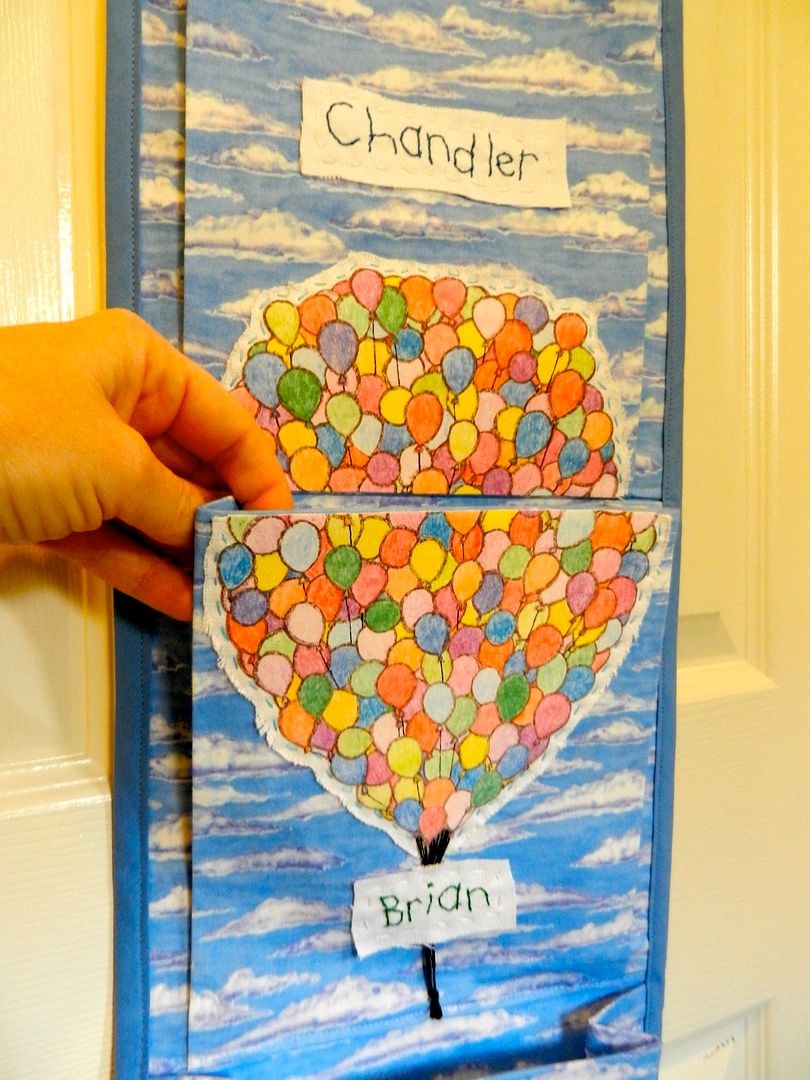
The names on the pockets were another part I thought about a lot. I knew I couldn't stitch or paint them right onto the cloud fabric because they'd be lost. And look half-done. What would a little girl do? Well, she'd probably lovingly spell out the names best she could with regular thread making sure her favorite boys each had their names in their favorite color. Again, deliberate randomness in the stitching and the lettering to express the theme. The name pieces were stitched on at the same time as the other elements.

The FE construction itself was easy-peasy. I could do that in my sleep. I did stabilize my fabric by fusing it to other fabric. The FE back is fused to the same white upholstery fabric as the applique elements. The pocket faces are fused to simple white sheeting. Also, to protect the backside of the stitching that holds all the little appliques on I ironed lightweight bits of fusible interfacing over the thread to add extra protection from objects going in and coming out of the pockets.

I'll leave you with a handful of my stack of sketches, colored pages, and templates.

file-6.jpg
 
Your Up FE is amazing! I didn't even notice the hanger part was a hose, but it fits perfectly!
 
Absolutely love all the creative FE's. You folks are really talented. For those of us not so crafty and are all thumbs, I thought I would post ours. I found it on ebay. It is a Mickey diaper stacker. The Mickey has stuffing, so he is a little puffy. The opening is on the side. I may shorten up the bottom, as it is just my DH and I and we can share the pocket. I haven't figured out how to personalize it yet, but here is the photo.
photo-1.jpg
 

GET UP TO A $1000 SHIPBOARD CREDIT AND AN EXCLUSIVE GIFT!

If you make your Disney Cruise Line reservation with Dreams Unlimited Travel you’ll receive these incredible shipboard credits to spend on your cruise!


New Posts


Save Up to 30% on Rooms at Walt Disney World!

Save up to 30% on rooms at select Disney Resorts Collection hotels when you stay 5 consecutive nights or longer in late summer and early fall. Plus, enjoy other savings for shorter stays.This offer is valid for stays most nights from August 1 to October 11, 2025.
CLICK HERE


DIS Facebook DIS youtube DIS Instagram DIS Pinterest

Back
Top